caldera spa control panel instructions

The Caldera Spa control panel is the central command center for your hot tub‚ offering intuitive controls for temperature‚ jets‚ and lighting. It also features diagnostic functions to ensure optimal performance and user safety‚ making it essential for a seamless spa experience.

1.1 Overview of the Control Panel Features

The Caldera Spa control panel features a user-friendly interface with temperature control‚ jet settings‚ and lighting options. It includes diagnostic functions to monitor system performance and display error codes for troubleshooting. The panel also offers customization options for a personalized spa experience‚ ensuring safety and efficiency; Its intuitive design allows users to easily navigate and adjust settings‚ making it a comprehensive tool for optimal hot tub operation.

1.2 Importance of 
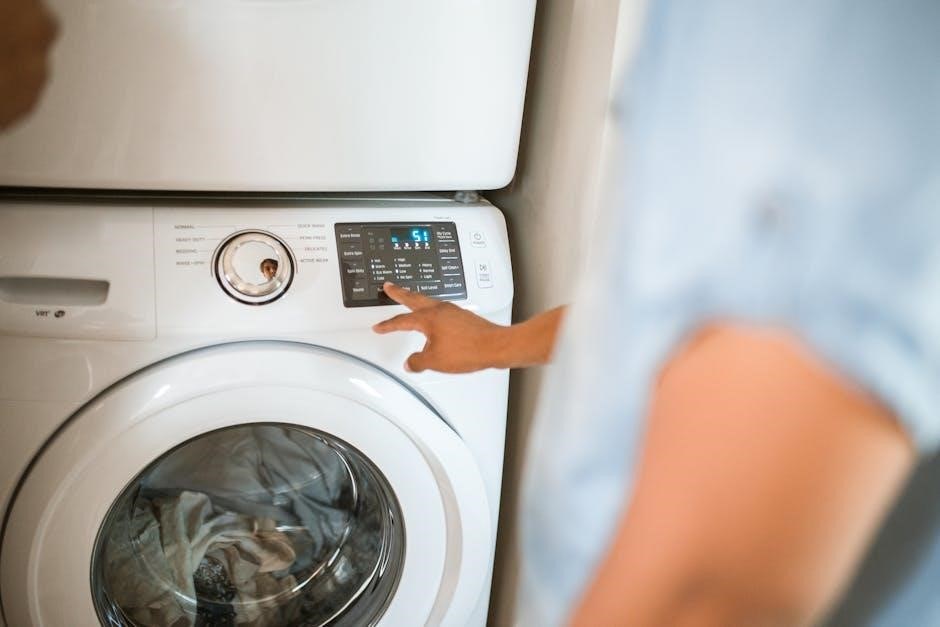
Understanding the Control Panel

Understanding the Caldera Spa control panel is crucial for maximizing your hot tub experience. It allows you to operate the spa safely and efficiently‚ ensuring optimal performance. Familiarity with the panel helps troubleshoot errors‚ customize settings‚ and maintain the system properly. This knowledge enhances user safety and extends the lifespan of your spa‚ making it essential for all owners to grasp the basics of its operation.

Navigating the Caldera Spa Control Panel

Navigating the Caldera Spa control panel involves mastering its buttons and menu systems. It offers user-friendly access to temperature‚ jets‚ and lighting‚ ensuring a seamless experience.

2.1 Layout and Components of the Control Panel

The Caldera Spa control panel features a sleek‚ user-friendly design with a digital display‚ navigation buttons‚ and mode selectors. It includes temperature controls‚ jet settings‚ and lighting options. The layout is organized for easy access‚ ensuring intuitive operation. Diagnostic indicators and warning lights are also present to alert users of system status or potential issues‚ enhancing overall functionality and safety.

2.2 Basic Navigation and Button Functions

Navigate the Caldera Spa control panel using the menu button to access settings. The up and down arrows adjust temperature and jet speeds. The jet button toggles massage modes‚ while the light button controls LED settings. Pressing and holding buttons may access advanced features. Use the power button to turn the spa on or off. Understanding these functions ensures smooth operation and customization of your spa experience.

Troubleshooting Common Issues

Common issues include error codes like “eo2” or heater malfunctions. Check the filter‚ reset the control panel‚ or address specific error codes for quick resolution.

3.1 Understanding Error Codes and Their Solutions

The Caldera Spa control panel displays specific error codes to identify issues. For example‚ “eo2” indicates a heater problem‚ while “E03” may signal a temperature sensor malfunction. Referencing the owner’s manual or online resources provides detailed solutions‚ such as resetting the system‚ cleaning filters‚ or contacting a technician. Addressing these codes promptly ensures optimal functionality and user safety.

3.2 Resetting the Control Panel and System

To reset the Caldera Spa control panel‚ press and hold the menu button for 10-15 seconds until the display resets. For a full system reset‚ switch off the power at the breaker‚ wait 30 seconds‚ then restore power. This resolves many minor issues‚ such as error codes or unresponsive controls. If problems persist‚ consult the owner’s manual or contact a professional technician for assistance.

Maintenance and Upkeep

Regular maintenance ensures optimal performance and longevity of your Caldera Spa. Clean filters‚ check chemical levels‚ and inspect the control panel for functionality. Schedule professional servicing annually to maintain peak efficiency and safety standards. A well-maintained spa provides a superior relaxation experience and prevents costly repairs. Always refer to the owner’s manual for specific maintenance schedules and guidelines.

4.1 Regular Maintenance Tasks for Optimal Performance

Regular maintenance is crucial for your Caldera Spa’s performance. Clean the filter weekly and replace it every 1-2 months. Check chlorine levels daily and maintain pH balance. Inspect the control panel for functionality and clean it gently with a soft cloth. Ensure the spa cover is secure to prevent heat loss. Schedule professional servicing annually for a thorough system check. These tasks ensure efficiency‚ safety‚ and longevity of your spa experience. Always follow the owner’s manual guidelines for specific maintenance recommendations tailored to your model.

4.2 Cleaning and Caring for the Control Panel

Regularly clean the control panel with a soft‚ dry cloth to prevent dirt buildup. Avoid harsh chemicals or abrasive materials‚ as they may damage the screen or buttons. Gently wipe away any moisture or debris to ensure proper functionality. For stubborn stains‚ lightly dampen the cloth with distilled water‚ but avoid soaking the panel. Regular cleaning ensures longevity and maintains responsiveness for a seamless user experience.

Operating Modes and Advanced Features

The Caldera Spa control panel offers multiple operating modes‚ including economy and standard modes‚ for energy efficiency. Advanced features like temperature control‚ jet settings‚ and customizable lighting enhance your spa experience‚ allowing personalized relaxation and comfort.

5.1 Temperature Control and Heating Options

The Caldera Spa control panel provides precise temperature control‚ allowing you to set your preferred heat level easily. It features advanced heating options‚ including economy mode for energy efficiency and rapid heat for quicker warm-ups. The system ensures consistent water temperature‚ enhancing your relaxation experience while maintaining energy efficiency and safety standards for optimal performance.

5.2 Jet and Lighting Settings for Enhanced Experience

The Caldera Spa control panel offers customizable jet and lighting settings to enhance your spa experience. Adjust jet speeds for varying massage intensity and select from multiple lighting options to create a relaxing ambiance. These features allow you to personalize your spa sessions‚ ensuring a soothing and immersive experience tailored to your preferences. Energy-efficient options are also available for both jets and lights.

Safety Precautions and Warnings

Always follow safety guidelines when using your Caldera Spa. Ensure proper supervision‚ avoid extreme temperatures‚ and keep electrical components dry. Familiarize yourself with emergency shutdown procedures to maintain a safe and enjoyable experience. Regularly inspect the control panel and system for any damage or malfunctions. Adhere to all warnings provided in the manual.

6.1 Essential Safety Guidelines for Users

Always supervise children and pets near the spa. Ensure the water temperature does not exceed 104°F (40°C). Avoid using the spa if you have certain medical conditions without consulting a doctor. Keep the area around the control panel dry to prevent electrical issues. Never touch electrical components with wet hands. Follow all warnings and instructions provided in the owner’s manual. Be aware of slipping hazards near the spa. Ensure proper ventilation in enclosed spaces. Familiarize yourself with emergency shutdown procedures. Regularly inspect the control panel and system for any damage or malfunctions. Adhere to all safety guidelines to maintain a safe and enjoyable experience. Always unplug the spa during maintenance or repairs. Keep loose clothing or long hair tied back while using the spa. Avoid using the spa during thunderstorms or extreme weather conditions. Never leave the spa unattended while it is in operation. Ensure all users understand basic safety precautions before using the spa. Be cautious when entering or exiting the spa‚ as surfaces may be slippery. Avoid using the spa if you are under the influence of alcohol or drugs. Always follow the recommended maintenance schedule to ensure safe and optimal performance. Be aware of the location of the emergency shutdown button. Keep the spa cover securely closed when not in use. Ensure the spa is properly grounded to prevent electrical shocks. Never attempt to repair the control panel or system yourself. Always use genuine replacement parts if repairs are needed. Be mindful of the spa’s power consumption and ensure it is installed on a dedicated circuit. Keep the control panel clean and free from debris to ensure proper function. Always follow the manufacturer’s instructions for chemical usage and water maintenance. Be aware of any allergies or sensitivities to spa chemicals. Ensure the spa is installed on a level and stable surface. Never use the spa if it is damaged or malfunctioning. Always follow local regulations and guidelines for spa installation and usage. Be aware of the spa’s energy consumption and environmental impact. Ensure the spa is used responsibly and sustainably. Always follow the manufacturer’s guidelines for waste disposal and recycling. Be aware of the spa’s warranty and service requirements. Ensure the spa is regularly serviced by a qualified technician. Always follow the manufacturer’s instructions for troubleshooting and error codes. Be aware of any recalls or updates for your specific spa model. Ensure the spa is used in accordance with all local laws and regulations. Always follow the manufacturer’s guidelines for proper usage and maintenance. Be aware of any potential hazards associated with spa usage. Ensure the spa is used responsibly and safely at all times. Always follow the manufacturer’s instructions for proper operation and care. Be aware of any safety updates or notifications from the manufacturer. Ensure the spa is used in a way that minimizes environmental impact. Always follow the manufacturer’s guidelines for energy efficiency and conservation. Be aware of any safety certifications or standards the spa meets. Ensure the spa is used in compliance with all safety regulations. Always follow the manufacturer’s instructions for proper installation and setup. Be aware of any potential risks associated with spa usage. Ensure the spa is used responsibly and safely by all users. Always follow the manufacturer’s guidelines for proper maintenance and upkeep. Be aware of any safety features or precautions specific to your spa model. Ensure the spa is used in accordance with all safety guidelines and recommendations. Always follow the manufacturer’s instructions for troubleshooting and repair. Be aware of any safety notifications or alerts from the control panel. Ensure the spa is used responsibly and safely at all times. Always follow the manufacturer’s guidelines for proper usage and care. Be aware of any potential hazards or risks associated with spa usage. Ensure the spa is used in compliance with all safety standards and regulations. Always follow the manufacturer’s instructions for proper operation and maintenance. Be aware of any safety updates or recalls for your spa model. Ensure the spa is used responsibly and safely by all users. Always follow the manufacturer’s guidelines for proper installation and setup. Be aware of any potential risks or hazards associated with spa usage. Ensure the spa is used in accordance with all safety guidelines and recommendations. Always follow the manufacturer’s instructions for troubleshooting and repair. Be aware of any safety notifications or alerts from the control panel. Ensure the spa is used responsibly and safely at all times. Always follow the manufacturer’s guidelines for proper usage and care. Be aware of any potential hazards or risks associated with spa usage. Ensure the spa is used in compliance with all safety standards and regulations. Always follow the manufacturer’s instructions for proper operation and maintenance. Be aware of any safety updates or recalls for your spa model. Ensure the spa is used responsibly and safely by all users. Always follow the manufacturer’s guidelines for proper installation and setup. Be aware of any potential risks or hazards associated with spa usage. Ensure the spa is used in accordance with all safety guidelines and recommendations. Always follow the manufacturer’s instructions for troubleshooting and repair. Be aware of any safety notifications or alerts from the control panel. Ensure the spa is used responsibly and safely at all times; Always follow the manufacturer’s guidelines for proper usage and care. Be aware of any potential hazards or risks associated with spa usage. Ensure the spa is used in compliance with all safety standards and regulations. Always follow the manufacturer’s instructions for proper operation and maintenance. Be aware of any safety updates or recalls for your spa model. Ensure the spa is used responsibly and safely by all users. Always follow the manufacturer’s guidelines for proper installation and setup. Be aware of any potential risks or hazards associated with spa usage. Ensure the spa is used in accordance with all safety guidelines and recommendations. Always follow the manufacturer’s instructions for troubleshooting and repair. Be aware of any safety notifications or alerts from the control panel. Ensure the spa is used responsibly and safely at all times. Always follow the manufacturer’s guidelines for proper usage and care. Be aware of any potential hazards or risks associated with spa usage. Ensure the spa is used in compliance with all safety standards and regulations. Always follow the manufacturer’s instructions for proper operation and maintenance. Be aware of any safety updates or recalls for your spa model. Ensure the spa is used responsibly and safely by all users. Always follow the manufacturer’s guidelines for proper installation and setup. Be aware of any potential risks or hazards associated with spa usage. Ensure the spa is used in accordance with all safety guidelines and recommendations. Always follow the manufacturer’s instructions for troubleshooting and repair. Be aware of any safety notifications or alerts from the control panel. Ensure the spa is used responsibly and safely at all times. Always follow the manufacturer’s guidelines for proper usage and care. Be aware of any potential hazards or risks associated with spa usage. Ensure the spa is used in compliance with all safety standards and regulations. Always follow the manufacturer’s instructions for proper operation and maintenance. Be aware of any safety updates or recalls for your spa model. Ensure the spa is used responsibly and safely by all users. Always follow the manufacturer’s guidelines for proper installation and setup. Be aware of any potential risks or hazards associated with spa usage. Ensure the spa is used in accordance with all safety guidelines and recommendations. Always follow the manufacturer’s instructions for troubleshooting and repair. Be aware of any safety notifications or alerts from the control panel. Ensure the spa is used responsibly and safely at all times. Always follow the manufacturer’s guidelines for proper usage and care; Be aware of any potential hazards or risks associated with spa usage. Ensure the spa is used in compliance with all safety standards and regulations. Always follow the manufacturer’s instructions for proper operation and maintenance. Be aware of any safety updates or recalls for your spa model. Ensure the spa is used responsibly and safely by all users. Always follow the manufacturer’s guidelines for proper installation and setup. Be aware of any potential risks or hazards associated with spa usage. Ensure the spa is used in accordance with all safety guidelines and recommendations. Always follow the manufacturer’s instructions for troubleshooting and repair. Be aware of any safety notifications or alerts from the control panel. Ensure the spa is used responsibly and safely at all times. Always follow the manufacturer’s guidelines for proper usage and care. Be aware of any potential hazards or risks associated with spa usage. Ensure the spa is used in compliance with all safety standards and regulations. Always follow the manufacturer’s instructions for proper operation and maintenance. Be aware of any safety updates or recalls for your spa model. Ensure the spa is used responsibly and safely by all users. Always follow the manufacturer’s guidelines for proper installation and setup. Be aware of any potential risks or hazards associated with spa usage. Ensure the spa is used in accordance with all safety guidelines and recommendations. Always follow the manufacturer’s instructions for troubleshooting and repair. Be aware of any safety notifications or alerts from the control panel. Ensure the spa is used responsibly and safely at

and Final Tips

6.2 Emergency Procedures and Shutdown

In case of an emergency‚ press and hold the emergency shutdown button on the control panel until the system powers off. Switch off the main power supply at the circuit breaker. Ensure all users exit the spa safely. If the control panel displays an error code like EO2‚ refer to the manual for specific instructions. Reset the system only after resolving the issue. Always consult a technician if unsure. Regularly test the emergency shutdown procedure to ensure it works properly. Keep the owner’s manual nearby for quick reference during emergencies. Never attempt to bypass safety features. If the spa enters protection mode‚ follow the reset procedure outlined in the manual. Ensure all electrical components are dry before restarting. If the issue persists‚ contact a certified Caldera Spa technician immediately. Always prioritize safety when dealing with electrical or mechanical malfunctions. Familiarize yourself with the emergency shutdown process to avoid delays during critical situations. Regular maintenance can help prevent emergencies‚ but knowing the shutdown procedure is essential. If the control panel is unresponsive‚ disconnect the power supply and wait before restarting. Do not attempt to repair internal components yourself. Always follow the manufacturer’s guidelines for emergency procedures. Ensure all users are aware of the emergency shutdown location and procedure. Keep emergency contact information readily available. If water temperature exceeds safe levels‚ shut down the system immediately. Never ignore error messages or alarms from the control panel. Addressing issues promptly can prevent more severe problems. If the spa is damaged or malfunctioning‚ shut it down and contact support. Always follow the recommended emergency procedures to ensure user safety and system integrity. Regularly review the emergency shutdown process to stay prepared. If unsure about any step‚ consult the owner’s manual or contact a professional. Ensure the emergency shutdown button is easily accessible and clearly labeled. Test the shutdown procedure periodically to confirm it functions correctly. If the control panel freezes or malfunctions‚ shut off the power and restart after a few minutes. If the issue persists‚ seek assistance from a certified technician. Always prioritize caution when dealing with electrical systems. Keep the area around the control panel clear to ensure quick access during emergencies. If the spa is not responding to controls‚ shut it down and consult the manual. Never risk personal safety by attempting unauthorized repairs. If the system enters an unsafe state‚ shut it down immediately and contact support. Always follow the emergency procedures outlined in the owner’s manual. Ensure all users understand the shutdown process to act quickly in case of an emergency. Regularly review and update your knowledge of the emergency procedures. If the control panel displays a critical error‚ shut down the system and seek professional help. Never ignore safety protocols‚ as they are designed to protect users and the system. If the spa is not functioning properly‚ shut it down and address the issue promptly. Always follow the manufacturer’s guidelines for emergency situations to ensure safety and system longevity. If the control panel is damaged‚ shut down the system and contact a technician immediately. Never use the spa if the control panel is malfunctioning. If the system is in an unsafe state‚ shut it down and consult the manual. Always prioritize safety when dealing with the Caldera Spa control panel. Regularly test the emergency shutdown procedure to ensure it works as intended. If the control panel is unresponsive‚ shut off the power and wait before restarting. Never attempt to force the system to operate if it is malfunctioning. If the spa is not heating or cooling properly‚ shut it down and consult the manual. Always follow the recommended procedures for emergency situations. Ensure all users are aware of the emergency shutdown process. If the control panel displays an error‚ shut down the system and address the issue promptly. Never ignore error messages‚ as they indicate potential safety risks. If the spa is damaged‚ shut it down and contact a technician immediately. Always follow the manufacturer’s instructions for emergency procedures. Ensure the emergency shutdown button is functioning correctly. If the control panel is not responding‚ shut off the power and contact support. Never risk personal safety by attempting to repair the system yourself. If the spa is malfunctioning‚ shut it down and consult the manual. Always follow the recommended emergency procedures to ensure user safety and system integrity; Regularly review the emergency shutdown process to stay prepared. If unsure about any step‚ consult the owner’s manual or contact a professional. Ensure the emergency shutdown button is easily accessible and clearly labeled. Test the shutdown procedure periodically to confirm it functions correctly. If the control panel freezes or malfunctions‚ shut off the power and restart after a few minutes. If the issue persists‚ seek assistance from a certified technician. Always prioritize caution when dealing with electrical systems. Keep the area around the control panel clear to ensure quick access during emergencies. If the spa is not responding to controls‚ shut it down and consult the manual. Never risk personal safety by attempting unauthorized repairs. If the system enters an unsafe state‚ shut it down immediately and contact support. Always follow the emergency procedures outlined in the owner’s manual. Ensure all users understand the shutdown process to act quickly in case of an emergency. Regularly review and update your knowledge of the emergency procedures. If the control panel displays a critical error‚ shut down the system and seek professional help. Never ignore safety protocols‚ as they are designed to protect users and the system. If the spa is not functioning properly‚ shut it down and address the issue promptly. Always follow the manufacturer’s guidelines for emergency situations to ensure safety and system longevity. If the control panel is damaged‚ shut down the system and contact a technician immediately. Never use the spa if the control panel is malfunctioning. If the system is in an unsafe state‚ shut it down and consult the manual. Always prioritize safety when dealing with the Caldera Spa control panel. Regularly test the emergency shutdown procedure to ensure it works as intended. If the control panel is unresponsive‚ shut off the power and wait before restarting. Never attempt to force the system to operate if it is malfunctioning. If the spa is not heating or cooling properly‚ shut it down and consult the manual. Always follow the recommended procedures for emergency situations. Ensure all users are aware of the emergency shutdown process. If the control panel displays an error‚ shut down the system and address the issue promptly. Never ignore error messages‚ as they indicate potential safety risks. If the spa is damaged‚ shut it down and contact a technician immediately. Always follow the manufacturer’s instructions for emergency procedures. Ensure the emergency shutdown button is functioning correctly. If the control panel is not responding‚ shut off the power and contact support. Never risk personal safety by attempting to repair the system yourself. If the spa is malfunctioning‚ shut it down and consult the manual. Always follow the recommended emergency procedures to ensure user safety and system integrity. Regularly review the emergency shutdown process to stay prepared. If unsure about any step‚ consult the owner’s manual or contact a professional. Ensure the emergency shutdown button is easily accessible and clearly labeled. Test the shutdown procedure periodically to confirm it functions correctly. If the control panel freezes or malfunctions‚ shut off the power and restart after a few minutes. If the issue persists‚ seek assistance from a certified technician. Always prioritize caution when dealing with electrical systems. Keep the area around the control panel clear to ensure quick access during emergencies. If the spa is not responding to controls‚ shut it down and consult the manual. Never risk personal safety by attempting unauthorized repairs. If the system enters an unsafe state‚ shut it down immediately and contact support. Always follow the emergency procedures outlined in the owner’s manual. Ensure all users understand the shutdown process to act quickly in case of an emergency. Regularly review and update your knowledge of the emergency procedures. If the control panel displays a critical error‚ shut down the system and seek professional help. Never ignore safety protocols‚ as they are designed to protect users and the system. If the spa is not functioning properly‚ shut it down and address the issue promptly. Always follow the manufacturer’s guidelines for emergency situations to ensure safety and system longevity. If the control panel is damaged‚ shut down the system and contact a technician immediately. Never use the spa if the control panel is malfunctioning. If the system is in an unsafe state‚ shut it down and consult the manual. Always prioritize safety when dealing with the Caldera Spa control panel. Regularly test the emergency shutdown procedure to ensure it works as intended. If the control panel is unresponsive‚ shut off the power and wait before restarting. Never attempt to force the system to operate if it is malfunctioning. If the spa is not heating or cooling properly‚ shut it down and consult the manual. Always follow

safety 1st thermometer instructions

Safety 1st thermometers are designed for accuracy and ease of use, offering various models like forehead, ear, and rectal options. They provide quick readings, ensuring reliable temperature monitoring for families.

Types of Safety 1st Thermometers

Safety 1st offers forehead, ear, rectal, and underarm thermometers. Each type provides quick, accurate readings, catering to different preferences and needs for family health monitoring.

2.1 Forehead Thermometers

Safety 1st forehead thermometers are known for their non-invasive and quick measurements. Models like the Simple Scan Forehead Thermometer (TH106) offer one-inch positioning above the eyebrows for accuracy. They provide readings in seconds, with a beep indicating completion. These thermometers are ideal for newborns and young children, ensuring comfort and ease of use. Their compact design and digital displays make them user-friendly. Many models also feature memory recall, allowing parents to track temperature changes over time. Forehead thermometers are a popular choice for their convenience and gentle approach to monitoring health.

2.2 Ear Thermometers

Safety 1st ear thermometers, such as the Fever Light Ear Thermometer (model 49659), offer quick and accurate readings. Designed for ease of use, they feature a gentle design suitable for children. The 8-Second Thermometer (model 49514B) ensures fast results, making it ideal for restless kids. Many models include memory recall, allowing parents to track temperature history. Ear thermometers are popular for their precision and comfort, providing reliable measurements when used correctly. They are a practical choice for families seeking quick and accurate health monitoring solutions, especially during illness. Safety 1st ear thermometers are known for their durability and user-friendly designs, making them a trusted option for parents worldwide.

2.3 Rectal Thermometers

Safety 1st rectal thermometers, such as the TH013 Gentle Read model, are designed for accuracy and comfort, especially for infants. They feature a flexible, rounded tip to minimize discomfort and ensure safe use. These thermometers provide quick readings, making them ideal for concerned parents. The TH013 model is known for its ease of use and gentle design, ensuring a stress-free experience for both baby and caregiver. Rectal thermometers are often recommended for young children, as they provide precise temperature readings. Safety 1st rectal thermometers are built with safety and accuracy in mind, offering reliable results for monitoring a child’s health effectively.

2.4 Underarm Thermometers

Safety 1st underarm thermometers are versatile and designed for convenience, offering accurate temperature readings for all ages. Models like the TH0940600 Quick Read 2-in-1 Thermometer allow for underarm or oral use, ensuring flexibility. These thermometers are known for their quick response time and memory recall features, making them ideal for families. The underarm method is less invasive, providing a comfortable option for children. Safety 1st underarm thermometers are equipped with features like fever indicators and easy-to-read displays, ensuring reliable results. They are a practical choice for parents seeking a gentle and efficient way to monitor their child’s temperature without discomfort.

Preparing the Thermometer

Unbox and install batteries as instructed. Ensure the thermometer is set to the correct mode for its intended use (oral, rectal, or underarm). Prepare for accurate readings.

3.1 Unboxing and Initial Setup

Welcome to the setup guide for your Safety 1st thermometer! Upon unboxing, ensure all components are included, such as the thermometer, batteries, and user manual. For models like the TH097 or TH106, carefully remove any protective packaging. Before first use, allow the device to reach room temperature to ensure accuracy. Familiarize yourself with the buttons and features, such as the power button, memory recall, and mode selection. Read the manual thoroughly to understand specific instructions for your model. Proper setup ensures reliable performance and accurate readings. If unsure, refer to the troubleshooting section or contact customer support for assistance. Your thermometer is now ready for use!

3.2 Battery Installation

To power your Safety 1st thermometer, locate the battery compartment, usually found on the back or bottom. Open it by sliding or unscrewing, depending on the model. Insert the required battery type (e.g., LR41 or 1.5V) with the correct polarity. For models like the TH097 or TH106, ensure the battery is securely placed to avoid loose connections. Close the compartment tightly. If your thermometer has a test button, press it to verify proper function. Avoid using mixed or damaged batteries to prevent malfunction. Proper battery installation is crucial for accurate readings. Refer to your specific model’s manual for detailed instructions, as some may vary slightly in design or battery requirements.

Using the Thermometer

Turn on the thermometer, position it correctly for forehead, oral, rectal, or underarm use. Follow specific guidelines for each mode to ensure accurate readings. A beep signals completion.

4.1 Oral Use

For oral use, turn on the thermometer and ensure the mouth is closed around the probe under the tongue; Keep the mouth closed to maintain accuracy. Wait for the beep, indicating the reading is complete. Remove gently and read the temperature on the display. Ensure no food or drink was consumed 15 minutes prior for accurate results. Suitable for older children and adults, oral use is quick and straightforward. Refer to the user manual for specific model instructions, such as the Safety 1st TH106 or TH094 models. Always follow safety guidelines to avoid discomfort or injury. Clean the thermometer after use for hygiene.

4.2 Rectal Use

For rectal use, turn on the thermometer and lubricate the tip with petroleum jelly for comfort. Gently insert the thermometer into the rectum, ensuring a secure and comfortable position. Hold the baby steady to avoid movement. Wait for the beep, indicating the reading is complete. Remove carefully and clean the thermometer with soap and water. Rectal use is recommended for infants and younger children. Always follow the manufacturer’s guidelines, such as those for the Safety 1st TH013 Gentle Read Rectal Thermometer. Ensure the child is calm to get an accurate reading. This method provides quick and reliable results. Consult the user manual for specific model instructions.

4.3 Underarm Use

For underarm use, place the thermometer snugly under the arm, ensuring it touches the skin. Hold the baby’s arm down to keep it in place. Turn on the device and wait for the beep, signaling the reading is complete; This method is less invasive and suitable for newborns. After use, clean the thermometer with soap and water. Ensure the area is dry before insertion for accurate results. Follow the manufacturer’s guidelines for specific models, like the Safety 1st Quick Read 2-in-1 Thermometer. Underarm use is a gentle and effective way to monitor temperature, especially for infants. Always refer to the user manual for detailed instructions.

Reading and Interpreting Results

Once the thermometer beeps, carefully remove it and read the temperature on the LCD screen. The display shows the temperature in either Fahrenheit or Celsius, depending on the model. For most Safety 1st thermometers, a fever is indicated by a red light or a specific symbol. Normal body temperature typically ranges from 97.7°F to 99.5°F (36.5°C to 37.5°C). If the reading exceeds this range, it may signal a fever. Some models, like the Safety 1st Rapid Read 3-in-1 Thermometer, store previous readings for comparison. Always refer to the user manual for specific guidelines on interpreting results accurately.

Maintenance and Cleaning

Regular maintenance ensures accurate readings and prolongs the life of your Safety 1st thermometer. Clean the device after each use with a soft, dry cloth or isopropyl alcohol wipes. Avoid submerging the thermometer in water or exposing it to harsh chemicals. For models like the Fever Light Ear Thermometer, gently wipe the lens to maintain accuracy. Store the thermometer in a protective case or pouch to prevent damage. Replace batteries as needed, following the user manual instructions. Proper cleaning and storage help maintain hygiene and ensure reliable performance for future use.

Troubleshooting Common Issues

If your Safety 1st thermometer isn’t functioning properly, check for common issues like low battery or incorrect positioning. Ensure the lens is clean and free of debris, as dirt can cause inaccurate readings. For error codes, refer to the user manual for specific solutions. If the thermometer fails to turn on, try replacing the battery or ensuring it’s properly installed. For models with digital displays, a simple restart may resolve the issue. If problems persist, consult the troubleshooting section in the manual or contact Safety 1st customer support for assistance. Regular maintenance and proper usage can help prevent many common issues.

Safety Precautions

When using Safety 1st thermometers, always follow safety guidelines to ensure accurate readings and prevent damage. Avoid exposing the device to extreme temperatures or moisture, as this may affect performance. Keep the thermometer out of reach of children to prevent accidental breakage or misuse. For battery-operated models, handle batteries with care and avoid improper disposal. Never submerge the thermometer in water unless specified in the manual. Ensure the lens or probe is clean and dry before use to maintain accuracy. If the thermometer is used rectally, always use a new disposable cover for each use to prevent cross-contamination. Refer to the user manual for specific safety instructions tailored to your model.

Popular Models and Their Features

Some popular Safety 1st thermometers include the Rapid Read 3-in-1 Thermometer (TH097), which offers oral, rectal, and underarm use with quick results. The Simple Scan Forehead Thermometer (TH106) features non-contact infrared technology for effortless readings. The 5-Second Rectal Thermometer (TH111) is designed for newborns with a flexible, comfort-tip probe. Additionally, the Fever Light Ear Thermometer provides fast and accurate readings with a gentle glow for nighttime use. Each model is tailored for specific needs, ensuring convenience, accuracy, and safety for families. These thermometers are known for their ease of use and reliability, making them top choices for parents seeking trusted health monitoring tools.

User Reviews and Feedback

Users praise Safety 1st thermometers for their accuracy and ease of use. Many highlight the Quick Read 2-in-1 Thermometer (TH094) for its versatility and fast results. Parents appreciate the Simple Scan Forehead Thermometer (TH106) for its non-invasive design and ease of cleaning. The Fever Light Ear Thermometer is also popular for its gentle glow, making nighttime use convenient. Some users note the importance of following instructions for accurate readings. Overall, Safety 1st thermometers are well-regarded for their reliability and suitability for newborns and toddlers. Customers consistently recommend these products for their combination of affordability, functionality, and user-friendly features, making them a trusted choice for family health monitoring.

Accessories and Replacement Parts

Safety 1st thermometers come with essential accessories like storage cases and cleaning wipes. Replacement parts, such as batteries (LR41 or equivalent), are easily available. For models like the TH106 forehead thermometer, users can purchase additional lens filters. The TH094 Quick Read 2-in-1 Thermometer may require replacement probes, while the TH097 3-in-1 Thermometer offers interchangeable tips. These accessories ensure optimal performance and hygiene. Users can find these items on the official Safety 1st website or through authorized retailers. Always refer to the user manual for compatibility before purchasing. Accessories and replacement parts help maintain accuracy and extend the lifespan of your Safety 1st thermometer, ensuring reliable temperature monitoring for years to come.

Warranty Information

Safety 1st thermometers are backed by a limited warranty, typically covering manufacturing defects for a specified period. The warranty length varies by model, with many offering coverage for 365 days from the date of purchase. For example, the Rapid Read 3-in-1 Thermometer (SKU: TH097) includes a one-year warranty. To claim warranty benefits, users must register their product and provide proof of purchase. The warranty does not cover damage caused by misuse or normal wear and tear. For detailed warranty terms, refer to the user manual or visit the official Safety 1st website. Warranty information ensures peace of mind, knowing your thermometer is protected against defects.

Safety 1st thermometers offer reliable and efficient temperature monitoring for families. With a range of models suited for forehead, ear, and rectal use, they cater to diverse needs. Their quick reading speeds and user-friendly designs make them ideal for parents seeking accurate results. The brand emphasizes safety and comfort, ensuring peace of mind for users. By following the provided instructions, users can maximize the thermometers’ performance and longevity. Whether for newborns or older children, Safety 1st thermometers are a trusted choice for precise and hassle-free temperature monitoring, backed by comprehensive guides and excellent customer support.

rust-oleum rust reformer instructions

Rust-Oleum Rust Reformer transforms rusted metal into a paintable‚ non-rusting surface. It bonds with rust to stop corrosion and extends the life of metal surfaces effectively.

Overview of Rust-Oleum Rust Reformer

Rust-Oleum Rust Reformer is a innovative solution designed to tackle rusted metal surfaces. It transforms rust into a stable‚ paintable surface‚ preventing further corrosion. This product bonds with rusty metal‚ creating a durable barrier that protects against future rust formation. Available in both spray and brush-on formulas‚ it offers versatility for various applications. Its unique formula penetrates deeply to stop rust at its source‚ ensuring long-lasting protection. Ideal for automotive‚ industrial‚ or household use‚ Rust-Oleum Rust Reformer is a reliable choice for extending the life of metal surfaces. By addressing rust effectively‚ it prepares surfaces for painting‚ ensuring a smooth and even finish. This product is widely praised for its ease of use and effectiveness in combating corrosion.

Importance of Following Instructions

Following the instructions for Rust-Oleum Rust Reformer is crucial for achieving optimal results. Proper preparation and application ensure the product bonds effectively with rusted metal. Skipping steps like cleaning or drying can lead to poor adhesion and reduced durability. Applying too much or too little can compromise performance. Adhering to recommended drying and curing times ensures the surface is ready for painting or further coating. Neglecting safety precautions‚ such as wearing protective gear and working in well-ventilated areas‚ can pose health risks. By following the guidelines‚ users ensure a successful transformation of rusted metal into a stable‚ non-rusting surface‚ extending the life of their projects. Proper usage also prevents common mistakes‚ ensuring long-lasting protection.

Surface Preparation for Rust Reformer Application

Proper surface preparation ensures Rust-Oleum Rust Reformer adheres effectively. Clean the rusty surface thoroughly‚ remove loose debris‚ and allow it to dry completely before application.

Cleaning the Rusty Surface

Cleaning the rusty surface is essential for optimal results with Rust-Oleum Rust Reformer. Begin by removing dirt‚ oil‚ or grease using a degreaser or soap and water. Scrub the surface with a stiff brush to eliminate loose rust particles and debris. Rinse thoroughly with clean water to ensure no residue remains. Allow the surface to air dry completely‚ as any moisture can hinder the product’s effectiveness. This step ensures a strong bond between the rusted metal and the Rust Reformer‚ promoting a durable‚ rust-resistant finish. Proper cleaning lays the foundation for a successful application.

Removing Loose Rust and Debris

Removing loose rust and debris is crucial for a successful application of Rust-Oleum Rust Reformer. Use a wire brush or sandpaper to scrub away flaking rust and corrosion. This ensures the product adheres properly to the metal surface. Avoid using harsh chemicals that might damage the metal. Instead‚ focus on mechanical removal to create a clean base. After scrubbing‚ wipe the surface with a clean cloth to remove dust and particles. This step ensures the Rust Reformer bonds effectively‚ promoting a durable and rust-resistant finish. Proper preparation is essential for achieving long-lasting results.

Drying the Surface Before Application

Drying the surface thoroughly before applying Rust-Oleum Rust Reformer is essential for optimal results. After cleaning and removing loose rust‚ allow the surface to air dry completely. Avoid using heat to speed up the drying process‚ as this could cause warping or damage to the metal. Ensure there is no moisture or condensation present‚ as this can interfere with the product’s adhesion. A clean‚ dry surface ensures the Rust Reformer bonds effectively with the rusted metal. If necessary‚ use a clean‚ lint-free cloth to gently pat the surface dry. Proper drying ensures a strong bond and prevents future rust from forming. This step is critical for achieving a durable‚ rust-resistant finish.

Application Instructions

Shake the can thoroughly‚ apply Rust-Oleum Rust Reformer evenly with a brush or spray‚ and allow proper drying time between coats for best results.

Shaking the Can Properly

Before applying Rust-Oleum Rust Reformer‚ shake the can vigorously for at least one minute. This ensures the formula is well-mixed and the nozzle is clear. Continue shaking periodically during use to maintain consistency and prevent clogging. Proper shaking is crucial for a smooth‚ even application. Make sure the can is at room temperature for optimal performance. Shaking adequately guarantees the product bonds effectively with the rusty surface‚ enhancing its corrosion-fighting properties. Always follow this step to achieve professional-grade results and extend the durability of your metal surfaces. Proper preparation is key to a successful application.

Spraying or Brushing the Product

Rust-Oleum Rust Reformer can be applied using either a spray or brush method. For spraying‚ hold the can upright and maintain a distance of 12-16 inches from the surface. Move the can in steady‚ back-and-forth motions to ensure even coverage. Avoid oversaturating the surface‚ as this can lead to drips. For brushing‚ use a high-quality brush to apply thin‚ even coats. Work in small sections to ensure proper adhesion. Both methods provide excellent results‚ but spraying is faster for large areas‚ while brushing offers more control for detailed work. The product’s versatility ensures a professional finish regardless of the application method chosen. Always work in a well-ventilated area for best results.

Allowing Proper Drying Time

Proper drying time is crucial for the effectiveness of Rust-Oleum Rust Reformer. The product typically dries to the touch within 20-30 minutes‚ but full curing may take up to 24 hours‚ depending on environmental conditions. Ensure the surface remains untouched during this period to allow the formula to bond effectively with the rusted metal. Humidity‚ temperature‚ and air circulation can influence drying time‚ so ideal conditions are between 50°F and 90°F with low humidity. Avoid rushing the process‚ as premature painting or exposure to moisture can compromise the bond and reduce durability. Allowing the product to cure fully ensures a strong‚ rust-resistant surface ready for painting or further treatment; Patience is key to achieving long-lasting results.

Post-Application Care

After applying Rust-Oleum Rust Reformer‚ allow the surface to cure fully‚ typically 24 hours‚ depending on conditions. Ensure the area remains dry and free from moisture during this period to achieve optimal results and a durable‚ rust-resistant finish.

Curing Time and Conditions

For optimal results‚ Rust-Oleum Rust Reformer requires a minimum of 24 hours to fully cure under normal conditions. The curing process can be influenced by temperature and humidity. Ideally‚ the surface should be kept dry and free from moisture during this period. Higher temperatures may accelerate curing‚ while cooler conditions may extend the time needed. It is essential to avoid exposure to rain or dew until the product has fully cured. Proper curing ensures a strong bond with the metal and effective rust prevention. Always allow the recommended time before applying additional coats or exposing the surface to environmental elements.

Preparing for Painting or Further Coating

Once Rust-Oleum Rust Reformer has fully cured‚ the surface is ready for painting or additional coatings. Lightly sand the area to ensure a smooth finish and remove any minor imperfections. This step enhances paint adhesion and ensures a professional result. The product creates a stable‚ paintable surface that prevents future rust from forming. For best results‚ apply a high-quality primer before painting‚ especially in harsh environments. Always ensure the surface is clean‚ dry‚ and free of dust or oils before proceeding. Proper preparation guarantees long-lasting protection and a durable finish for your metal projects or repairs.

Safety Precautions

Always wear protective gear‚ including gloves and goggles‚ when using Rust-Oleum Rust Reformer. Ensure good ventilation to avoid inhaling fumes. Avoid skin and eye contact. Use in well-ventilated areas‚ away from open flames or sparks‚ as the product is flammable.

Protective Gear and Ventilation

When using Rust-Oleum Rust Reformer‚ prioritize safety by wearing protective gear‚ including gloves‚ goggles‚ and a mask. This prevents skin and eye irritation and inhalation of fumes. Ensure good ventilation by working in well-ventilated areas or using fans to dissipate vapors. Avoid breathing in the product’s fumes‚ as they can cause respiratory discomfort. Keep the workspace away from open flames or sparks‚ as the product is flammable. Proper ventilation and protective equipment are essential to ensure a safe and successful application process. Always follow the manufacturer’s guidelines for safety to minimize risks and achieve optimal results.

Avoiding Common Application Mistakes

To ensure optimal results with Rust-Oleum Rust Reformer‚ avoid common mistakes such as not properly cleaning the surface or applying the product on loose rust. Incorrect surface preparation can lead to peeling or reduced adhesion. Avoid applying in high humidity or direct sunlight‚ as this can affect drying and bonding. Do not over-apply‚ as excessive layers may crack or blister. Allow the recommended drying time before painting or exposing the surface to moisture. Ignoring these guidelines can compromise the product’s effectiveness and longevity. By adhering to instructions‚ you ensure a durable‚ rust-resistant finish that lasts. Proper application techniques are key to achieving professional-quality results.

lego mini x wing instructions

The LEGO Mini X-Wing is a beloved model from the LEGO Star Wars series, featuring iconic starfighters like Set 30051 and Set 30654. These sets capture the essence of the Rebel Alliance’s heroism, offering detailed designs and instructions for fans to build their own miniature versions. With its rich history and enduring popularity, the LEGO Mini X-Wing remains a must-have for collectors and enthusiasts alike.

1.1 Overview of the LEGO Star Wars Series

The LEGO Star Wars series, launched in 1999, brings the iconic galaxy far, far away to life through LEGO bricks. This beloved theme features a wide range of sets, from mini models like the X-Wing to intricate Ultimate Collector Series (UCS) creations. It combines the creativity of LEGO with the epic storytelling of Star Wars, offering fans of all ages a way to reimagine their favorite moments and characters in a playful, brick-built universe.

1.2 Significance of the X-Wing in Star Wars

The X-Wing Starfighter is an iconic symbol of the Rebel Alliance in the Star Wars saga, renowned for its versatility and role in pivotal battles like the Battle of Yavin. Its distinctive design and historical significance make it a fan favorite, appearing in multiple episodes and inspiring countless LEGO creations. The X-Wing’s enduring popularity stems from its association with heroic pilots and its status as a powerful Rebel asset, embodying hope and resistance in the fight against the Empire;

LEGO Mini X-Wing Sets

LEGO Mini X-Wing Sets, such as Set 30051 and Set 30654, offer fans detailed miniature versions of the iconic Star Wars starfighter, perfect for collectors and enthusiasts alike.

2.1 Set 30051: Mini X-Wing Fighter

Set 30051: Mini X-Wing Fighter is a compact LEGO Star Wars model featuring 76 pieces. Released in 2003, it captures the Rebel Alliance’s iconic starfighter in miniature form. Designed for simplicity, it offers a quick and fun building experience while staying true to the X-Wing’s recognizable design. Instructions are readily available online, making it accessible for fans of all ages to construct and enjoy this small-scale Star Wars classic.

2.2 Set 30654: X-Wing Starfighter

Set 30654: X-Wing Starfighter is a detailed LEGO model inspired by Star Wars Episode VI. It features a sleek design, capturing the iconic Rebel Alliance starfighter’s look. With its intricate build, this set offers a challenging yet rewarding experience. Instructions are available online, guiding fans through constructing this miniature starfighter. Its precision and accuracy make it a standout piece for collectors and Star Wars enthusiasts seeking a faithful replica of the X-Wing.

Building Instructions

LEGO Mini X-Wing instructions are available for sets like 30051 and 30654, offering detailed, page-by-page guides to help fans accurately build these iconic Star Wars models.

3.1 Step-by-Step Guide for Set 30051

Set 30051, the Mini X-Wing Fighter, offers a simple yet engaging build experience. With 76 pieces, it’s designed for quick assembly, making it perfect for beginners. Start by constructing the cockpit, then attach the wings and engines. The instructions provide clear, page-by-page guidance, ensuring accuracy. This set is ideal for younger builders or those new to LEGO Star Wars, delivering a compact yet recognizable X-Wing model.

3.2 Detailed Instructions for Set 30654

Set 30654, the X-Wing Starfighter, features a more complex design with intricate details. The instructions are divided into sections, starting with the cockpit and progressing to the wings and engines. Each page provides precise steps, ensuring accuracy. This set includes unique elements like movable laser cannons and S-foils, making it a challenging yet rewarding project for fans seeking a detailed miniature replica of the iconic starfighter.

Key Features of the LEGO Mini X-Wing

The LEGO Mini X-Wing features intricate designs mirroring the Star Wars universe, with detailed wings, engines, and cockpits. It offers a balance of complexity and playability, making it a standout model for fans of all skill levels.

4.1 Design and Accuracy to the Star Wars Universe

The LEGO Mini X-Wing meticulously captures the iconic design of the Star Wars X-Wing fighter, featuring its distinctive wings, engines, and cockpit. The model’s proportions and details closely align with the original Star Wars aesthetic, ensuring authenticity. Sets like 30051 and 30654 include intricate elements to replicate the X-Wing’s look, making it instantly recognizable to fans. This attention to detail enhances the building experience and the model’s display appeal.

4.2 Number of Pieces and Complexity Level

LEGO Mini X-Wing sets vary in piece count, with Set 30051 containing 76 pieces and Set 30654 offering a more detailed design. These sets cater to different skill levels, providing a balance between simplicity and complexity. The instructions guide builders through assembling intricate features, ensuring a rewarding experience for both newcomers and experienced LEGO enthusiasts. The piece count reflects the model’s size and detail, making it accessible yet engaging.

Advanced Building Techniques

Mastering advanced techniques enhances your LEGO Mini X-Wing build, focusing on stability, balance, and smooth details. These methods ensure a polished and realistic final model, elevating your creation.

5.1 Tips for Achieving Stability and Balance

Achieving stability and balance in your LEGO Mini X-Wing involves carefully positioning the wings and cockpit. Ensure symmetrical placement and use flat plates for a secure base. Tightening connections evenly prevents wobbling. Applying minimal force when attaching larger components helps maintain balance. Regularly check alignment as you build to ensure a sturdy, even structure that captures the X-Wing’s iconic design perfectly.

5.2 Tricks for Smoother and More Realistic Details

For a smoother and more realistic LEGO Mini X-Wing, use angled plates and slopes to create seamless lines. Incorporate micro-scale details like tiny engines and cockpit controls. Applying tiles and inverted elements can hide studs, enhancing the model’s aesthetics. Utilize color consistency to match the Star Wars universe, and add subtle weathering effects for a battle-worn appearance, making your X-Wing look authentically detailed and visually stunning.

Display and Customization Ideas

Showcase your LEGO Mini X-Wing on a dedicated stand or alongside other Star Wars models for a striking display. Customize it with unique decals, alternative color schemes, or additional accessories like mini-figures or lightsaber elements to personalize your build and make it truly one-of-a-kind, reflecting your creativity and passion for the Star Wars universe.

6.1 How to Showcase Your LEGO Mini X-Wing

To showcase your LEGO Mini X-Wing effectively, consider using a display stand or a glass case to protect it from dust. Position it alongside other Star Wars models or within a themed diorama to enhance its visual appeal. Proper lighting can highlight the model’s intricate details, making it a standout piece in any collection. This ensures your LEGO Mini X-Wing remains a cherished and admired display item.

6.2 Creative Ways to Customize the Model

Personalize your LEGO Mini X-Wing by adding custom decals, weathering effects, or unique paint jobs to reflect different Star Wars pilots. Incorporate LED lights for a glowing cockpit or engine details. Swap minifigures to feature your favorite Rebel pilots. Experiment with alternate color schemes or modify wing designs for a unique twist. These creative touches make your model stand out while staying true to its Star Wars heritage.

LEGO Star Wars History

The LEGO Star Wars series began in 1999, collaborating with Lucasfilm to bring iconic Star Wars vehicles like the X-Wing to life in LEGO form, evolving over decades.

7.1 Evolution of LEGO Star Wars Sets

Starting in 1999, LEGO Star Wars sets have evolved from simple designs to intricate models. The Mini X-Wing, like Set 30051, reflects this progression with added details and improved accuracy, capturing the Star Wars essence while remaining accessible for younger builders. Over the years, the series has introduced new techniques and elements, ensuring timeless appeal for fans of all ages.

7.2 Popularity of the X-Wing Models Over the Years

The LEGO X-Wing models have maintained their popularity due to their timeless appeal and connection to the Star Wars saga. Sets like 30051 and 30654 remain favorites, offering fans a way to recreate iconic moments. Recent releases, including a new UCS X-Wing, continue to excite collectors and builders, ensuring the X-Wing’s enduring legacy as a beloved LEGO Star Wars model.

New LEGO X-Wing Releases

Lego has announced three new Star Wars sets, including a UCS X-Wing model, set to launch in early May. Fans can expect detailed designs and exciting features.

8.1 Upcoming Sets and Their Features

Lego has revealed three new Star Wars sets, including a Ultimate Collector Series (UCS) X-Wing model. This highly detailed set features intricate designs, authentic movie elements, and advanced building techniques. Additionally, two new diorama sets will be released, offering fresh ways to recreate iconic Star Wars scenes. These upcoming sets promise to deliver exciting challenges and immersive experiences for fans of all skill levels.

8.2 Exciting News for LEGO Star Wars Fans

Lego fans are thrilled with the announcement of new Star Wars sets, including a UCS X-Wing and two dioramas. These releases promise enhanced details, exclusive minifigures, and innovative building techniques. The UCS X-Wing is expected to be a crown jewel for collectors, while the dioramas offer unique display options. This wave of sets is set to reignite passion and creativity among Lego Star Wars enthusiasts worldwide, delivering fresh and exciting building opportunities;

Troubleshooting Common Building Issues

Common issues include piece compatibility and structural weaknesses. Ensure all parts align correctly and refer to instructions for stability. Addressing these enhances the model’s durability and accuracy.

9.1 Solving Piece Compatibility Problems

Identifying the correct pieces is crucial. Use the LEGO instructions to verify each part’s placement. If a piece doesn’t fit, check for similar-looking alternatives or refer to the LEGO Star Wars Episode VI set 30654 guide. Ensuring compatibility maintains the model’s integrity and prevents structural issues during assembly. Double-checking each step helps avoid mismatches and ensures a smooth building experience.

9.2 Fixing Structural Weaknesses in the Model

Examine the LEGO Mini X-Wing for areas that feel unstable. Reinforce joints by adding extra support pieces or repositioning bricks for better alignment. If a section wobbles, check the LEGO instructions to ensure correct assembly. For models like Set 30654, paying attention to wing connections and cockpit stability is key. Addressing weaknesses early prevents damage and ensures a sturdy, long-lasting build.

LEGO Mini X-Wing in the LEGO Community

The LEGO Mini X-Wing has inspired countless fan-built variations and sparked lively discussions among enthusiasts. Builders share their custom designs, modifications, and tips online, fostering creativity and collaboration within the LEGO Star Wars community.

10.1 Fan-Built Variations and Modifications

LEGO enthusiasts have created numerous custom variations of the Mini X-Wing, showcasing their creativity. Fans often modify the model by adding intricate details, alternative color schemes, or integrating new LEGO pieces. These unique designs highlight the versatility of the original set and inspire others to experiment with their builds, fostering a vibrant exchange of ideas within the LEGO Star Wars community.

10.2 Community Reviews and Feedback

Fans praise the LEGO Mini X-Wing for its accuracy and fun build experience. Many highlight the clear instructions provided for sets like 30051 and 30654, making it accessible to builders of all skill levels. The community often shares tips and tricks, while some suggest improvements for stability. Overall, the model is celebrated for its detailing and faithfulness to the Star Wars universe, making it a beloved project among LEGO enthusiasts.

Building the LEGO Mini X-Wing is a rewarding experience, combining fun with nostalgia; With detailed instructions and iconic designs, it’s a must-build for Star Wars fans, inspiring future LEGO projects and creative endeavors.

11.1 Final Thoughts on Building the LEGO Mini X-Wing

Building the LEGO Mini X-Wing is a delightful and rewarding experience, offering a perfect blend of nostalgia and creativity. With detailed instructions available for sets like 30051 and 30654, fans can effortlessly bring this iconic Star Wars starfighter to life. The model’s accuracy and charm make it a standout piece for any collection, evoking pride and a sense of accomplishment upon completion.

11.2 Encouragement for Future LEGO Projects

Completing the LEGO Mini X-Wing is just the beginning of your LEGO Star Wars journey. With the skills and confidence gained, fans are encouraged to explore more complex sets, such as the Ultimate Collector’s Series X-Wing. Each LEGO project offers a unique sense of accomplishment and fosters creativity. Embrace the joy of building, and let your passion for LEGO guide you to even greater creations in the future!

rpez kleen filter cleaning instructions

The RPEZ Kleen filter cleaning process ensures optimal performance and longevity. Regular maintenance is crucial for efficient airflow and dust capture. Durable materials and reusable designs make these filters a cost-effective solution for various applications, enhancing overall system efficiency and reducing replacement costs over time.

Overview of RPEZ Kleen Filters

RPEZ Kleen filters are durable, lightweight, and designed for efficient airflow and dust capture. Made from strong, corrosion-resistant materials, they offer long-lasting performance. These filters are washable and reusable, making them a cost-effective solution for various applications. Available in custom sizes, they cater to diverse needs, ensuring a perfect fit for different systems. Their robust construction and easy maintenance make them a popular choice in industries requiring reliable filtration. With a focus on sustainability, RPEZ Kleen filters reduce waste by allowing repeated cleaning and reuse, making them an environmentally friendly option. Their versatility and durability ensure they remain a top choice for maintaining clean and efficient air quality systems. Regular cleaning enhances their performance, extending their lifespan and ensuring optimal functionality over time.

Importance of Regular Cleaning

Regular cleaning of RPEZ Kleen filters is essential for maintaining their efficiency and extending their lifespan. Neglecting maintenance can lead to reduced airflow, increased energy consumption, and compromised air quality. Dust and debris buildup can clog the filter, diminishing its ability to capture particles effectively. Clean filters ensure optimal system performance, reduce operational costs, and prevent potential damage to equipment. Moreover, regular cleaning prevents the growth of mold and bacteria, which can spread contaminants throughout the air system. By maintaining a clean filter, users can enjoy improved indoor air quality, lower energy bills, and a prolonged filter lifespan. Cleaning every 3 to 6 months is recommended, depending on usage and environmental conditions, to uphold these benefits and ensure continuous functionality.

Step-by-Step Cleaning Instructions

Cleaning RPEZ Kleen filters involves removing excess dust, flushing with water, and drying thoroughly. This ensures optimal performance and extends lifespan. Regular maintenance ensures efficiency and reduces replacement costs.

Pre-Cleaning Preparation

Before cleaning your RPEZ Kleen filter, ensure the system is powered off for safety. Remove the filter from its housing by following the manufacturer’s instructions. Inspect the filter for any large debris and gently brush it off to prevent clogging during the cleaning process. Lay the filter on a clean, flat surface or hang it securely to maintain its shape. Gather necessary cleaning supplies, such as a hose with high water pressure and a mild detergent if needed. Ensure the area is well-ventilated and protected from water splatter. Proper preparation ensures a thorough and effective cleaning process.

Removing Excess Dust and Lint

Start by gently tapping the filter on a hard surface with the dirty side facing down to dislodge loose particles. For stubborn debris, use a soft-bristled brush or a vacuum cleaner with a gentle suction setting to remove dust and lint. Avoid using harsh materials that might damage the filter mesh. This step is essential to prevent clogs during the flushing process and ensures a more thorough cleaning. For large filters, consider dividing them into sections and cleaning each part individually. Proper removal of excess dust and lint enhances the filter’s efficiency and prolongs its lifespan.

Flushing with Water

Flush the filter with water from both sides to remove embedded dirt and debris. Use a low to moderate water pressure hose, starting from the inside and working outward. Avoid using high-pressure jets that could damage the mesh material. Continue rinsing until the water runs clear, ensuring all contaminants are removed. For particularly stubborn dirt, gently scrub the surface with a soft-bristled brush while flushing. This step is critical for restoring the filter’s performance and ensuring optimal airflow. Proper flushing prepares the filter for drying and potential recoating, extending its lifespan and maintaining efficiency. Regularly flushing with water keeps the filter in prime condition for reuse.

Drying the Filter

After flushing, allow the filter to air dry completely to prevent mold or mildew growth. Gently shake or pat the filter with a clean towel to remove excess water. Do not twist or wring the mesh, as this could cause damage. Place the filter in a well-ventilated area, away from direct sunlight, to ensure even drying. Avoid using heat sources like ovens or hair dryers, as they may warp the material. Once dry, inspect for any remaining moisture to ensure the filter is ready for reuse or recoating. Proper drying is essential to maintain the filter’s performance and prevent damage during storage or future use.

Maintenance and Reuse Tips

Regular maintenance ensures longevity. Made of durable, lightweight aluminum, these filters resist rust and corrosion. Reusable design lowers costs, making them a practical choice for long-term use.

Recommended Cleaning Frequency

Regular cleaning is essential to maintain the RPEZ Kleen filter’s efficiency. The manual recommends cleaning or replacing the filter every 6 months. However, usage and environmental conditions may require more frequent maintenance, such as every 3 months in high-dust environments. Proper washing and recoating with Super Filter Coat can extend the filter’s lifespan. Factors like airflow volume and dust exposure should be considered when determining the ideal cleaning schedule. Consistent upkeep ensures optimal performance, prevents clogging, and reduces the need for premature replacements. By adhering to a structured cleaning routine, users can maximize the filter’s durability and overall system efficiency.

Recoating with Super Filter Coat

Recoating your RPEZ Kleen filter with Super Filter Coat is a straightforward process that enhances its performance and longevity. Start by ensuring the filter is clean and completely dry, as any moisture or debris can hinder adhesion. Once dry, apply the Super Filter Coat evenly, following the manufacturer’s instructions for the correct amount and method—whether spraying or brushing. Allow the coating to dry fully, typically a few hours, before reinstalling the filter. This step is crucial to prevent smudging or uneven adhesion. Always use the recommended type of Super Filter Coat to maintain effectiveness. Recoating should be done as needed, depending on wear, but typically after each thorough cleaning. This process helps maintain optimal airflow and filtration efficiency, ensuring your system runs smoothly and effectively. Regular recoating can extend the filter’s lifespan and improve overall air quality. By following these steps, you can keep your RPEZ Kleen filter performing at its best, reducing maintenance costs and ensuring consistent performance over time.

Specifications and Features

Specifications and Features

The RPEZ Kleen filter features lightweight aluminum construction, ensuring durability and resistance to rust and corrosion. Custom sizes are available, making it versatile for various applications always.

Material and Durability

The RPEZ Kleen filters are crafted from high-quality, lightweight aluminum, ensuring exceptional durability and resistance to rust and corrosion. This robust material guarantees long-lasting performance, even in challenging environments. The aluminum construction not only enhances strength but also allows for easy handling and installation. Designed to withstand frequent cleaning and reuse, these filters maintain their structural integrity over time. Their durability makes them a reliable choice for commercial and industrial applications, providing consistent airflow and filtration efficiency. With proper maintenance, RPEZ Kleen filters can endure extensive use, making them a cost-effective and sustainable option for various systems. Their resilience ensures they remain a top choice for professionals seeking dependable filtration solutions.

Custom Sizes and Availability

RPEZ Kleen filters are available in a wide range of custom sizes, catering to diverse applications and system requirements. With heights and lengths spanning from 2 to 60 inches, these filters can be tailored to fit specific installations. This versatility ensures optimal performance across various environments, from commercial kitchens to industrial settings. Custom sizes are readily available upon request, allowing users to meet unique specifications without compromising on quality. For precise measurements and configurations, detailed specification sheets are provided, ensuring a perfect fit and seamless integration. This adaptability, combined with their durable design, makes RPEZ Kleen filters a flexible and practical choice for a broad range of filtration needs.

Additional Resources

For further guidance, explore video tutorials and technical manuals offering detailed insights into RPEZ Kleen filter cleaning and maintenance procedures, ensuring optimal results and system efficiency.

Video Tutorials and Guides

Video tutorials provide step-by-step guidance on RPEZ Kleen filter cleaning and maintenance. Professionals demonstrate how to remove, clean, and reinstall filters effectively. These resources also cover topics like flushing with water, drying, and recoating with Super Filter Coat. Tutorials often include tips for extending filter lifespan and improving system performance. Platforms like YouTube and manufacturer websites offer comprehensive guides tailored for different models and applications. Additionally, instructional videos detail proper preparation and safety precautions, ensuring users achieve optimal results. Whether you’re a beginner or experienced user, these visual aids simplify the cleaning process, making it efficient and straightforward. They are an invaluable resource for anyone looking to maintain their RPEZ Kleen filters correctly and efficiently.

Technical Manuals and Specifications

Technical manuals for RPEZ Kleen filters provide detailed specifications and maintenance schedules. These documents outline the materials used, such as durable aluminum, and offer insights into custom size availability. Manuals include guidelines for cleaning frequency, recommended cleaning methods, and compatibility with products like Super Filter Coat. Specifications often highlight features like rust resistance, lightweight construction, and high dust-holding capacity. Users can find these resources on manufacturer websites or through authorized distributors. Technical manuals also provide troubleshooting tips and warranty information, ensuring users can address issues promptly. By following these guidelines, users can optimize filter performance and extend lifespan. These resources are essential for understanding the technical aspects of RPEZ Kleen filters and ensuring proper maintenance.

avocado smash instructions

Avocado smash is a trendy, nutritious dish, perfect for quick meals. Its creamy texture and fresh flavors make it a versatile topping for toast, salads, and sandwiches.

1.1 Overview of Avocado Smash as a Trendy and Nutritious Dish

Avocado smash is a vibrant, versatile dish that combines the creaminess of avocados with fresh flavors. Its trendiness lies in its simplicity, nutritional richness, and adaptability to various recipes. Made by mashing ripe avocados and blending them with ingredients like lemon juice, herbs, and spices, it offers a healthy, delicious base for toast, salads, and sandwiches. The dish is celebrated for its balance of flavors and textures, making it a favorite among health-conscious food lovers.

1.2 Popularity of Avocado Smash in Modern Cuisine

Avocado smash has become a staple in modern cuisine due to its versatility and nutritional benefits. Its rise to fame stems from its creamy texture, fresh flavors, and ease of preparation. Restaurants and home cooks alike embrace it for its adaptability in breakfast, brunch, and light meal recipes. The dish aligns with current health trends, offering a rich source of healthy fats and essential nutrients, making it a favorite among food enthusiasts worldwide.

Selecting the Perfect Avocado for Smashing

Selecting the perfect avocado involves choosing ripe ones. Gently squeeze the skin; a ripe avocado yields slightly but remains firm. Avoid overly soft or bruised fruit.

2.1 How to Choose Ripe Avocados

To choose ripe avocados, gently squeeze the skin; a ripe one yields slightly but remains firm. Avoid soft or mushy avocados. Look for a color change from green to nearly black, depending on the variety. A ripe avocado may also have a slight indentation around the pit. Store unripe avocados at room temperature to ripen them naturally. Once ripe, refrigerate to maintain freshness for a few days.

2.2 Tips for Storing Avocados to Maintain Freshness

Store unripe avocados at room temperature to ripen naturally. Once ripe, refrigerate to slow down ripening. To prevent browning, sprinkle lemon juice on exposed flesh before storing. For longer freshness, wrap tightly in plastic wrap or an airtight container. Avoid washing before storing, as moisture can cause spoilage. Proper storage ensures avocados remain fresh and ready for smashing when needed.

Basic Steps to Make Avocado Smash

Mash ripe avocados with a fork, mix in lemon juice, salt, and optional spices. Adjust consistency and seasonings to taste for a quick, versatile topping or spread.

3.1 Cutting and Scooping the Avocado

Halve the avocado lengthwise, remove the pit, and scoop the creamy flesh into a bowl. For chunkier texture, cut into small pieces before mashing. Use a knife to slice gently for smoother results. Ensure the avocado is ripe for easy scooping and even distribution of flavors when mixed with other ingredients.

3.2 Mixing with Lemon Juice and Seasonings

Squeeze fresh lemon juice over the avocado to prevent browning and enhance flavor. Add a pinch of salt and optional spices like cayenne or chili flakes for a spicy kick. Mix gently with a fork to combine, ensuring a chunky texture. For extra zing, incorporate garlic or herbs like parsley and mint. Taste and adjust seasoning as needed for a balanced, vibrant flavor profile.

3;3 Achieving the Perfect Consistency

Use a fork to mash the avocado to your desired texture—smooth or chunky. For a creamier consistency, mash thoroughly; for a rustic feel, leave some chunks. Avoid over-mashing, as it can make the avocado too paste-like. Adjust by adding more lemon juice or seasonings if needed, ensuring the smash remains vibrant and fresh without becoming too runny.

Flavor Variations for Avocado Smash

Elevate the dish by adding spices like chili flakes, fresh herbs such as parsley or dill, or crumbly cheese for a creamy, tangy twist to the classic smash.

4.1 Spicy Twist with Chili Flakes or Jalapeños

Add a bold kick to your avocado smash by incorporating spicy elements. Mix in chili flakes or diced jalapeños for a fiery flavor. This addition not only enhances taste but also boosts metabolism. For a balanced zing, combine with a squeeze of lime juice. Perfect for adventurous palates, this variation turns the classic smash into a vibrant, memorable dish.

4.2 Fresh Herbs Like Parsley, Dill, or Mint

Elevate your avocado smash by adding fresh herbs like parsley, dill, or mint. These ingredients bring a bright, refreshing flavor and vibrant color. Chop the herbs finely and mix them into the smashed avocado for a light, aromatic twist. This addition complements the creamy texture and pairs well with lemon juice, creating a balanced and revitalizing dish perfect for any meal.

4.3 Adding Crumbly Cheese for Creaminess

Incorporate crumbly cheese like feta or goat cheese into your avocado smash for a rich, creamy texture. Gently fold the cheese into the mashed avocado, allowing its tangy flavor to enhance the dish. This addition provides a luxurious twist, transforming the smash into a decadent and satisfying topping for toast, salads, or as a dip, perfect for enhancing any meal with its velvety smoothness and bold taste.

Pairing Avocado Smash with Other Foods

Avocado smash pairs perfectly with crusty toast, fresh salads, and hearty sandwiches. It enhances breakfast dishes like eggs and tomatoes, adding creaminess and freshness to any meal.

5.1 Classic Avocado Toast Combinations

Avocado smash on toast is a classic combination, often topped with cherry tomatoes, fresh herbs, and a sprinkle of feta cheese. Drizzling with balsamic glaze or olive oil enhances the flavor. Adding a fried or poached egg provides protein, while a sprinkle of chili flakes adds a spicy kick. These combinations create a satisfying and nutritious meal perfect for breakfast, lunch, or a light dinner.

5.2 Using Avocado Smash on Salads and Sandwiches

Avocado smash adds a creamy texture to salads and sandwiches, enhancing flavor and nutrition. Use it as a spread on whole-grain bread or as a base for wraps. Toss it with mixed greens, cherry tomatoes, and grilled chicken for a fresh salad. It also pairs well with smoked salmon or roasted vegetables, creating a balanced and delicious meal option for any time of day.

Presentation Tips for Avocado Smash

Styling avocado smash for photos involves vibrant colors and textures. Garnish with fresh herbs, edible flowers, or seeds to create visually appealing dishes that stand out on social media.

6.1 Styling for Instagram-Worthy Photos

Transform avocado smash into a visual masterpiece by using vibrant colors and textures. Arrange fresh herbs like parsley or mint artfully, and add edible flowers or seeds for a pop of color. Use natural light to highlight the creamy texture and fresh ingredients. Experiment with creative angles and minimalist backgrounds, such as rustic wood or marble, to make your dish stand out. Garnish with microgreens or chili flakes for added appeal.

6.2 Garnishing with Seeds or Sprouts

Elevate your avocado smash by adding seeds or sprouts for texture and nutrition. Sprinkle chia, flax, or sesame seeds on top for a nutty crunch. Alfalfa or broccoli sprouts add freshness and a delicate burst of flavor. For a vibrant touch, mix in toasted pumpkin seeds or drizzle with olive oil. These garnishes not only enhance the dish’s visual appeal but also provide a nutritious and satisfying finish to your creation.

Health Benefits of Avocado Smash

Avocado smash is nutrient-rich, offering healthy fats, vitamins, and fiber. It supports heart health, aids digestion, and provides essential nutrients for a balanced diet.

7.1 Nutritional Value of Avocados

Avocados are rich in healthy fats, fiber, and essential vitamins like C and E. They also contain minerals such as potassium and magnesium, supporting heart health and digestion. Their high nutrient density makes them a great source of energy and a beneficial addition to a balanced diet, promoting overall wellness and vitality.

7.2 Benefits of Incorporating Fresh Herbs and Spices

Fresh herbs like parsley, dill, and mint add vibrant flavors and antioxidants to avocado smash. Spices such as chili flakes or jalapeños enhance taste and provide anti-inflammatory benefits. These additions not only elevate the dish’s flavor profile but also contribute to overall health, making avocado smash a nutrient-rich and delicious choice for any meal.

Quick Tips for Making Avocado Smash

Use fresh, ripe avocados for the best flavor. Lightly mash with a fork for a chunky texture. Add lemon juice to prevent browning and enhance taste;

8.1 Time-Saving Hacks for Preparing Avocado Smash

Speed up your prep by mashing avocados directly on toast. Use a fork for a quick smash, and season with salt, pepper, and lemon juice. Add pre-chopped herbs or spices for instant flavor. Toast bread in advance and store it for up to a day. For a faster smash, skip peeling avocados—scoop the flesh straight into a bowl. These hacks save time without sacrificing taste or texture.

8.2 Avoiding Common Mistakes

Avoid over-mashing avocados, as it can result in an unappealing mushy texture. Use ripe avocados for the best flavor and consistency. Don’t skip lemon juice, as it prevents browning and enhances taste. Avoid over-seasoning, which can overpower the avocado’s natural flavor. Too much lemon juice can make it overly acidic, so balance is key. Lastly, don’t store mashed avocado for too long, as it loses freshness quickly.

euhomy ice maker self-cleaning instructions

Regular maintenance is crucial for efficiency and hygiene․ The Euhomy Ice Maker’s self-cleaning feature simplifies this process, ensuring optimal performance and fresh ice production easily and consistently․

Overview of the Importance of Regular Cleaning

Regular cleaning is essential for maintaining the efficiency and hygiene of your Euhomy Ice Maker․ Over time, mineral buildup, bacteria, and mold can accumulate inside the machine, affecting ice quality and potentially causing unpleasant odors․ Cleaning prevents limescale deposits, which can damage internal components and reduce performance․ It also ensures fresh-tasting ice by removing impurities and residues․ Neglecting maintenance can lead to malfunction or the spread of bacteria, making regular cleaning crucial for long-term functionality and safety․ By keeping the ice maker clean, you extend its lifespan and guarantee consistent, high-quality ice production․ Cleanliness directly impacts both the machine’s durability and the freshness of the ice it produces․

Understanding the Self-Cleaning Feature

The Euhomy Ice Maker’s self-cleaning feature simplifies maintenance by automatically removing impurities and mineral buildup, ensuring fresh ice production and optimal performance with minimal effort required․

How the Self-Cleaning Function Works

The Euhomy Ice Maker’s self-cleaning function operates by flushing water through the internal system to remove impurities and mineral buildup․ To activate it, press and hold the Timer or Power button for 5 seconds until the lights blink, signaling the start of the cycle․ The process typically lasts 15-20 minutes, during which the machine circulates water to clean internal components․ For tougher stains, a mixture of water and vinegar or lemon juice can be used․ After the cycle, drain the water and wipe down surfaces with a soft cloth․ This feature ensures a thorough and efficient cleaning process, maintaining hygiene and performance․

Benefits of the Automatic Cleaning Mode

The automatic cleaning mode on your Euhomy Ice Maker offers several advantages․ It maintains the machine’s efficiency by removing mineral buildup and impurities, which can affect ice quality and production speed․ Regular use of this feature prevents mold and mildew growth, ensuring fresh and clean ice every time․ The self-cleaning function is also time-saving, as it eliminates the need for manual scrubbing․ Additionally, it extends the lifespan of the machine by keeping internal components free from residue․ With this feature, you can enjoy a hassle-free maintenance routine and consistent performance, making it an essential part of your ice maker’s upkeep․

Preparing for the Cleaning Process

Before cleaning, empty the water tank and remove all ice from the machine․ This ensures the self-cleaning process is effective and prevents any water or ice from interfering․

Steps to Prepare the Ice Maker for Self-Cleaning

To prepare your Euhomy Ice Maker for self-cleaning, start by emptying the water tank and removing the ice basket․ Next, mix a solution of equal parts water and white vinegar or lemon juice․ Plug in the machine but do not turn it on․ Press and hold the Timer button for 5 seconds to activate the self-cleaning mode․ Allow the cycle to run, which typically takes 15-20 minutes․ After the cycle completes, rinse the interior thoroughly with clean water to remove any residue․ Finally, dry the machine with a soft cloth to prevent water spots and ensure it’s ready for its next use․

Recommended Cleaning Solutions (Lemon Water or Vinegar)

For effective cleaning, use a mixture of equal parts water and white vinegar or lemon juice․ Vinegar is ideal for removing mineral buildup and neutralizing odors, while lemon water adds a fresh scent․ Avoid harsh chemicals, as they can damage the machine or leave harmful residues․ To prepare the solution, mix 1 part vinegar or lemon juice with 1 part water․ This natural and gentle approach ensures a safe and thorough cleaning process․ After using the solution, rinse the interior with clean water to eliminate any lingering taste or smell, ensuring your ice maker remains in optimal condition for consistent performance․

Removing Ice and Water Before Cleaning

Before initiating the self-cleaning process, ensure the ice maker is empty․ Remove any remaining ice cubes from the basket and discard them․ Drain the water reservoir completely to prevent any residual water from interfering with the cleaning cycle․ This step is crucial as leftover ice or water can hinder the effectiveness of the cleaning solution or cause dilution․ Once the machine is empty, proceed with the cleaning process․ Always refer to the manufacturer’s guidelines to ensure proper preparation․ A clean start guarantees a more thorough and efficient cleaning, maintaining the machine’s performance and hygiene standards․

Activating the Self-Cleaning Mode

Activate the self-cleaning mode by pressing and holding the timer button for 5 seconds․ The machine will start a 15-20 minute cleaning cycle automatically․

Step-by-Step Instructions to Initiate the Cleaning Cycle

To activate the self-cleaning mode on your Euhomy Ice Maker, start by ensuring the machine is properly plugged in․ Next, locate the timer button on the control panel․ Press and hold this button for at least 5 seconds until the indicator lights begin to flash, signaling the start of the cleaning cycle․ The machine will then run an automatic 15- to 20-minute cleaning process․ During this time, the ice maker will flush out any residue and sanitize its internal components․ Once the cycle is complete, the lights will stop flashing, and the machine will shut off․ For tougher stains, a mixture of water and vinegar can be used manually before initiating the cycle․

Understanding the Cleaning Cycle Duration and Indicators

The Euhomy Ice Maker’s self-cleaning cycle typically lasts between 15 to 20 minutes․ During this process, you may notice blinking lights or specific indicators on the control panel, signaling that the cycle is active․ It’s important to allow the machine to complete the full cycle without interruption to ensure thorough cleaning․ Once the cycle is finished, the lights will stop flashing, and the machine will automatically shut off․ For optimal results, avoid opening the lid during the cleaning process․ After completion, rinse the interior with fresh water to remove any cleaning solution residue․ Regular cleaning helps maintain hygiene and ensures fresh-tasting ice․

Additional Cleaning Tips for Optimal Maintenance

Regularly wipe the interior with a soft cloth and mild detergent․ Use a vinegar solution for deeper cleans․ Clean the ice basket and scoop after each use․

Using a Soft Cloth and Mild Detergent for Manual Cleaning

For manual cleaning, dampen a soft cloth with warm water and a mild detergent․ Gently wipe down the exterior and interior surfaces, paying attention to areas with visible buildup; Avoid harsh chemicals or abrasive materials that could damage the finish․ For tougher stains, lightly scrub with a soft-bristled brush before wiping clean․ This method prevents mineral deposits and odors, ensuring the ice maker remains hygienic and functional․ Regular manual cleaning complements the self-cleaning feature, maintaining peak performance and fresh ice production․ Always rinse thoroughly and dry with a clean cloth to prevent water spots and residue buildup․

Cleaning the Ice Basket and Scoop

Regularly cleaning the ice basket and scoop is essential for maintaining hygiene and preventing odors․ Remove the basket and scoop from the ice maker and wash them in warm, soapy water; Use a mild detergent and a soft sponge or brush to scrub away any residue or stains․ Rinse thoroughly with clean water to remove all soap residue․ For tougher stains, soak the basket and scoop in a mixture of equal parts water and white vinegar for about 10 minutes before scrubbing․ After cleaning, dry them completely with a clean towel to prevent water spots․ This ensures the ice remains fresh and free from contaminants․ Always reattach the basket and scoop securely after cleaning to maintain proper function․ Regular cleaning of these parts is crucial for optimal ice production and longevity of the machine․ Additionally, avoid using abrasive cleaners or scrubbers, as they may damage the surfaces․ Always refer to the user manual for specific care instructions if needed․ By keeping the ice basket and scoop clean, you ensure your Euhomy Ice Maker continues to perform efficiently and produce clean, fresh ice every time․ Cleaning these components is a simple yet important step in maintaining your appliance․ Do not submerge electrical parts in water during cleaning․ Always ensure all parts are dry before reassembling․ Proper maintenance ensures the longevity and effectiveness of your ice maker․ Cleaning the ice basket and scoop regularly helps prevent mold and bacteria growth, keeping your ice tasting fresh and clean․ It’s a quick process that should be done every few uses to maintain hygiene standards․ For stubborn stains, vinegar is an effective natural cleaner that won’t leave harsh chemical residues․ After cleaning, make sure to rinse thoroughly to remove any vinegar taste․ Cleaning the ice basket and scoop is a straightforward process that requires minimal effort but yields significant benefits for the overall performance and hygiene of your Euhomy Ice Maker․ Always handle the basket and scoop with care to avoid scratching or bending․ If you notice any signs of wear or damage, replace the parts as needed to ensure proper function․ Cleaning these parts regularly also helps prevent ice from sticking together, ensuring each cube is perfectly formed․ By incorporating this step into your maintenance routine, you can enjoy consistent, high-quality ice production from your Euhomy Ice Maker․ Cleaning the ice basket and scoop is a simple task that plays a vital role in the overall maintenance of your appliance․ It not only keeps your ice clean and fresh but also extends the lifespan of your ice maker․ Regular cleaning prevents the buildup of mold, mildew, and bacteria, which can affect the taste and quality of the ice․ Always prioritize cleaning these parts to ensure your Euhomy Ice Maker continues to deliver the best results․ Cleaning the ice basket and scoop is an essential part of maintaining your Euhomy Ice Maker․ By doing so, you ensure that your ice remains clean, fresh, and free from any contaminants․ Regular cleaning also helps prevent any unpleasant odors and ensures the longevity of your appliance; It’s a simple process that requires minimal time and effort but offers significant benefits․ Always remember to clean these parts thoroughly and dry them before placing them back in the ice maker․ This will help maintain the quality of your ice and the performance of your machine․ Cleaning the ice basket and scoop is a crucial step in the maintenance of your Euhomy Ice Maker․ It helps remove any residue, prevents the growth of mold and bacteria, and ensures that your ice tastes fresh and clean․ Regular cleaning also prevents ice from clumping together, making it easier to serve and enjoy․ By keeping these parts clean, you can maintain the efficiency and effectiveness of your ice maker․ Cleaning the ice basket and scoop is a simple yet important task that should be done regularly to keep your Euhomy Ice Maker in top condition․ It ensures that your ice remains clean and fresh, and it helps prolong the lifespan of your appliance․ Always use mild detergents and avoid abrasive materials to prevent damage․ After cleaning, rinse thoroughly and dry completely to prevent water spots and mineral buildup․ This routine maintenance step is essential for the optimal performance and hygiene of your ice maker․ Cleaning the ice basket and scoop is a straightforward process that requires attention to detail․ Start by removing the basket and scoop from the ice maker․ Wash them in warm, soapy water, using a soft sponge or brush to remove any residue or stains․ For tougher stains, soak them in a mixture of water and white vinegar for about 10 minutes before scrubbing․ Rinse thoroughly with clean water to remove all soap and vinegar residues․ Dry them completely with a clean towel to prevent water spots․ Reattach the basket and scoop securely after cleaning․ Regular cleaning of these parts ensures that your Euhomy Ice Maker continues to produce fresh, clean ice efficiently․ It also prevents the growth of mold and bacteria, which can affect the taste and quality of the ice․ By incorporating this into your maintenance routine, you can enjoy consistent ice production and extend the lifespan of your appliance․ Cleaning the ice basket and scoop is a simple task that requires minimal effort but offers significant benefits․ Always prioritize cleaning these parts to ensure your Euhomy Ice Maker functions optimally and delivers high-quality ice every time․ Cleaning the ice basket and scoop is an essential part of maintaining your Euhomy Ice Maker․ Regular cleaning ensures that your ice remains clean, fresh, and free from contaminants․ It also helps prevent the buildup of mold and bacteria, which can affect the taste and quality of the ice․ To clean, remove the basket and scoop, wash them with mild detergent and warm water, rinse thoroughly, and dry completely․ This process is quick and easy but crucial for the longevity and performance of your appliance․ Always handle these parts with care to avoid damage․ Cleaning the ice basket and scoop regularly will keep your Euhomy Ice Maker in great condition, ensuring it continues to produce fresh, clean ice for years to come․

Post-Cleaning Procedures

After cleaning, rinse and dry the ice maker thoroughly to prevent water spots and mineral buildup․ Ensure no residue or odors remain for optimal freshness․

Rinsing and Drying the Ice Maker After Cleaning

After completing the self-cleaning cycle, rinse the interior with clean water to remove any vinegar or lemon solution residue․ Use a soft, dry cloth to wipe down all surfaces, paying attention to areas around the ice basket and water tank․ This step ensures no moisture remains, which could lead to mineral buildup or mold growth․ For the ice basket and scoop, wash them separately with mild soap and warm water, then rinse thoroughly and dry with a clean towel․ Proper drying is essential to maintain hygiene and prevent bacterial growth․ Always ensure the ice maker is completely dry before resuming ice production․ This step guarantees fresh, clean ice every time․ If any vinegar taste remains, rinse the machine again with plain water to eliminate it․ Regular rinsing and drying will keep your Euhomy ice maker in optimal condition and ensure it continues to function efficiently․ By following these steps, you can maintain the quality and performance of your appliance, ensuring it remains a reliable source of fresh ice for years to come․ Regular maintenance not only prolongs the lifespan of the machine but also enhances your overall user experience․ Keep your Euhomy ice maker clean and dry to enjoy consistent results․ Never skip this crucial step, as it directly impacts the taste and quality of the ice produced․ A clean and dry machine also reduces the risk of odors and bacterial contamination, making it safer for use․ Always prioritize proper rinsing and drying after each cleaning cycle to maintain your ice maker’s performance and hygiene standards․ This simple yet important step is key to enjoying fresh, clean ice whenever you need it․ By incorporating this into your routine, you can ensure your Euhomy ice maker remains a trusted and reliable appliance in your home or office․ Remember, consistent maintenance leads to consistent results, so take the time to rinse and dry your ice maker thoroughly after every cleaning session․ This attention to detail will pay off in the long run, keeping your appliance in great working condition and delivering the quality you expect․ Don’t overlook this essential part of the cleaning process, as it plays a vital role in preserving the functionality and cleanliness of your Euhomy ice maker․ A clean, dry machine is a happy machine, and it will continue to serve you well with proper care․ Make rinsing and drying a priority to enjoy fresh, clean ice without any hassle or compromise on quality․ Your Euhomy ice maker deserves the best care, and this step ensures it receives it․ By following these guidelines, you can maintain your appliance’s efficiency and extend its lifespan, ensuring it remains a valuable addition to your kitchen or office․ Proper rinsing and drying are simple yet effective ways to keep your ice maker in top shape, so make sure to include them in your cleaning routine․ Your ice maker will thank you, and so will your taste buds․ This step is crucial for maintaining the quality and safety of the ice produced, so never skip it․ Always rinse and dry your Euhomy ice maker after cleaning to keep it performing at its best․ This simple practice will ensure your appliance remains clean, efficient, and free from any unwanted odors or residues․ Take pride in your ice maker’s maintenance, and it will continue to deliver exceptional results for years to come․ Rinsing and drying are more than just steps—they’re essential practices that safeguard your investment and ensure your ice maker remains a reliable and hygienic appliance․ Don’t underestimate their importance, as they directly impact the performance and longevity of your Euhomy ice maker․ By prioritizing these steps, you can enjoy fresh, clean ice with confidence, knowing your appliance is well-maintained and functioning optimally․ A clean and dry ice maker is not just about hygiene; it’s about preserving the quality of the ice it produces․ Take the time to rinse and dry thoroughly, and your Euhomy ice maker will reward you with consistent, high-quality performance․ This step is a small effort that yields significant benefits, ensuring your appliance remains in excellent condition and continues to meet your needs effectively․ Always remember, a well-maintained ice maker is a happy ice maker, and rinsing and drying are key to its happiness and longevity․ By incorporating these steps into your cleaning routine, you can enjoy the convenience and reliability of your Euhomy ice maker for a long time․ A clean and dry machine not only performs better but also ensures that every piece of ice it produces is fresh and free from contaminants․ This attention to detail is what sets a well-maintained appliance apart from one that’s neglected․ Take the extra moment to rinse and dry your ice maker, and you’ll be rewarded with years of trouble-free service and delicious, clean ice․ Proper rinsing and drying are the final touches to a thorough cleaning process, ensuring your Euhomy ice maker is ready to produce fresh ice whenever you need it․ Don’t skip this step—it’s the icing on the cake for maintaining your appliance’s performance and hygiene․ A clean, dry ice maker is a testament to proper care, and it will continue to serve you faithfully with consistent results․ Make rinsing and drying a non-negotiable part of your cleaning routine, and your Euhomy ice maker will thank you with years of reliable service and fresh, clean ice․ This simple yet crucial step is the cornerstone of effective maintenance, ensuring your appliance remains in peak condition and continues to deliver the quality you expect․ Always rinse and dry your ice maker after cleaning to keep it functioning at its best and producing fresh, clean ice every time․ This step is vital for maintaining the health and efficiency of your Euhomy ice maker, so never overlook its importance․ By rinsing and drying thoroughly, you can ensure your appliance remains clean, hygienic, and ready to produce ice at a moment’s notice․ Don’t compromise on this essential part of the cleaning process—it’s the key to preserving the quality and longevity of your ice maker․ A clean and dry machine is not just about aesthetics; it’s about functionality and safety․ Take the time to rinse and dry your Euhomy ice maker after every cleaning, and you’ll enjoy fresh, clean ice with peace of mind․ This simple practice is a small investment that pays big dividends in the form of a well-maintained, high-performing appliance․ Always prioritize rinsing and drying to keep your ice maker in top shape and ensure it continues to meet your needs effectively․ Your Euhomy ice maker deserves the best care, and this step ensures it receives it․ By following these guidelines, you can maintain your appliance’s efficiency and extend its lifespan, ensuring it remains a valuable addition to your kitchen or office․ Proper rinsing and drying are simple yet effective ways to keep your ice maker in top shape, so make sure to include them in your cleaning routine․ Your ice maker will thank you, and so will your taste buds․ This step is crucial for maintaining the quality and safety of the ice produced, so never skip it․ Always rinse and dry your Euhomy ice maker after cleaning to keep it performing at its best․ This simple practice will ensure your appliance remains clean, efficient, and free from any unwanted odors or residues․ Take pride in your ice maker’s maintenance, and it will continue to deliver exceptional results for years to come․ Rinsing and drying are more than just steps—they’re essential practices that safeguard your investment and ensure your ice maker remains a reliable and hygienic appliance․ Don’t underestimate their importance, as they directly impact the performance and longevity of your Euhomy ice maker․ By prioritizing these steps, you can enjoy fresh, clean ice with confidence, knowing your appliance is well-maintained and functioning optimally․ A clean and dry ice maker is not just about hygiene; it’s about preserving the quality of the ice it produces․ Take the time to rinse and dry thoroughly, and your Euhomy ice maker will reward you with consistent, high-quality performance․ This step is a small effort that yields significant benefits, ensuring your appliance remains in excellent condition and continues to meet your needs effectively․ Always remember, a well-maintained ice maker is a happy ice maker, and rinsing and drying are key to its happiness and longevity․ By incorporating these steps into your cleaning routine, you can

Ensuring No Residue or Odors Remain

After completing the cleaning process, ensure no residue or odors linger․ Rinse the ice maker thoroughly with clean water to eliminate any cleaning solution traces․ For lingering odors, mix equal parts water and white vinegar, pour it into the water reservoir, and run a cleaning cycle․ Repeat if necessary․ Dry the interior with a soft cloth, focusing on crevices where moisture might hide․ For stubborn stains or odors, soak the ice basket and scoop in a vinegar solution before rinsing․ Regularly cleaning the water tank and ice basket helps prevent residue buildup․ If odors persist, run additional cleaning cycles or use a mild detergent․ Always ensure the machine is dry to prevent bacterial growth․ This ensures fresh, odor-free ice production․ Regular maintenance prevents mineral buildup and keeps the machine odor-free․ For tough odors, repeat the cleaning process with vinegar․ Always dry the machine after cleaning to avoid moisture-related issues․ This attention to detail ensures your Euhomy ice maker remains clean and odor-free, producing fresh ice consistently․ Proper rinsing and drying prevent residue and odors, ensuring optimal performance and hygiene․ Regular cleaning and drying maintain the quality and safety of the ice produced․ By following these steps, you ensure your ice maker stays in excellent condition and continues to deliver fresh, clean ice․ Always prioritize thorough rinsing and drying to eliminate any lingering residue or odors, ensuring your Euhomy ice maker functions at its best․ This ensures a clean and fresh ice-making experience every time․ Remember, consistent maintenance is key to preventing residue and odors, ensuring your ice maker remains reliable and hygienic․ Regular cleaning and proper drying are essential for maintaining the quality and safety of the ice produced․ By taking these steps, you can enjoy fresh, clean ice without any unwanted tastes or odors․ Always ensure your ice maker is thoroughly rinsed and dried after cleaning to prevent any residue or odors from remaining․ This attention to detail will help maintain the performance and hygiene of your appliance, ensuring it continues to meet your needs effectively․ Regular maintenance not only prolongs the lifespan of the machine but also enhances your overall user experience․ Keep your ice maker clean and dry to enjoy consistent results․ Never skip this crucial step, as it directly impacts the taste and quality of the ice produced․ A clean and dry machine also reduces the risk of odors and bacterial contamination, making it safer for use․ Always prioritize proper rinsing and drying after each cleaning cycle to maintain your ice maker’s performance and hygiene standards․ This simple yet important step is key to enjoying fresh, clean ice whenever you need it․ By incorporating this into your routine, you can ensure your Euhomy ice maker remains a trusted and reliable appliance in your home or office․ Remember, consistent maintenance leads to consistent results, so take the time to rinse and dry your ice maker thoroughly after every cleaning session․ This attention to detail will pay off in the long run, keeping your appliance in great working condition and delivering the quality you expect; Don’t overlook this essential part of the cleaning process, as it plays a vital role in preserving the functionality and cleanliness of your Euhomy ice maker․ A clean, dry machine is a happy machine, and it will continue to serve you well with proper care․ Make rinsing and drying a priority to enjoy fresh, clean ice without any hassle or compromise on quality․ Your Euhomy ice maker deserves the best care, and this step ensures it receives it․ By following these guidelines, you can maintain your appliance’s efficiency and extend its lifespan, ensuring it remains a valuable addition to your kitchen or office․ Proper rinsing and drying are simple yet effective ways to keep your ice maker in top shape, so make sure to include them in your cleaning routine․ Your ice maker will thank you, and so will your taste buds․ This step is crucial for maintaining the quality and safety of the ice produced, so never skip it․ Always rinse and dry your Euhomy ice maker after cleaning to keep it performing at its best․ This simple practice will ensure your appliance remains clean, efficient, and free from any unwanted odors or residues․ Take pride in your ice maker’s maintenance, and it will continue to deliver exceptional results for years to come․ Rinsing and drying are more than just steps—they’re essential practices that safeguard your investment and ensure your ice maker remains a reliable and hygienic appliance․ Don’t underestimate their importance, as they directly impact the performance and longevity of your Euhomy ice maker․ By prioritizing these steps, you can enjoy fresh, clean ice with confidence, knowing your appliance is well-maintained and functioning optimally․ A clean and dry ice maker is not just about hygiene; it’s about preserving the quality of the ice it produces․ Take the time to rinse and dry thoroughly, and your Euhomy ice maker will reward you with consistent, high-quality performance․ This step is a small effort that yields significant benefits, ensuring your appliance remains in excellent condition and continues to meet your needs effectively․ Always remember, a well-maintained ice maker is a happy ice maker, and rinsing and drying are key to its happiness and longevity․ By incorporating these steps into your cleaning routine, you can enjoy the convenience and reliability of your Euhomy ice maker for a long time․ A clean and dry machine not only performs better but also ensures that every piece of ice it produces is fresh and free from contaminants․ This attention to detail is what sets a well-maintained appliance apart from one that’s neglected․ Take the extra moment to rinse and dry your ice maker, and you’ll be rewarded with years of trouble-free service and delicious, clean ice․ Proper rinsing and drying are the final touches to a thorough cleaning process, ensuring your Euhomy ice maker is ready to produce fresh ice whenever you need it․ Don’t skip this step—it’s the icing on the cake for maintaining your appliance’s performance and hygiene․ A clean, dry ice maker is a testament to proper care, and it will continue to serve you faithfully with consistent results․ Make rinsing and drying a non-negotiable part of your cleaning routine, and your Euhomy ice maker will thank you with years of reliable service and fresh, clean ice․ This simple yet crucial step is the cornerstone of effective maintenance, ensuring your appliance remains in peak condition and continues to deliver the quality you expect․ Always rinse and dry your ice maker after cleaning to keep it functioning at its best and producing fresh, clean ice every time․ This step is vital for maintaining the health and efficiency of your Euhomy ice maker, so never overlook its importance․ By rinsing and drying thoroughly, you can ensure your appliance remains clean, hygienic, and ready to produce ice at a moment’s notice․ Don’t compromise on this essential part of the cleaning process—it’s the key to preserving the quality and longevity of your ice maker․ A clean and dry machine is not just about aesthetics; it’s about functionality and safety․ Take the time to rinse and dry your Euhomy ice maker after every cleaning, and you’ll enjoy fresh, clean ice with peace of mind․ This simple practice is a small investment that pays big dividends in the form of a well-maintained, high-performing appliance․ Always prioritize rinsing and drying to keep your ice maker in top shape and ensure it continues to meet your needs effectively․ Your Euhomy ice maker deserves the best care, and this step ensures it receives it․ By following these guidelines, you can maintain your appliance’s efficiency and extend its lifespan, ensuring it remains a valuable addition to your kitchen or office․ Proper rinsing and drying are simple yet effective ways to keep your ice maker in top

char-broil big easy instructions manual

The Char-Broil Big Easy is a versatile, 3-in-1 cooker combining smoking, roasting, and grilling. Its infrared technology ensures even heat distribution for perfect results without oil or flare-ups.

1.1 Overview of the Char-Broil Big Easy Series

The Char-Broil Big Easy Series is a line of versatile, 3-in-1 cookers designed for smoking, roasting, and grilling. Known for its innovative infrared cooking technology, the series offers even heat distribution and minimizes flare-ups. The Big Easy models, such as the TRU-Infrared and Oil-Less Fryer, are compact yet powerful, making them ideal for backyard cooking. These cookers are user-friendly, catering to both beginners and experienced chefs. With a focus on convenience and flavor, the Big Easy Series delivers consistent results, whether cooking large meats or delicate dishes, making it a popular choice for outdoor enthusiasts.

1.2 Key Features and Benefits

The Char-Broil Big Easy boasts a robust design with a high-quality steel construction and a durable, weather-resistant finish. Its standout feature is the TRU-Infrared Cooking Technology, which ensures even heat distribution and prevents flare-ups. The cooker includes a food thermometer for precise temperature monitoring. It also offers a large cooking capacity, accommodating whole turkeys or multiple racks of ribs. The Big Easy is easy to assemble and maintain, with dishwasher-safe parts. Its versatility allows for smoking, roasting, and grilling, making it a multifunctional addition to any outdoor kitchen. The included manual provides detailed instructions for optimal use, ensuring delicious results every time.

Assembly and Initial Setup

Begin by carefully unpacking all components and verifying the inventory. Follow the step-by-step instructions in the manual to assemble the cooker securely and efficiently.

2.1 Unpacking and Inventory of Parts

Start by carefully unpacking the Char-Broil Big Easy from its box. Ensure all components, including the grill, burner, regulator, and accessories, are accounted for. Refer to the manual’s parts list to verify completeness. Handle each part with care to prevent damage. Lay out the components on a flat, stable surface to organize them before assembly. This step ensures a smooth setup process and helps identify any missing or damaged items early on.

2.2 Step-by-Step Assembly Instructions

Begin by attaching the legs to the main body of the Char-Broil Big Easy using the provided bolts. Next, connect the burner assembly to the base, ensuring it is securely fastened. Attach the regulator to the propane tank and connect it to the burner. Install the cooking grates and ensure all parts are aligned properly. Refer to the manual for specific torque settings and safety checks. Once assembled, test the ignition system and verify that all components function correctly before use. Always follow the instructions carefully to ensure proper and safe assembly.

Safety Precautions

Always use the Char-Broil Big Easy with LP gas and the provided regulator/valve assembly. Ensure proper ventilation and keep flammable materials away from the cooking area.

Never leave the grill unattended while in operation. Keep children and pets at a safe distance. Always turn off the burner when not in use.

3.1 General Safety Guidelines

Always read the Char-Broil Big Easy manual thoroughly before use. Ensure proper ventilation when operating the grill indoors or in enclosed spaces. Keep flammable materials, such as curtains or leaves, away from the unit. Never leave the grill unattended while cooking. Maintain a safe distance from children and pets to avoid accidents. Use only LP (propane) gas with the provided regulator/valve assembly. Never operate the grill near open flames or sparks. Ensure the cooking area is clear of obstructions. Follow all safety warnings and guidelines provided in the manual for safe operation.

3.2 Installation Safety Precautions

Ensure the Char-Broil Big Easy is installed on a stable, heat-resistant surface. Keep the grill at least 10 feet away from buildings, trees, and other combustible materials. Use only the regulator and hose provided with the unit to connect to your LP gas supply. Avoid over-tightening connections to prevent damage. Never install the grill in enclosed or poorly ventilated areas. Ensure all gas connections are leak-tested before first use. Follow local building codes and regulations for outdoor cooking installations. Always refer to the manual for specific installation instructions and safety guidelines.

Cooking Techniques

The Char-Broil Big Easy excels in smoking, roasting, and grilling, utilizing infrared technology for even heat and no flare-ups. Perfect for cooking large meats and versatile dishes effortlessly.

4.1 Smoking and Roasting

The Char-Broil Big Easy excels at smoking and roasting, delivering tender, flavorful results. Its infrared technology ensures even heat distribution, preventing flare-ups and promoting consistent cooking. Perfect for large cuts like brisket or poultry, the cooker maintains precise temperatures for ideal doneness. Use the included food thermometer to monitor progress, ensuring meat reaches safe internal temperatures. The Big Easy’s design allows for slow, low-temperature smoking or high-heat roasting, making it versatile for various recipes. With minimal effort, achieve professional-grade smoked and roasted dishes effortlessly at home.

4.2 Grilling and Infrared Cooking Technology

The Char-Broil Big Easy leverages advanced infrared cooking technology for superior grilling results. This system ensures even heat distribution, eliminating hotspots and flare-ups, while cooking food faster than traditional methods. The infrared design allows for consistent temperatures, locking in juices and flavors. Perfect for searing steaks, burgers, or vegetables, the Big Easy delivers crisp, caramelized finishes. Its versatility enables seamless transitions between grilling, smoking, and roasting, making it a comprehensive solution for outdoor cooking enthusiasts seeking professional-grade results with minimal effort.

Temperature Control and Monitoring

The Big Easy monitors internal food temperatures automatically, shutting off when target temperatures are reached. Upgrade to a digital thermometer for enhanced precision and control during cooking.

5.1 Using the Food Thermometer

The Char-Broil Big Easy includes a food thermometer to ensure precise cooking. Insert the probe into the thickest part of the meat, avoiding bone or fat. Monitor the temperature closely to achieve perfect doneness. The thermometer helps prevent overcooking and ensures food safety. For enhanced accuracy, consider upgrading to a digital thermometer like the Char-Broil Smart model, which offers real-time temperature tracking and customizable alerts. Always follow the recommended internal temperatures for your specific type of meat to guarantee the best results.

5.2 Understanding Proper Cooking Temperatures

Proper cooking temperatures are crucial for food safety and quality. Use the Char-Broil Big Easy’s thermometer to monitor internal meat temperatures. Poultry should reach 165°F, beef 145°F, and pork 145°F. Ensure the thickest part of the meat is measured. For even cooking, avoid overcrowding the grill. Let meat rest after cooking to retain juices. Always refer to the Big Easy’s manual for specific temperature guidelines, ensuring delicious and safe meals every time with precise control over your cooking process.

Maintenance and Cleaning

Regularly clean the grill grates and burners to prevent food residue buildup. After use, wipe down surfaces and check for wear. Store covered to protect from elements.

6.1 Regular Maintenance Tips

Regular maintenance ensures optimal performance. After each use, clean grill grates with a wire brush and wipe down surfaces. Check burners for blockages and ensure proper gas flow. Lubricate moving parts annually to prevent rust. Inspect hoses and connections for leaks or damage. Store the grill covered to protect from weather. Replace worn-out parts promptly to maintain efficiency. Cleaning prevents grease buildup and ensures safety. Follow manufacturer guidelines for care to extend lifespan and maintain warranty.

6.2 Cleaning the Grill and Accessories

Cleaning the Char-Broil Big Easy is essential for maintaining performance. Use a wire brush to scrub grates after preheating to remove food residue. Dampen a cloth with soapy water to wipe down exterior and interior surfaces, avoiding abrasive cleaners. For tough stains, mix baking soda and water into a paste and apply before rinsing. Clean drip pans and grease trays regularly to prevent buildup. Accessories like thermometers and trays should be washed with mild detergent. Dry all parts thoroughly to prevent rust and ensure longevity.

Troubleshooting Common Issues

Common issues include gas leaks, ignition failures, and uneven heating. Refer to the manual for diagnostic guides and solutions to restore optimal performance and safety.

7.1 Resolving Gas and Ignition Problems

Gas and ignition issues often stem from improper connections or regulator malfunctions. Ensure the propane tank is full and the valve is open. Check for blockages in the burner orifice and clean them if necessary. If the igniter fails, try lighting the burner manually with a match. Verify the regulator is properly attached and not damaged. Always use LP gas as specified in the manual. If issues persist, consult a professional or contact Char-Broil support for assistance.

7.2 Addressing Temperature Fluctuations

Temperature fluctuations can occur due to improper burner alignment or blocked vents. Ensure the burner is clean and free of debris. Check for proper ventilation and verify that the lid is sealed tightly. If temperatures drop, increase the heat setting gradually. Use the included food thermometer to monitor internal temperatures accurately. Avoid frequent lid openings to maintain consistent heat. If issues persist, refer to the manual for troubleshooting steps or contact Char-Broil support for further assistance. Regular maintenance can help prevent such fluctuations and ensure optimal performance.

Accessories and Upgrades

The Char-Broil Big Easy offers various accessories, including grill trays and covers, to enhance your cooking experience. Upgrading to smart technology provides advanced temperature control and monitoring.

8.1 Recommended Accessories for the Big Easy

Enhance your Char-Broil Big Easy experience with recommended accessories like grill trays, covers, and a food thermometer. These tools ensure optimal performance and convenience. The food thermometer guarantees precise temperature control, while grill trays simplify cooking and cleanup. A cover protects your grill from weather damage, extending its lifespan. For advanced functionality, consider upgrading to a digital thermometer or smart technology for real-time monitoring. These accessories are designed to maximize your cooking efficiency and enjoyment, making the Big Easy even more versatile and user-friendly for all your culinary needs.

8.2 Upgrading to Smart Cooking Technology

Upgrading the Char-Broil Big Easy with smart cooking technology offers enhanced control and convenience. The Char-Broil Smart Thermometer allows real-time monitoring of internal food temperatures via a smartphone app, ensuring perfectly cooked meals. This upgrade integrates seamlessly with the existing system, providing remote Monitoring and customizable alerts. It also enables precise temperature adjustments, reducing the risk of overcooking. The smart technology enhances the overall cooking experience, offering flexibility and consistency. This innovative feature is a must for tech-savvy grillers seeking advanced cooking solutions without compromising on performance. It’s a modern twist for traditional grilling enthusiasts.

nanoblock instructions

Nanoblock instructions are essential for creating intricate models with precision and detail. They provide step-by-step guidance, ensuring a smooth and enjoyable building experience for enthusiasts of all skill levels.

Why Nanoblock Instructions Are Essential

Nanoblock instructions are crucial for achieving precise and detailed results. They provide a clear, step-by-step guide, ensuring that even the tiniest bricks are placed correctly. Without these instructions, builders may struggle with misplacements or incomplete models. The instructions act as a roadmap, breaking down complex designs into manageable steps. They cater to all skill levels, making the building process accessible and enjoyable. By following the instructions, builders can avoid frustration and ensure a successful outcome. Whether you’re a novice or an experienced enthusiast, Nanoblock instructions are indispensable for creating stunning and intricate models with ease and confidence.

Understanding the Importance of Step-by-Step Guidance

Step-by-step guidance in Nanoblock instructions is vital for ensuring accuracy and reducing errors. Each phase is meticulously detailed, allowing builders to follow a logical progression. This structured approach minimizes confusion, especially for complex models. The instructions often include visual cues and color-coded components, enhancing clarity. By breaking down the assembly process into manageable parts, builders can focus on one step at a time, maintaining organization and precision. This methodical guidance fosters confidence and skill development, making it easier to tackle intricate designs. Ultimately, step-by-step instructions empower builders to achieve professional-quality results, transforming individual bricks into breathtaking miniature masterpieces with patience and dedication.

Types of Nanoblock Instructions

Nanoblock instructions come in traditional paper booklets and digital formats, offering clear step-by-step guides with enhanced visual cues for a smooth building experience.

Traditional Paper Booklets

Traditional paper booklets are the most common form of Nanoblock instructions, typically included within each set. These booklets provide a straightforward, step-by-step guide to assembling intricate models. They feature clear diagrams, often with numbered sequences, to help builders navigate the process effortlessly. Color-coded representations of bricks are frequently used to enhance clarity, making it easier to identify the correct pieces for each step. The tactile nature of paper booklets allows for easy referencing while building, and their visual cues cater to builders of all skill levels. This format remains popular for its simplicity and effectiveness in guiding users through complex builds, ensuring a satisfying and precise construction experience.

Digital and Interactive Formats

Digital and interactive formats of Nanoblock instructions offer a modern and engaging way to build intricate models. Available on websites and apps, these formats often include zoomable diagrams, 3D views, and animated step-by-step guides. They allow builders to rotate models and access additional tips, enhancing the learning experience. Some platforms provide downloadable PDFs, combining the convenience of digital access with the familiarity of traditional booklets. Interactive tools cater to visual learners, making complex builds more accessible. Websites like BlockGuide and dedicated YouTube channels supplement these resources, offering tutorials and community insights. This digital evolution ensures builders can choose the format that best suits their preferences, optimizing their Nanoblock experience for efficiency and enjoyment.

Reading Nanoblock Instructions Effectively

Reading Nanoblock instructions requires patience and attention to detail. Use color-coding, good lighting, and organize your workspace to ensure accuracy and a seamless building experience.

Top Tips for Maximizing Understanding

  • Take your time to carefully review each step in the instructions to avoid misinterpretations.
  • Utilize the color-coding system to quickly identify the correct bricks for each step.
  • Use a magnifying glass or good lighting to see small details clearly.
  • Organize your workspace with a building mat or tray to keep bricks sorted.
  • Break down complex builds into smaller, manageable sections.
  • Refer to online communities or forums for additional tips and solutions.

By following these strategies, you can navigate Nanoblock instructions with confidence and enjoy a smooth, rewarding building experience.

Utilizing Color-Coding and Visual Cues

Nanoblock instructions often employ color-coding and visual cues to enhance clarity and simplify the building process. Color-coded bricks help users quickly identify the correct pieces for each step, reducing confusion and saving time. Visual cues, such as arrows and symbols, provide clear guidance on brick placement, orientation, and alignment. These features are particularly helpful for intricate models, where precision is key. By leveraging these tools, builders can follow instructions more efficiently, ensuring accuracy and reducing the likelihood of errors. This visual approach makes the instructions accessible to builders of all skill levels, fostering a more enjoyable and rewarding experience.

Organizing Your Workspace for Success

A well-organized workspace is crucial for a smooth Nanoblock building experience. Start by clearing a flat, stable surface and using a building mat or tray to keep bricks tidy. Sort bricks by color or shape to quickly locate specific pieces. This saves time and reduces frustration. Consider using small containers or compartments to separate bricks, especially for large sets. A magnifying glass or good lighting can enhance visibility, while tweezers help handle tiny pieces. Keeping your workspace organized ensures you can focus on the instructions without distractions. A clutter-free environment promotes efficiency and enjoyment, making the building process more rewarding and stress-free.

Troubleshooting Common Issues

Common issues when building with Nanoblock instructions often involve misaligned bricks or unclear steps. Patience and persistence are key; re-examining instructions or using magnifying tools can help resolve challenges effectively.

Strategies for Overcoming Challenges

When facing difficulties with Nanoblock instructions, several strategies can help. First, carefully re-examine the instructions to ensure accuracy. Using a magnifying glass or good lighting can enhance visibility, especially for small details. Breaking complex builds into smaller sections can make the process more manageable. Consulting online forums or dedicated Nanoblock communities often provides solutions from experienced builders. Taking a break and revisiting the instructions with a fresh perspective can also clarify confusing steps. Additionally, organizing bricks and using a building mat can reduce frustration. Patience and persistence are key, as these strategies help overcome challenges and achieve a successful build.

Using Tools for Better Visibility

Enhancing visibility is crucial when working with Nanoblock instructions, especially due to the tiny size of the bricks. A magnifying glass or good lighting can significantly improve detail recognition, making it easier to follow instructions. Tweezers are another valuable tool, helping to handle small pieces with precision. For intricate designs, consider using a loupe or even a microscope for extreme detail. Additionally, organizing your workspace with a building mat or tray keeps bricks tidy and prevents loss. These tools not only aid in accuracy but also reduce frustration, ensuring a smoother and more enjoyable building experience. Investing in the right tools can elevate your Nanoblock crafting skills.

Breaking Down Complex Builds

Complex Nanoblock builds can be overwhelming, but breaking them into smaller sections simplifies the process. Start by identifying key components of the model and tackling one at a time. This approach helps maintain focus and reduces confusion. Use the instructions to guide each phase, ensuring accuracy and completion. Prioritize foundational pieces first, as they provide stability for subsequent layers. Taking breaks between sections allows for a fresh perspective, preventing errors. Managing intricate details incrementally fosters patience and mastery, ensuring a polished final product. This methodical strategy turns daunting projects into achievable tasks, making even the most elaborate Nanoblock creations manageable and rewarding.

Additional Resources for Nanoblock Enthusiasts

Explore online communities, dedicated websites, and YouTube channels for Nanoblock instructions, offering detailed guides, tips, and support to enhance your building experience and expand your creativity.

Online Communities and Forums

Online communities and forums are invaluable resources for Nanoblock enthusiasts, offering a space to share ideas, ask questions, and learn from fellow builders. Websites like blockguide.ch and Manuall.co.uk provide extensive libraries of instructions and user guides. Additionally, platforms like Reddit’s r/Nanoblocks and the Nanoblocks Wiki foster collaboration and knowledge-sharing among enthusiasts. These communities often feature detailed troubleshooting guides, tips, and tricks, as well as user-created content. By engaging with these forums, builders can gain insights, solve challenges, and enhance their Nanoblock experience. Whether you’re a beginner or an expert, these resources offer a supportive environment to grow your skills and connect with like-minded hobbyists.

Dedicated Websites and YouTube Channels

Dedicated websites like Block Guide and NanoBlock Instruction offer comprehensive collections of Nanoblock instructions, catering to both casual builders and avid enthusiasts. These platforms provide detailed step-by-step guides, high-quality images, and downloadable PDFs for offline use. Additionally, YouTube channels such as NanoBlock Instructions Channel and Christopher Tan Designs offer video tutorials, making complex builds more accessible. These visual guides are particularly helpful for understanding intricate steps, offering a dynamic and immersive learning experience. By leveraging these resources, builders can enhance their skills and confidently tackle even the most challenging Nanoblock projects.

Nanoblock instructions are indispensable for creating intricate and detailed models, offering a rewarding experience for builders of all skill levels. They provide clear, step-by-step guidance, ensuring precision and enjoyment. Whether through traditional paper booklets or digital formats, these instructions cater to diverse preferences, enhancing the building process. The inclusion of visual cues, color-coding, and interactive tools further aids understanding. Online communities, dedicated websites, and YouTube channels offer additional support, fostering a sense of connection among enthusiasts. By following Nanoblock instructions, builders can unlock their creativity, achieve a sense of accomplishment, and bring their miniature masterpieces to life with ease and confidence.

instruct the ignorant

Instructing the ignorant requires empathy, patience, and a clear understanding of their knowledge gaps․ Education bridges ignorance, fostering awareness and critical thinking․ Empowering others through knowledge enriches society․

1․1 Understanding the Concept of Ignorance

Ignorance refers to a lack of knowledge, information, or understanding about a particular topic or subject․ It is a natural state that arises from limited exposure, education, or cultural barriers․ Ignorance can manifest in various forms, such as misinformation, unawareness of facts, or a misunderstanding of concepts․ Recognizing ignorance is the first step toward addressing it, as it allows individuals to seek knowledge and clarification․ Overcoming ignorance requires empathy, education, and a willingness to learn, ensuring that individuals can grow intellectually and socially․

1․2 The Importance of Education in Addressing Ignorance

Education is a powerful tool for combating ignorance, as it provides individuals with the knowledge and skills needed to understand the world․ Through structured learning, education dismantles misinformation and fosters critical thinking․ It equips people with the ability to question assumptions and seek truth, thereby reducing the prevalence of ignorance․ By promoting literacy, numeracy, and cultural awareness, education empowers individuals to make informed decisions, contributing to personal and societal progress․ Thus, education serves as the cornerstone in the fight against ignorance, enabling individuals to navigate complex realities effectively․

The Psychology of Ignorance

Ignorance stems from cognitive biases and limited knowledge, often reinforced by overconfidence․ Psychological factors like the Dunning-Kruger effect highlight how unaware individuals may overestimate their understanding, hindering growth․

2․1 Cognitive Biases and Their Role in Perpetuating Ignorance

Cognitive biases, such as confirmation bias and the Dunning-Kruger effect, significantly contribute to ignorance․ These biases distort perception, leading individuals to overlook evidence and cling to misconceptions․ Confirmation bias, for instance, makes people favor information that aligns with their beliefs, while the Dunning-Kruger effect causes overconfidence in inaccurate knowledge․ These mental shortcuts prevent the acceptance of new information, reinforcing ignorance․ Addressing these biases requires awareness and critical thinking, enabling individuals to question their assumptions and seek truth․

2․2 The Dunning-Kruger Effect: When Ignorance Meets Confidence

The Dunning-Kruger effect occurs when individuals with limited knowledge or skills overestimate their competence․ This cognitive bias creates a dangerous mix of ignorance and confidence, leading people to make poor decisions despite their lack of understanding․ It often stems from metacognitive deficits, where individuals cannot objectively assess their own abilities․ This phenomenon highlights the challenge of addressing ignorance, as those affected are unaware of their knowledge gaps․ Recognizing this effect is crucial for fostering humility and a willingness to learn, which are essential for overcoming ignorance and fostering intellectual growth․

Effective Strategies for Instructing the Ignorant

Effective instruction requires patience, empathy, and clear communication․ Using analogies and relatable examples simplifies complex concepts, fostering understanding and engagement in learners․

3․1 Patience and Empathy in the Learning Process

Patience and empathy are crucial when instructing the ignorant․ Recognizing knowledge gaps without judgment fosters a safe learning environment․ Empathy builds trust, encouraging learners to ask questions and seek clarification․ Patience allows educators to break down complex ideas into digestible parts, ensuring understanding․ By combining these qualities, educators create a supportive atmosphere where learners feel comfortable admitting ignorance and actively participate in their own education․ This approach not only enhances learning but also empowers individuals to embrace lifelong knowledge acquisition․

3․2 Using Analogies and Relatable Examples to Simplify Complex Concepts

Using analogies and relatable examples is a powerful way to simplify complex concepts for the ignorant․ By bridging knowledge gaps with familiar scenarios, educators make abstract ideas more accessible․ For instance, explaining technical processes through everyday experiences, like comparing coding to cooking, helps learners visualize and understand․ Relatable examples reduce confusion and enhance engagement, making the learning process more effective․ This approach ensures that even intricate topics are presented in a digestible manner, fostering comprehension and retention․ It’s a key strategy for making education inclusive and impactful․

3․3 Encouraging Critical Thinking and Questioning

Encouraging critical thinking and questioning is essential when instructing the ignorant․ It fosters curiosity, analysis, and informed decision-making․ By promoting a culture where questions are valued, educators help learners move beyond mere memorization to deeper understanding․ This approach breaks down barriers of ignorance by empowering individuals to seek knowledge independently․ Open-ended discussions and real-world applications further enhance the ability to think critically, ensuring that learning is both meaningful and lasting․ Cultivating a safe environment for inquiry is key to unlocking intellectual growth and awareness․

The Role of Technology in Educating the Ignorant

Technology plays a pivotal role in educating the ignorant by providing accessible resources and tools․ It bridges knowledge gaps, enabling lifelong learning and fostering awareness globally․

4․1 Search Engines and Their Impact on Access to Information

Search engines have revolutionized access to information, enabling users to retrieve targeted results quickly․ They empower individuals to address knowledge gaps, fostering education and awareness․ By mastering search query syntax, users can refine results, enhancing learning efficiency․ However, challenges like information overload and misinformation persist, requiring critical thinking․ Search engines democratize knowledge, making it accessible globally and promoting lifelong learning․ They serve as essential tools in educating the ignorant, bridging gaps and empowering individuals to seek understanding․ Their impact is profound, reshaping how we acquire and utilize information in the digital age․

4․2 The Benefits and Limitations of Online Learning Platforms

Online learning platforms offer unprecedented access to education, breaking barriers of time and location․ They provide diverse courses, catering to various learning needs and styles․ However, limitations exist, such as the need for self-discipline and potential disparities in content quality․ Despite these challenges, platforms like Coursera and Khan Academy democratize education, enabling individuals to address ignorance proactively․ They empower learners to acquire new skills and knowledge, fostering personal growth and societal progress․ Balancing convenience with critical engagement is key to maximizing their educational potential and impact․

Real-World Examples of Successful Education

Historical literacy movements and modern digital education initiatives exemplify how targeted instruction reduces ignorance․ Their success demonstrates the transformative power of education in empowering individuals globally․

5․1 Historical Movements for Literacy and Education

Historical movements, such as the global push for universal literacy in the 19th and 20th centuries, illustrate the societal impact of educating the ignorant․ These movements, often led by governments and non-profits, emphasized access to education for all, regardless of class or gender․ For example, the establishment of public schools and compulsory education laws transformed societies by reducing ignorance and fostering economic growth․ These efforts laid the foundation for modern education systems, proving that targeted instruction can eradicate widespread ignorance and empower future generations․

5․2 Modern Initiatives for Global Education and Awareness

Modern initiatives like the United Nations’ Sustainable Development Goals and global campaigns for digital literacy are transforming education․ Organizations such as UNESCO and the Global Partnership for Education focus on eradicating ignorance by providing access to quality education worldwide․ Online platforms and mobile learning apps have also emerged, offering free or low-cost educational resources․ These efforts aim to bridge knowledge gaps, promote inclusivity, and empower individuals, ensuring that no one remains in ignorance due to lack of opportunities․ Technology plays a crucial role in these contemporary educational movements․

Addressing Misinformation and Disinformation

Addressing misinformation requires media literacy, fact-checking, and critical thinking․ Educating individuals to verify sources empowers them to combat ignorance and make informed decisions effectively online․

6․1 The Role of Media Literacy in Combating Ignorance

Media literacy equips individuals with the skills to critically analyze information, identify biases, and recognize misinformation․ By understanding how media operates, people can discern credible sources, enhancing their ability to make informed decisions․ This competence fosters a more informed society, reducing the spread of ignorance and promoting a culture of discernment and critical thinking in the digital age․ Educating individuals to navigate media effectively is essential for combating misinformation and fostering an informed populace․

6․2 Fact-Checking and Verification in the Digital Age

Fact-checking and verification are crucial tools for combating misinformation and ignorance․ In the digital age, where information spreads rapidly, verifying sources ensures accuracy and credibility․ Platforms and initiatives dedicated to fact-checking help identify false claims, fostering transparency and trust․ By encouraging individuals to question and verify information, society can reduce the spread of misinformation․ This practice promotes critical thinking and empowers people to make informed decisions, countering ignorance effectively in an increasingly complex information landscape․

The Importance of Lifelong Learning

Lifelong learning fosters personal growth and adaptability, enabling individuals to stay informed and overcome ignorance․ Embracing curiosity and continuous education empowers people to thrive in an evolving world․

7․1 Continuous Education as a Tool for Personal Growth

Continuous education is a powerful tool for personal growth, enabling individuals to stay informed and adaptable in a rapidly changing world․ It fosters empathy, critical thinking, and curiosity, helping people overcome ignorance and broaden their perspectives․ By embracing lifelong learning, individuals can acquire new skills, challenge assumptions, and develop a deeper understanding of the world․ This process not only enhances intellectual abilities but also builds confidence and resilience, encouraging individuals to confront and admit gaps in their knowledge․ Ultimately, continuous education empowers people to thrive and contribute meaningfully to society․

7․2 Overcoming the Fear of Asking Questions and Admitting Ignorance

Overcoming the fear of asking questions and admitting ignorance is crucial for personal growth and learning․ Many individuals hesitate to seek clarification due to fear of judgment or embarrassment․ However, acknowledging gaps in knowledge is the first step toward understanding․ Creating a supportive environment where questions are encouraged fosters curiosity and reduces stigma․ Admitting ignorance demonstrates humility and a willingness to learn, which are essential for intellectual development․ By embracing this mindset, individuals can break free from the constraints of unawareness and actively pursue knowledge with confidence and openness․