mo 6716s adjustment manual

JUKI MO-6716S Overlock Machine: A Comprehensive Adjustment Guide

This guide details adjustments for the JUKI MO-6716S‚ a super-high-speed overlock machine‚ covering specifications like stitch length (1.5-4mm) and differential feed.

The JUKI MO-6716S is a highly capable‚ super-high-speed overlock machine renowned for its precision and reliability in industrial sewing applications. This model‚ detailed in JUKI’s engineering manuals (like 29355807 No.E350-01)‚ excels in creating professional-grade seams on a wide variety of fabrics. It’s designed for both overlock and safety stitch operations‚ adhering to JIS E13 D12 standards (and USA standard 516).

Understanding its adjustable features – stitch length (1.5 to 4 mm)‚ differential feed (gathering 1:2‚ stretching 1:0.7) – is crucial for achieving optimal results. Resources like All-Guides.com provide access to instruction and engineer’s manuals‚ aiding in comprehensive machine mastery and effective troubleshooting.

Machine Specifications & Key Features

The JUKI MO-6716S boasts impressive specifications for high-volume production. It features a maximum sewing speed suited for industrial environments and a stitch length adjustable from 1;5 to 4 mm. Differential feed capabilities range from gathering at 1:2 (max 1:4) to stretching at 1:0.7 (max 1:0.6)‚ offering versatile seam finishing options.

The machine’s needle gauge is 24.5mm‚ and it’s available in direct-drive models (MO-6700S-DD‚ MO-6716S-DD) and semi-dry-head configurations. Key features include 2-needle overlock and safety stitching options‚ making it adaptable for diverse fabric types and seam requirements. Refer to JUKI documentation for detailed technical data.

Understanding the Machine Components

This section explores the MO-6716S’s core elements: the needle and looper system‚ feed dog mechanism‚ and upper/lower tension units—critical for adjustments.

Needle and Looper System

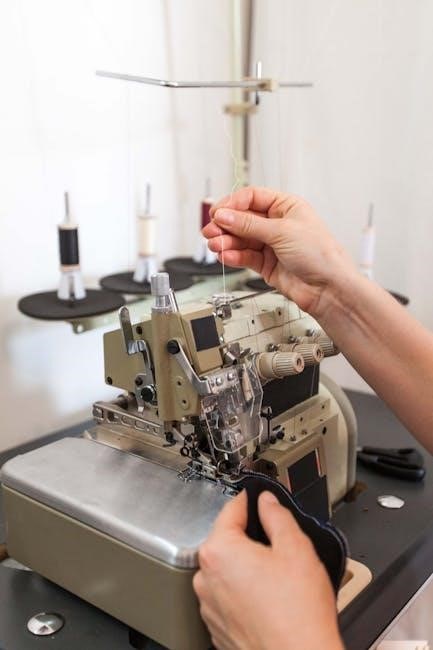
The JUKI MO-6716S utilizes a sophisticated needle and looper system‚ fundamental to its overlock stitching. Proper needle installation and alignment are paramount for consistent performance‚ preventing skipped stitches and thread breakage.

The looper‚ working in harmony with the needles‚ forms the interlocking stitches. Precise looper threading and tension adjustment are crucial; imbalances can lead to uneven stitch formation or fabric puckering. Regularly inspect needles for damage – blunt or bent needles significantly impact stitch quality.

Understanding the interplay between needle size‚ thread type‚ and fabric weight is essential for optimal results. The engineer’s manual provides detailed diagrams and specifications for correct needle and looper positioning‚ ensuring smooth operation and longevity of the machine.

Feed Dog Mechanism

The JUKI MO-6716S feed dog mechanism is critical for consistent fabric advancement during the overlocking process. This system ensures even stitch length and prevents fabric distortion. The machine boasts a differential feed capability‚ allowing for gathering (up to 1:4) or stretching (up to 1:0.7) of fabrics.

Adjusting the differential feed ratio is vital when working with varying fabric types and weights. Incorrect settings can cause puckering or stretching. Regular cleaning of the feed dogs is essential to remove lint and debris‚ maintaining a smooth and reliable feed action.

The engineer’s manual details the precise adjustments for the feed dog mechanism‚ including timing and pressure settings‚ ensuring optimal performance and preventing fabric handling issues.

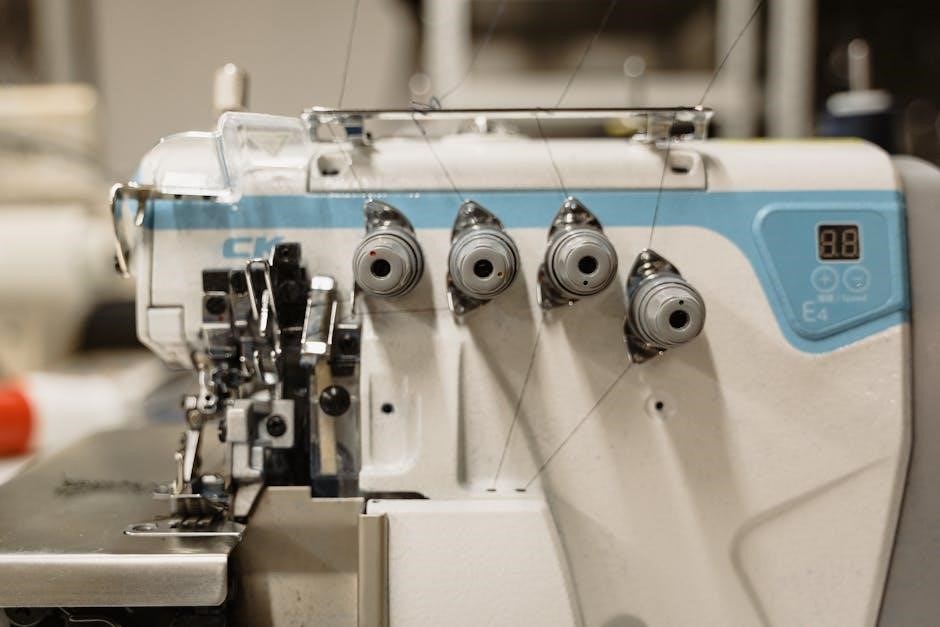
Tension Units – Upper and Lower

Proper tension adjustment is paramount for achieving balanced and professional-looking overlock stitches on the JUKI MO-6716S. Both upper (needle/thread) and lower (looper) tension units must be correctly calibrated to prevent looping‚ puckering‚ or thread breakage.

The engineer’s manual provides detailed instructions on adjusting these units‚ emphasizing the importance of testing with the specific fabric and thread combination being used. Fine-tuning is often required‚ as different materials demand varying tension levels.

Incorrect tension can lead to uneven stitch formation and compromised seam strength. Regularly check and readjust tension‚ especially when changing thread types or fabric weights‚ to maintain optimal sewing quality.

Essential Adjustments for Optimal Performance

Achieving peak performance with the MO-6716S requires precise adjustments to needle alignment‚ looper tension‚ differential feed‚ and stitch length settings.

Needle Installation and Alignment

Proper needle installation is crucial for consistent stitching on the JUKI MO-6716S. Ensure the needle is inserted correctly‚ with the flat side facing the appropriate direction as detailed in the engineer’s manual. Alignment is paramount; misaligned needles cause skipped stitches or damage fabric.

Verify the needle’s position relative to the looper. A slight misalignment can disrupt the loop formation process. Use a needle alignment plate or gauge (if available) to confirm correct positioning. Regularly inspect needles for bends‚ burrs‚ or damage‚ replacing them as needed. Always use the recommended needle type and size for the fabric being sewn. Incorrect needles contribute to tension issues and poor stitch quality. Refer to the manual for specific guidance.

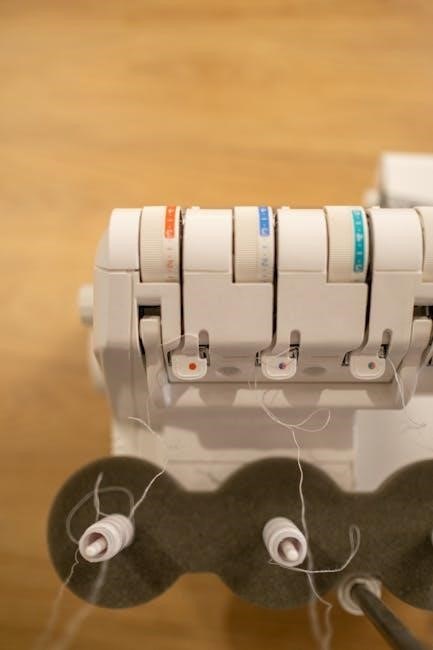
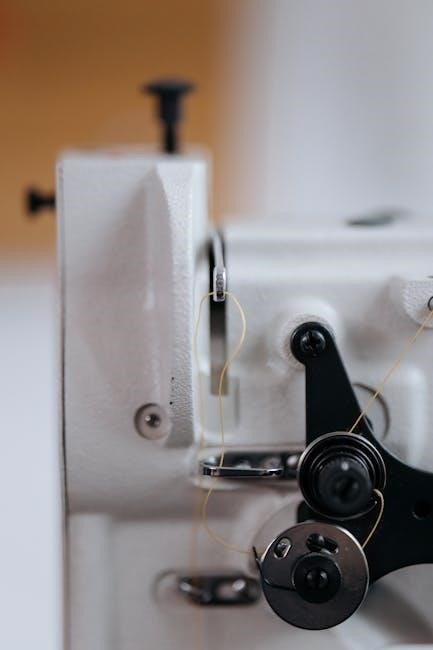
Looper Threading and Tension Adjustment

Correct looper threading is fundamental to the JUKI MO-6716S’s performance. Follow the threading diagram in the engineer’s manual meticulously‚ ensuring the thread engages all guides and tension discs properly. Improper threading leads to inconsistent loop formation and thread breakage.

Tension adjustment is critical for balanced stitches. Begin with the manufacturer’s recommended settings and adjust incrementally. Too much tension causes puckering; too little results in loose loops. Observe the stitch formation closely while making adjustments. The upper and lower looper tensions must be balanced for optimal results. Regularly clean the tension discs to remove lint and debris‚ maintaining consistent thread control. Refer to the manual for detailed tension guidelines.

Differential Feed Adjustment

The JUKI MO-6716S features a differential feed mechanism crucial for handling various fabrics. This adjustment controls the feed dog’s relative speed‚ preventing stretching or puckering. A ratio of 1:2 (maximum 1:4) gathers fabric‚ while 1:0.7 (maximum 1:0.6) stretches it.

To adjust‚ observe the fabric as it feeds through the machine. If the fabric stretches‚ increase the differential feed ratio. Conversely‚ if it puckers‚ decrease the ratio. Small adjustments are key. Proper differential feed ensures even seam construction‚ especially with knit or delicate fabrics. Consult the engineer’s manual for specific recommendations based on fabric type and desired effect. Regular cleaning of the feed dogs is also essential.

Stitch Length Adjustment

The JUKI MO-6716S allows for precise stitch length control‚ ranging from 0.8 to 4mm. This adjustment directly impacts seam strength and appearance. Shorter stitch lengths are ideal for delicate fabrics and increased seam density‚ while longer stitches suit heavier materials and quicker sewing.

Adjustment is typically made via a dial or lever on the machine. Always test the stitch length on a scrap of the fabric you intend to use. Observe for proper stitch formation and avoid excessively short stitches that could cause thread breakage. Refer to the engineer’s manual for detailed instructions and recommended settings for different fabric weights and applications. Consistent stitch length contributes to professional-looking results.

Troubleshooting Common Issues

Addressing skipped stitches‚ thread breakage‚ fabric puckering‚ and uneven stitching requires systematic diagnosis and adjustment‚ often detailed in the engineer’s manual.

Skipped Stitches – Causes and Solutions

Skipped stitches on the JUKI MO-6716S often indicate issues with needle alignment‚ timing‚ or thread tension. First‚ ensure the needle is correctly installed and not bent or damaged; a new needle is often the simplest solution.

Verify proper looper threading and tension – incorrect tension can disrupt the loop formation. Check the timing between the needle and looper‚ referencing the engineer’s manual for precise adjustments.

Insufficient thread penetration can also cause skips; adjust the needle height if necessary. Finally‚ confirm the feed dog mechanism is functioning correctly‚ providing consistent fabric movement. Regularly consulting the manual is crucial for accurate troubleshooting and maintaining optimal performance.

Thread Breakage – Identifying the Problem

Frequent thread breakage on the JUKI MO-6716S typically points to threading errors‚ excessive tension‚ or mechanical issues. Begin by re-threading the machine‚ ensuring correct paths for both needles and loopers‚ as detailed in the engineer’s manual.

Inspect the tension discs for debris or damage‚ and adjust tension settings – too much tension strains the thread. Check for burrs or rough edges on thread guides that could be causing friction.

A poorly timed looper or a dull knife can also contribute to breakage. Regularly lubricating moving parts‚ as outlined in the maintenance schedule‚ minimizes friction and prevents strain. Always use high-quality thread appropriate for the fabric being sewn.

Fabric Puckering – Adjustment Techniques

Fabric puckering during overlocking with the JUKI MO-6716S often indicates an imbalance in the feed mechanism or incorrect tension settings. Start by adjusting the differential feed; reducing the feed ratio can alleviate stretching and puckering‚ especially on delicate fabrics.

Loosen the upper looper tension slightly to allow the fabric to feed more easily. Ensure the presser foot pressure isn’t too high‚ as excessive pressure can distort the fabric.

Verify the knife is properly aligned and not dragging on the fabric. Experiment with stitch length; a shorter stitch length can sometimes reduce puckering. Refer to the engineer’s manual for detailed adjustments and troubleshooting steps.

Uneven Stitching – Diagnosis and Correction

Uneven stitching on the JUKI MO-6716S frequently points to inconsistencies in thread tension or improper needle/looper synchronization. Begin by re-threading the machine‚ ensuring each thread is correctly seated in its tension discs and guides.

Carefully examine the needle and looper for damage or wear‚ replacing them if necessary. Adjust the upper and lower looper tensions incrementally‚ testing after each adjustment.

Confirm the feed dog mechanism is functioning smoothly and consistently. Consult the engineer’s manual for precise timing adjustments. A slight misalignment can cause significant stitching irregularities; meticulous attention to detail is crucial.

Advanced Adjustments & Maintenance

For optimal performance‚ advanced adjustments include presser foot pressure‚ knife alignment‚ and regular lubrication as detailed in the JUKI MO-6716S engineer’s manual.

Presser Foot Pressure Adjustment

Adjusting presser foot pressure is crucial for achieving consistent stitch quality and preventing fabric slippage on the JUKI MO-6716S. Incorrect pressure can lead to skipped stitches‚ puckering‚ or uneven feeding. The adjustment mechanism typically involves a screw or dial located near the presser foot.

Increasing pressure is beneficial for slippery or lightweight fabrics‚ ensuring adequate grip during sewing. Conversely‚ decreasing pressure is recommended for heavier or textured materials to avoid marking or distortion. Begin with the factory setting and incrementally adjust‚ testing on a scrap piece of the intended fabric after each modification. Observe the stitch formation and fabric behavior closely to determine the optimal pressure setting for your specific material and project. Proper adjustment significantly enhances overall sewing performance.

Knife Alignment and Sharpening

Maintaining properly aligned and sharp knives is essential for a clean‚ professional edge finish on the JUKI MO-6716S overlock machine. Misaligned knives result in uneven trimming‚ while dull blades cause fabric fraying and require increased operator force. Regularly inspect the upper and lower knives for damage or dullness.

Alignment is typically adjusted using screws on the knife holders‚ ensuring a precise shearing action. Sharpening should be performed by a qualified technician using specialized tools to maintain the correct blade angle. Attempting to sharpen the knives yourself without proper expertise can cause irreversible damage. A well-maintained knife system contributes significantly to the machine’s efficiency and the quality of the finished seams‚ preventing fabric distortion and ensuring a neat appearance.

Lubrication Points and Procedures

Consistent lubrication is critical for the smooth operation and longevity of the JUKI MO-6716S overlock machine. Key lubrication points include the needle bar‚ looper shafts‚ feed dog mechanism‚ and all gear interfaces. Use only JUKI-approved oil specifically designed for high-speed sewing machines; other lubricants may cause build-up or corrosion.

Apply oil sparingly to these areas‚ following the lubrication diagram in the engineer’s manual. Avoid over-lubrication‚ as excess oil attracts lint and debris. Regularly wipe away any excess oil. A preventative lubrication schedule‚ performed daily or after each shift‚ minimizes friction‚ reduces wear‚ and ensures optimal performance. Proper lubrication prevents premature component failure and maintains consistent stitch quality‚ contributing to overall machine reliability.

Safety Precautions & Best Practices

Always disconnect power before adjustments. Utilize the engineer’s manual for guidance‚ and wear appropriate safety glasses during maintenance procedures.

General Safety Guidelines

Prioritize personal safety when working with the JUKI MO-6716S. Always disconnect the machine from the power source before performing any adjustments‚ threading‚ or maintenance.

Never attempt repairs or modifications beyond your skill level; consult a qualified technician. Keep hands and loose clothing away from moving parts during operation.

Wear appropriate eye protection to shield against flying debris. Ensure the work area is well-lit and free of obstructions. Familiarize yourself with the machine’s emergency stop procedures.

Refer to the engineer’s manual for detailed safety instructions specific to the MO-6716S. Proper grounding is essential for electrical safety.

Preventative Maintenance Schedule

To ensure optimal performance of your JUKI MO-6716S‚ implement a regular maintenance schedule. Daily‚ remove lint and debris from all areas‚ especially around the needle and looper.

Weekly‚ inspect and clean the feed dog mechanism‚ ensuring smooth movement. Monthly‚ lubricate all designated points as outlined in the engineer’s manual – crucial for a super-high-speed machine.

Every six months‚ check for wear on the needle‚ looper‚ and knife‚ replacing as needed. Annually‚ a professional servicing is recommended‚ including a thorough cleaning and inspection of all components.

Consistent maintenance prevents issues and extends the lifespan of your MO-6716S‚ maintaining stitch quality and operational efficiency.

Electrical Safety Considerations

Always disconnect the JUKI MO-6716S from the power source before performing any maintenance or adjustments. Never operate the machine with damaged power cords or plugs; replace them immediately.

Ensure the machine is properly grounded to prevent electrical shock. Avoid operating the machine in damp or wet environments. Regularly inspect the electrical components for signs of wear or damage.

If you are unfamiliar with electrical work‚ consult a qualified technician for repairs. Do not attempt to modify the machine’s electrical system.

Adhering to these safety precautions will minimize the risk of electrical hazards and ensure safe operation of your MO-6716S.

Resources and Documentation

Access the JUKI MO-6716S Engineer’s Manual and instruction manuals online at All-Guides.com for free PDF viewing and downloads.

Accessing the JUKI MO-6716S Engineer’s Manual

The JUKI MO-6716S Engineer’s Manual (No. E350-01‚ 29355807) is a crucial resource for in-depth adjustments and troubleshooting. This manual provides detailed schematics‚ parts lists‚ and precise instructions beyond the standard user guide.

Currently‚ All-Guides.com hosts a readily accessible version of this manual in PDF format‚ allowing for convenient online viewing or direct download. It’s essential for technicians and serious users needing to perform complex repairs or fine-tune machine settings.

Understanding the manual requires some technical knowledge‚ as it’s geared towards experienced sewing machine professionals. However‚ it’s the definitive source for comprehensive adjustment procedures for the MO-6716S.

Online Support Forums and Communities

Beyond the official JUKI documentation‚ numerous online forums and communities offer valuable support for MO-6716S owners. These platforms provide a space to connect with other users‚ share experiences‚ and seek advice on specific adjustment challenges.

Searching online will reveal dedicated sewing machine forums where JUKI overlock models‚ including the MO-6716S‚ are frequently discussed. Users often post detailed questions about troubleshooting skipped stitches‚ thread breakage‚ or fabric puckering‚ receiving helpful responses from experienced members;

These communities can be an invaluable resource for finding practical solutions and learning tips not always found in the official manuals.

10 week half marathon training plan pdf

Embark on a transformative journey! This comprehensive 10-week plan‚ averaging 22-28 weekly miles‚ prepares you to confidently conquer 13.1 miles‚ building from a 3-mile long run.

Is This Plan Right For You?

This 10-week plan is ideal if you currently run consistently‚ comfortably completing 5-7 miles and a long run of around 8 miles. It’s designed for those aiming to finish a half marathon healthily and happily‚ rather than aggressively pursuing a specific time goal.

However‚ it also suits runners seeking to improve their pace‚ incorporating race-pace work into the schedule. If you’re new to running or haven’t run consistently‚ a longer preparation period is recommended. Assess your base fitness honestly; this plan builds upon existing endurance‚ not creates it from scratch. Consider your weekly running availability – typically 4-5 days are needed.

Assessing Your Current Fitness Level

Before diving in‚ honestly evaluate your running base. Can you comfortably run 3 miles without stopping? What’s your longest recent run? Are you currently running several times a week? This plan assumes a foundation of consistent running.

Consider your recent mileage; averaging 22 miles weekly requires a gradual build-up. If you’re starting from zero‚ extend the plan’s duration. A comfortable 5-7 mile run is a good indicator of readiness. Don’t overestimate your abilities – starting too aggressively increases injury risk. Pick a consistent route to track progress and gauge your fitness accurately.

Goal Setting: Time or Completion?

Define your ‘why’ – is it simply finishing‚ or aiming for a specific time? A completion goal prioritizes enjoyment and health‚ allowing for flexibility. A time goal (like breaking 2:30) demands more rigorous training and discipline.

Be realistic! Assess your current fitness and past performance. If new to half marathons‚ focus on finishing strong. Experienced runners can target a personal best. This plan can be adapted‚ but your primary goal shapes your intensity. Remember‚ a happy‚ healthy finish is always a success!

Understanding the Weekly Structure

Expect a balanced approach! Typically‚ this plan incorporates 4-5 runs weekly‚ including a crucial long run‚ complemented by 3 days of rest or cross-training.

Average Weekly Mileage (22-28 Miles)

Consistent mileage is key to success! This 10-week half marathon training plan strategically builds your endurance‚ averaging between 22 and 28 miles per week. The initial weeks focus on establishing a solid base‚ gradually increasing the total distance.

As you progress‚ the weekly mileage will peak‚ preparing your body for the demands of the 13;1-mile race. Remember‚ this is an average; some weeks may be slightly lower to allow for recovery. The Pacer plan‚ for example‚ is designed for runners already comfortable with 5-7 miles a week.

Listen to your body and adjust accordingly‚ prioritizing consistent effort over hitting exact numbers every single week.

Running Days Per Week (Typically 4-5)

Structure your week for optimal results! Most runners following this 10-week half marathon plan will run 4 to 5 days per week. This frequency allows for sufficient training stimulus while incorporating crucial rest and recovery.

A typical schedule includes easy runs‚ a longer run‚ and potentially a race pace workout. Runners World plans suggest 4 running days‚ balanced with 3 days of rest or cross-training.

The Pacer plan assumes 5 days of running for those already comfortable with a higher volume. Prioritize quality over quantity‚ and remember that rest days are just as important as running days for preventing injury and maximizing performance.

Importance of Rest and Cross-Training (3 Days)

Prioritize recovery for peak performance! Dedicate at least 3 days per week to rest and cross-training. These non-running days are vital for muscle repair‚ injury prevention‚ and preventing burnout.

Rest allows your body to adapt to the training stress‚ while cross-training maintains fitness without the impact of running. Runners World emphasizes 3 days of rest or cross-training alongside 4 running days.

Effective cross-training activities include swimming‚ cycling‚ or strength training. Remember‚ consistent rest and varied activity are key components of a successful and sustainable training plan.

Key Run Types Explained

Unlock your potential with varied runs! This plan incorporates easy runs for aerobic base‚ long runs for endurance‚ and race pace runs to hone speed.

Easy Runs: Building Aerobic Base

Easy runs form the cornerstone of your half marathon preparation. These conversational-paced runs‚ performed at a comfortable effort‚ are crucial for developing your aerobic capacity and endurance. They should feel sustainable‚ allowing you to hold a conversation without significant breathlessness.

Typically‚ easy runs comprise the majority of your weekly mileage‚ building a solid foundation. The plan incorporates 2 easy days per week‚ alongside dedicated long runs and race pace work. Prioritize consistency and focus on maintaining a relaxed form. Don’t push the pace; the goal is to accumulate mileage without excessive strain‚ preparing your body for more intense workouts.

Long Runs: Progressive Distance Increase (3-13.1 Miles)

The long run is paramount for half marathon success‚ progressively increasing from 3 miles to the full 13.1-mile distance over the 10 weeks. These runs build endurance‚ teach your body to utilize fat as fuel‚ and mentally prepare you for race day.

Gradual increases are key to avoid injury; don’t jump mileage too quickly. Rest days following long runs are essential for recovery. Practice your race day nutrition and hydration strategies during these longer efforts. Remember to run at a conversational pace‚ focusing on completing the distance comfortably. This builds confidence and stamina!

Race Pace Runs: Practicing Target Speed

Integrating race pace runs is crucial for dialing in your goal speed. These workouts involve running sustained segments at your anticipated half marathon pace‚ typically incorporated within a longer run – for example‚ 5 miles at goal pace.

This practice helps your body adapt to the demands of that speed and builds confidence. Start with shorter intervals and gradually increase the duration. Don’t attempt race pace runs when fatigued. Runners World suggests including one race pace day per week‚ alongside easy and long runs‚ for optimal preparation.

Week-by-Week Training Breakdown

Progressive overload is key! This plan systematically increases mileage and intensity over ten weeks‚ peaking around week eight before tapering for race day success.

Weeks 1-3: Building Foundation

Establish a solid base during these initial weeks. Focus on consistently completing shorter‚ easy runs to build aerobic capacity and strengthen muscles. Gradually increase weekly mileage‚ prioritizing consistency over speed.

Expect to comfortably run 3-5 miles‚ with your long run progressively increasing from 3 miles to around 5-6 miles by week three. Incorporate rest days and listen to your body‚ avoiding pushing through any pain. This phase is about building endurance and establishing a routine‚ preparing you for the more intense training ahead.

Remember‚ a strong foundation is crucial for preventing injuries and achieving your half marathon goals!

Weeks 4-7: Increasing Mileage and Intensity

Now‚ elevate your training! Weeks 4-7 focus on progressively increasing both your weekly mileage and the intensity of your runs. Continue easy runs‚ but introduce race pace work to familiarize yourself with your target speed. Your long run will steadily climb‚ potentially reaching 8-10 miles by week seven.

Expect a peak weekly mileage of around 25-28 miles. Don’t neglect cross-training; it aids recovery and prevents overuse injuries. Pay close attention to your body‚ adjusting the plan if needed. This phase builds strength and endurance‚ preparing you for the final stretch.

Weeks 8-10: Tapering and Race Preparation

The final countdown begins! Weeks 8-10 are dedicated to tapering – strategically reducing mileage to allow your body to recover and store energy for race day. Maintain intensity early in the taper‚ then gradually decrease volume. Your long run will shorten‚ peaking around 10 miles before significantly reducing.

Focus on nutrition and hydration. Visualize success and finalize race-day logistics. Resist the urge to cram in extra miles; trust your training! This phase is about rest and mental preparation. You’ve built the fitness; now‚ let your body reap the rewards and prepare to crush your goal!

Incorporating Cross-Training

Boost recovery and prevent injury! Integrate 3 days of cross-training‚ like swimming or cycling‚ to supplement running and enhance overall fitness.

Benefits of Cross-Training for Runners

Cross-training is invaluable for runners! It provides a much-needed break from the repetitive impact of running‚ reducing stress on joints and minimizing the risk of overuse injuries. Activities like swimming‚ cycling‚ or elliptical training work different muscle groups‚ building strength and endurance without the same pounding.

This balanced approach improves overall fitness‚ enhances cardiovascular health‚ and can even address muscle imbalances. Incorporating cross-training allows your running muscles to recover while maintaining fitness‚ ultimately leading to improved performance and a more sustainable training regimen. It’s a key component for a healthy and successful half marathon journey.

Recommended Cross-Training Activities

Diversify your training! Swimming is excellent‚ offering a full-body workout with zero impact. Cycling‚ both outdoors and stationary‚ builds leg strength and cardiovascular fitness. The elliptical provides a similar low-impact cardio option‚ engaging multiple muscle groups.

Strength training‚ focusing on core and legs‚ is also beneficial. Yoga and Pilates improve flexibility‚ balance‚ and core stability‚ crucial for injury prevention. Remember to choose activities you enjoy to ensure consistency. Aim for 3 days of cross-training per week‚ complementing your running schedule and promoting well-rounded fitness.

Nutrition and Hydration Strategies

Fuel your body! Prioritize carbohydrates for energy‚ especially before long runs‚ and stay consistently hydrated throughout training to optimize performance and recovery.

Fueling for Long Runs

Strategic nutrition is paramount for successful long runs. Prioritize carbohydrate intake in the days leading up to longer distances to maximize glycogen stores. During runs exceeding 75-90 minutes‚ consume 30-60 grams of carbohydrates per hour‚ utilizing options like gels‚ chews‚ or sports drinks.

Experiment with different fueling strategies during training to determine what your stomach tolerates best. Don’t neglect electrolytes‚ especially in warmer weather‚ to replace those lost through sweat. Post-run‚ focus on replenishing glycogen stores with a combination of carbohydrates and protein within 30-60 minutes for optimal recovery.

Hydration Schedule During Training

Maintaining adequate hydration is crucial throughout your 10-week plan. Drink consistently throughout the day‚ not just during runs. Before a run‚ consume 16-20 ounces of water 2-3 hours beforehand‚ and another 8-12 ounces 30 minutes prior.

During runs lasting over an hour‚ aim to drink 4-8 ounces of water or a sports drink every 20-30 minutes‚ adjusting based on weather and sweat rate. Post-run‚ replenish fluids by drinking 16-24 ounces for every pound lost. Monitor urine color – pale yellow indicates good hydration!

Injury Prevention and Recovery

Prioritize your body! Incorporate stretching and foam rolling regularly to address muscle imbalances and prevent common running injuries during this 10-week program.

Common Running Injuries and How to Avoid Them

Navigating potential setbacks is crucial. During your 10-week half marathon training‚ be mindful of common injuries like runner’s knee‚ shin splints‚ and plantar fasciitis. Prevention is key! Gradually increase mileage – avoid sudden jumps – and always warm up before each run with dynamic stretches.

Listen to your body! Don’t push through pain; rest and recover when needed. Proper footwear is essential‚ and consider a gait analysis to ensure you have the right support. Incorporate strength training to build supporting muscles and improve form. Cool down with static stretches post-run to enhance flexibility and reduce muscle soreness.

Importance of Stretching and Foam Rolling

Recovery is paramount for success! Integrating stretching and foam rolling into your 10-week half marathon plan is non-negotiable. Dynamic stretching before runs prepares muscles for activity‚ increasing blood flow and range of motion. Static stretching post-run improves flexibility and reduces soreness.

Foam rolling targets muscle knots and improves tissue quality‚ aiding recovery and preventing injuries. Focus on major muscle groups like quads‚ hamstrings‚ calves‚ and IT bands. Consistent application of these techniques enhances performance‚ minimizes discomfort‚ and allows your body to adapt to the increasing demands of training.

Utilizing Training Resources

Enhance your training! Explore resources like Runner’s World plans and Pfitzinger’s Faster Road Racing for expert guidance and supplemental workouts.

Runners World Training Plans

Runner’s World offers a variety of half marathon training plans suitable for different experience levels and time goals. These plans typically incorporate a weekly schedule of four running days‚ including two easy runs‚ one dedicated to race pace work‚ and a progressively longer long run.

A key feature is the gradual increase in long run distance‚ peaking around 10 miles before the taper period. Many plans emphasize building an aerobic base and include suggestions for cross-training and rest days. One user successfully utilized a Runner’s World plan to achieve a 2:27 half marathon‚ even completing only 69 of the scheduled runs‚ demonstrating adaptability.

Pfitzinger’s Faster Road Racing Book

Jack Pfitzinger’s “Faster Road Racing” is a highly recommended resource for runners seeking structured training plans. The book contains several half marathon plans‚ often incorporating a significant amount of speed work to improve performance. These plans cater to various fitness levels‚ offering options for runners with different weekly mileage capacities.

A suggestion from online running communities is to consult your local library for access to this valuable book. Pfitzinger’s plans are known for their detailed approach and focus on building both endurance and speed‚ making them a solid choice for dedicated runners aiming to improve their times.

Adapting the Plan to Your Needs

Personalize your training! Adjust mileage based on your progress and listen to your body‚ modifying workouts to accommodate individual limitations and ensure success.

Adjusting Mileage Based on Progress

Flexibility is key! This plan serves as a guide‚ not a rigid rulebook. If you consistently complete workouts feeling strong‚ cautiously increase weekly mileage by no more than 10%. Conversely‚ if you experience fatigue or discomfort‚ don’t hesitate to reduce mileage or incorporate extra rest days.

Pay close attention to your body’s signals. Don’t push through pain; address it promptly. Remember‚ completing the half marathon healthily is the primary goal. Prioritize consistent effort over strictly adhering to the schedule. A slight adjustment now can prevent injury and ensure you reach the finish line feeling strong and accomplished.

Modifying Workouts for Individual Limitations

Adapt to your needs! If you’re new to running or returning after a break‚ consider extending the plan beyond 10 weeks. Substitute walk breaks during runs‚ especially long runs‚ to build endurance gradually. For those with joint issues‚ prioritize low-impact cross-training like swimming or cycling.

Don’t feel pressured to match the prescribed pace; focus on effort level. If speed work feels overwhelming‚ reduce the number of repetitions or shorten the intervals. Listen to your body and modify workouts to suit your current fitness level and any physical limitations. Consistency‚ not perfection‚ is paramount.

Monitoring Your Progress

Track and listen! Regularly record mileage and pace‚ but prioritize how your body feels. Adjust the plan based on your progress and recovery needs.

Tracking Mileage and Pace

Consistent tracking is key to success! Utilize running apps‚ a simple spreadsheet‚ or a training log to meticulously record your weekly mileage. Note the distance and pace of each run – easy runs‚ long runs‚ and race pace workouts.

Analyzing this data reveals trends in your performance. Are you consistently hitting your pace goals? Is your mileage increasing appropriately? This information informs necessary adjustments to the plan. Don’t solely focus on pace; consider perceived exertion.

A slight deviation from planned pace isn’t alarming‚ but significant or persistent issues warrant attention. Tracking provides objective data‚ complementing your subjective feelings about your training.

Listening to Your Body

Your body is the ultimate guide! While the plan provides structure‚ prioritize internal cues. Don’t rigidly adhere to workouts if experiencing pain or excessive fatigue. Rest days are crucial; don’t view them as setbacks‚ but as opportunities for recovery and adaptation.

Distinguish between discomfort and injury. Muscle soreness is normal‚ but sharp‚ localized pain requires immediate attention. Adjust mileage or intensity if needed‚ and don’t hesitate to consult a medical professional.

Respect your limits and remember that consistency‚ not perfection‚ is paramount. A missed workout is better than a forced one that leads to injury.

larson quick fit handle set installation instructions

Larson Quick Fit Handle Set Installation Instructions: A Comprehensive Guide

This guide details the process of installing a Larson QuickFit handle set, covering removal of old hardware, preparation, and securing components for a smooth, functional door operation․

Understanding the Quick Fit Handle Set

The Larson Quick Fit Handle Set represents a significant advancement in storm door hardware, designed for simplified installation and enhanced user experience․ Unlike traditional handle sets requiring extensive adjustments and specialized tools, the Quick Fit system prioritizes ease of use without compromising security or durability․ This innovative design incorporates a streamlined mounting process, reducing installation time and minimizing potential complications․

Key to the Quick Fit’s functionality is its pre-aligned components and intuitive locking mechanism․ The set typically includes an exterior handle, an interior handle, a spindle, and mounting hardware, all engineered to work seamlessly together․ The system aims to address common frustrations associated with storm door handle replacements, such as misaligned parts and stripped screws, offering a more reliable and user-friendly solution for homeowners and installers alike․ It’s a quality door with a redesigned handle․

Benefits of the Quick Fit Design

The Larson Quick Fit Handle Set offers numerous advantages over conventional storm door handles․ Primarily, installation is significantly faster and easier, often requiring minimal tools and expertise․ This streamlined process saves valuable time and reduces the potential for errors during setup․ The pre-aligned components minimize frustrating adjustments, ensuring a secure and properly functioning handle․

Furthermore, the Quick Fit design enhances durability and reliability․ By simplifying the installation, it reduces the risk of over-tightening screws or damaging the door frame․ The robust construction of the handle set itself contributes to long-lasting performance․ It addresses the weakness found in older designs, like a fillet on the outer handle․ Ultimately, the Quick Fit provides a hassle-free experience, delivering a secure and aesthetically pleasing solution for storm door hardware․

Tools Required for Installation

Successfully installing a Larson Quick Fit Handle Set requires only a few essential tools, making it a DIY-friendly project․ A standard Phillips head screwdriver is the primary tool needed for loosening and tightening screws during the removal of the old handle and the installation of the new one․ While not always necessary, a flathead screwdriver can be helpful for certain adjustments or prying․

Safety glasses are strongly recommended to protect your eyes from debris․ Depending on the condition of the existing hardware, a small amount of penetrating oil might be useful for loosening stubborn screws․ For troubleshooting stripped screws, a screw extractor set could prove invaluable․ Finally, having a clean cloth on hand is beneficial for wiping down the handle area and ensuring a clean installation․ These minimal requirements contribute to the Quick Fit design’s accessibility․

Package Contents Verification

Before beginning the installation, carefully verify the contents of your Larson Quick Fit Handle Set package․ A complete set typically includes the exterior handle, the interior handle, the connecting spindle, and the necessary mounting screws․ Ensure all components are present and undamaged․ Check for the exterior handle plate and the interior handle plate; these are crucial for a secure fit․

Compare the received parts against the parts list included in the packaging․ Missing components will halt the installation process․ Inspect each item for any manufacturing defects or shipping damage․ If anything is missing or damaged, immediately contact Larson Manufacturing’s customer support (details in the ‘Additional Resources’ section) before proceeding․ Proper verification prevents frustration and ensures a successful installation․

Step-by-Step Installation Process

This section provides a detailed, sequential guide for installing your Larson QuickFit handle set, from removing the old hardware to securing the new components effectively․

Removing the Old Handle Set

Begin by carefully removing the existing handle set to prepare the door for the QuickFit replacement․ First, loosen the screws securing the interior and exterior face plates; these are typically Phillips head screws․ Once loosened, gently remove both the interior and exterior handle assemblies․ Pay close attention to how the spindle connects – noting its orientation will aid in reassembly․

Disconnecting the spindle is crucial․ It may slide straight out, or require a slight lift while pulling․ Be mindful of any small connecting pieces or retaining clips that might be present․ Inspect the surrounding area for any damaged screws or worn components․ Removing the old set cleanly ensures a smooth installation of the new QuickFit handle, preventing alignment issues later on․ Retain the old screws if they are in good condition for potential reuse․

Loosening and Removing Screws

The initial step involves carefully loosening the screws that secure the existing handle set’s face plates․ Typically, these are Phillips head screws located on both the interior and exterior sides of the door․ Use a screwdriver that properly fits the screw head to avoid stripping․ Apply gentle, consistent pressure while turning; avoid forcing the screws, as this can damage the screw head or the surrounding door material․

Once loosened, fully remove the screws and retain them for potential reuse if they are in good condition․ Note their length and type, as the new QuickFit set may require similar dimensions․ After removing the screws, gently pull the face plates away from the door․ If they are stuck, a slight wiggle may help dislodge them․ Be cautious not to scratch or damage the door’s surface during removal․

Disconnecting the Spindle

With the face plates removed, the spindle – the square or rectangular rod connecting the interior and exterior handles – will be exposed․ Gently push the spindle towards either the interior or exterior side of the door to allow for removal․ In some cases, the spindle may be held in place by small set screws within the handle mechanisms; if present, loosen these screws before attempting to remove the spindle․

Once loosened or if no set screws are present, carefully slide the spindle out of the handles․ Avoid bending or damaging the spindle, as this could affect the functionality of the new handle set․ Inspect the spindle for any signs of wear or damage; if it’s significantly worn, it’s best to discard it and rely on the new spindle included with the QuickFit set․ Retain the old spindle for comparison if needed․

Preparing the Door for the Quick Fit Handle

After removing the old handle set, proper door preparation is crucial for a successful QuickFit installation․ Begin by thoroughly cleaning the handle area with a mild cleaning solution and a soft cloth․ Remove any dirt, grime, or old adhesive residue that might interfere with the new handle’s adhesion and alignment․ Ensure the surface is completely dry before proceeding․

Next, carefully check for proper alignment of the latch and strike plate․ The latch should smoothly extend and retract into the strike plate without binding․ If misalignment exists, loosen the strike plate screws and adjust its position until proper alignment is achieved․ Tighten the screws securely once aligned․ A properly prepared door ensures smooth operation and prevents future issues․

Cleaning the Handle Area

Before installing the QuickFit handle, a clean surface is paramount for optimal adhesion and a professional finish․ Begin by removing any existing debris – dust, dirt, old sealant, or paint flakes – from the door around the handle and latch locations․ Utilize a soft cloth dampened with a mild household cleaner, avoiding abrasive cleaners that could damage the door’s surface․

Pay close attention to crevices and corners where grime tends to accumulate․ A small brush, like an old toothbrush, can be helpful for reaching these areas․ Once cleaned, wipe the area with a clean, damp cloth to remove any cleaner residue․ Ensure the surface is completely dry before proceeding with the installation․ A clean, dry surface guarantees a secure and lasting installation of your new Larson handle․

Checking for Proper Alignment

Accurate alignment is crucial for smooth handle operation and secure latching․ After cleaning, carefully inspect the existing spindle hole and latch mortise on the door․ Ensure the hole is clear of obstructions and properly sized for the new QuickFit handle’s spindle․ Misalignment can cause binding, difficulty turning the handle, or even prevent the latch from engaging correctly․

Test the alignment by temporarily inserting the new spindle (without the handles attached) into the hole․ It should slide in smoothly without excessive force․ Also, verify that the latch bolt extends and retracts freely within the strike plate opening on the door frame․ If any resistance is felt, address the issue before proceeding – slight adjustments to the strike plate may be necessary to ensure a perfect fit and effortless operation․

Installing the Exterior Handle

Begin with the exterior handle installation, ensuring a secure and weatherproof fit․ First, carefully insert the spindle through the exterior handle, aligning it with the prepared spindle hole in the door․ Ensure the spindle is fully seated within the handle mechanism․ Next, position the exterior handle plate against the door surface, aligning the screw holes․

Secure the exterior handle plate using the provided screws․ Tighten the screws gradually and evenly, avoiding over-tightening, which could strip the screw holes or damage the handle․ Once the plate is firmly attached, test the handle’s rotation to confirm smooth movement․ Verify that the spindle engages correctly with the latch mechanism, allowing for proper door operation․ A snug, but not overly tight, fit is ideal․

Inserting the Spindle

The spindle insertion is a crucial step in the exterior handle installation process․ Carefully take the spindle – the metal shaft connecting the handles – and align one end with the receiving hole within the exterior handle․ Gently push the spindle through, ensuring it passes completely through the handle’s internal mechanism․

Next, guide the opposite end of the spindle towards the corresponding hole in the door itself․ It should slide in smoothly; if resistance is met, double-check the alignment of both the handle and the door’s opening․ Ensure the spindle extends far enough to eventually connect with the interior handle․ Proper spindle insertion is vital for the handle to function correctly, enabling the door to latch and unlatch effectively․

Securing the Exterior Handle Plate

With the spindle correctly inserted, attention turns to securing the exterior handle plate․ Align the exterior handle plate with the pre-drilled holes on the door’s surface, ensuring a flush and even fit․ Take the provided screws – typically of a specific length and head type for this handle set – and carefully insert them through the plate’s holes․

Begin tightening the screws gradually and in a criss-cross pattern․ This prevents uneven pressure and potential warping of the handle plate․ Avoid over-tightening, as this could strip the screw holes or damage the handle itself․ Tighten until the plate is firmly secured against the door, with no noticeable movement or gaps․ A properly secured exterior handle plate provides stability and a professional finish․

Installing the Interior Handle

Now, focus on installing the interior handle, completing the handle set assembly․ Begin by carefully positioning the interior handle plate against the door, aligning it with the protruding spindle from the exterior handle․ Ensure the handle orientation is correct – typically, the handle should allow for smooth operation when pushed down or turned․

Once aligned, attach the interior handle plate using the screws provided․ Similar to the exterior plate, tighten these screws gradually in a criss-cross pattern to ensure even pressure and prevent damage․ Avoid over-tightening․ The goal is a secure fit without stripping the screw holes․ This step completes the mechanical linkage of the handle set, preparing for final adjustments․

Attaching the Interior Handle Plate

Begin by carefully aligning the interior handle plate with the pre-drilled holes on the door’s interior side․ Ensure the plate sits flush against the door surface, covering the spindle opening․ The plate’s orientation is crucial; confirm it matches the exterior handle plate for consistent operation․

Using the provided screws, gently start fastening the plate․ It’s recommended to initially insert all screws loosely before tightening any of them fully․ This allows for minor adjustments to ensure perfect alignment․ Tighten the screws in a diagonal pattern – top left, bottom right, top right, bottom left – to distribute pressure evenly and prevent warping or damage to the door or plate․ Avoid excessive force to prevent stripping the screw holes․

Connecting the Spindle to the Interior Handle

With the interior handle plate securely attached, carefully insert the spindle through the corresponding opening in the handle․ Ensure the spindle’s flat sides align with the flat sections within both the exterior and interior handle mechanisms․ A smooth, unobstructed insertion indicates proper alignment; forcing it could damage the components․

Once the spindle is fully inserted, verify it engages correctly with the exterior handle’s mechanism․ Rotate the handles to test the connection – they should move in unison, operating the latch smoothly․ If resistance is felt, double-check the alignment of the spindle and handle components․ A properly connected spindle is vital for the handle set’s functionality, ensuring effortless door operation and secure locking․

Adjustments and Troubleshooting

This section addresses common issues, including handle tightness, alignment problems, stripped screws, and latch malfunctions, providing solutions for a perfectly functioning Larson door handle․

Adjusting Handle Tightness

Achieving the correct handle tightness is crucial for smooth operation and preventing future issues․ If the handle feels loose after installation, gently tighten the mounting screws on both the interior and exterior handle plates․ Avoid over-tightening, as this can strip the screw holes or damage the handle components․ Tighten incrementally, checking the handle’s feel after each adjustment․

If the handle is difficult to turn, it may be too tight․ Slightly loosen the mounting screws until the handle operates smoothly․ A small amount of lubricant, such as silicone spray, can also be applied to the spindle where it enters the handle plates to reduce friction․ Regularly check the tightness of the screws, especially after initial use, as they may loosen slightly over time․ Consistent monitoring and minor adjustments will ensure long-lasting, effortless handle operation․

Addressing Alignment Issues

Proper alignment between the exterior and interior handles is essential for a functional lock․ If the handles don’t align correctly, the spindle may bind, making it difficult to operate the latch․ Begin by loosening the mounting screws on both handle plates, allowing for slight adjustments․ Gently manipulate the handles until they align smoothly, ensuring the spindle inserts freely without resistance․

Check the strike plate alignment on the door frame․ If misaligned, the latch bolt may not extend properly, causing binding․ Loosen the strike plate screws and adjust its position until the latch bolt engages smoothly․ Retighten all screws securely after alignment is achieved․ If significant misalignment persists, inspect the door and frame for warping or damage, which may require professional repair․

Dealing with Stripped Screws

Encountering stripped screws during handle installation is frustrating, but solvable․ First, attempt using a rubber band or steel wool placed between the screwdriver and screw head to gain better grip․ Apply firm, steady pressure while turning slowly․ If this fails, a screw extractor kit is highly recommended; these tools are designed to grip and remove damaged screws․

For severely stripped screws, consider using a manual impact driver․ This tool delivers a rotational force with each hammer strike, often loosening stubborn screws․ As a last resort, carefully drill out the screw head using a drill bit slightly smaller than the screw’s shaft․ Once the head is removed, the remaining shaft can often be extracted with pliers․ Always use caution to avoid damaging the door or handle components․

Troubleshooting Latch Problems

If the latch isn’t engaging smoothly, several issues could be present․ First, ensure proper alignment between the latch bolt and strike plate on the door frame․ Loosen the strike plate screws and adjust its position until the latch engages securely with a clean, positive click․ Check for obstructions within the strike plate opening – debris or paint buildup can hinder smooth operation․

If the handle feels loose or the latch doesn’t retract fully, examine the spindle connecting the interior and exterior handles․ Confirm it’s fully inserted and properly aligned․ A worn or damaged latch mechanism may require replacement; contact Larson’s customer support for assistance identifying the correct replacement part․ Finally, verify the door isn’t binding against the frame, as this can put undue stress on the latch․

Safety Precautions

Always prioritize safety during installation; wear safety glasses to protect your eyes and avoid over-tightening screws, which could damage the door or handle set․

Wearing Safety Glasses

Protecting your eyes is paramount during the Larson QuickFit handle set installation․ Removing old hardware, particularly screws, can generate small metal fragments or debris that pose a risk of eye injury․ These particles, though often microscopic, can cause irritation, scratches, or more serious damage if they enter your eyes․

Therefore, always wear appropriate safety glasses throughout the entire installation process․ Ensure the glasses fit snugly and provide adequate coverage around your eyes․ Standard eyeglasses or reading glasses do not offer sufficient protection; dedicated safety glasses with side shields are recommended․

Even if you feel confident in your skills, unexpected situations can arise․ A screw head might shatter, or a piece of the old handle could break off unexpectedly․ Prioritizing eye protection is a simple yet crucial step to ensure a safe and successful installation experience, preventing potential discomfort and medical issues․

Avoiding Over-Tightening Screws

A common mistake during installation of the Larson QuickFit handle set is over-tightening the screws․ While ensuring a secure fit is important, excessive force can easily damage the door, the handle components, or strip the screw holes, leading to significant problems․ Stripped screw holes render the handle unstable and require complex repairs․

Use a manual screwdriver instead of a power drill whenever possible, granting greater control over the applied torque․ When using a drill, set it to a low clutch setting․ Tighten screws until they are snug and offer resistance, but avoid applying further pressure․

Feel for resistance – that’s your cue to stop․ Regularly check the tightness of screws during and after installation․ If a screw feels loose, tighten it slightly, but again, avoid overdoing it․ Gentle and deliberate tightening preserves the integrity of the door and handle set, ensuring long-lasting functionality․

Additional Resources

For further assistance, explore Larson Manufacturing’s website for detailed guides, FAQs, and contact information for customer support, including helpful 3D installation videos․

Larson Manufacturing Website

Larson Manufacturing’s official website serves as a central hub for all things related to their door and window products, including comprehensive resources for the QuickFit Handle Set․ You’ll find detailed product specifications, downloadable installation manuals in PDF format, and frequently asked questions addressing common issues encountered during the installation process․

The website also features a robust support section where you can submit inquiries directly to their customer service team․ Beyond installation guidance, the Larson website provides information on warranty claims, replacement parts, and other helpful resources to ensure your door continues to function optimally․ Regularly updated with new content, it’s the first place to look for the latest information and troubleshooting tips related to your Larson door and its components․ Explore their online catalog to discover compatible accessories and upgrades․

Customer Support Contact Information

For personalized assistance with your Larson QuickFit Handle Set installation, reaching out to their customer support team is a valuable option․ While specific contact details may evolve, generally, you can find support options through the Larson Manufacturing website․ Look for a “Contact Us” or “Support” section, typically offering phone support, email submission forms, and potentially live chat features․

Be prepared to provide your product model number and a detailed description of the issue you’re encountering․ Having photos or videos of the installation process or the problem area can also expedite the support process․ Larson’s representatives are equipped to guide you through troubleshooting steps, clarify installation instructions, and assist with any warranty-related inquiries․ Prompt and helpful support ensures a smooth experience․

3D Animation Installation Videos

Larson Manufacturing recognizes the value of visual learning, and offers 3D animation installation videos to complement their QuickFit Handle Set instructions․ These videos, often available on platforms like YouTube and the Larson website, provide a dynamic and clear demonstration of each installation step․ A video created in Maxon Cinema 4D and Adobe After Effects specifically showcases the QuickFit handle installation process․

These animations are particularly helpful for visualizing the internal mechanisms and proper alignment of components․ They allow you to pause, rewind, and replay sections as needed, ensuring a thorough understanding before proceeding․ Searching online for “Larson QuickFit Handle Installation Video” will quickly surface these resources, offering a valuable supplement to the written guide and enhancing your installation success․

soap bible study pdf free

What is SOAP? A Comprehensive Guide

SOAP, initially designed for exchanging structured information in web services, contrasts with REST’s architectural style; WSDL defines SOAP services.

Understanding the Basics of SOAP Protocol

SOAP (Simple Object Access Protocol) operates as a messaging protocol utilizing XML for exchanging structured information within web services. Unlike REST, which is an architectural style, SOAP is a protocol with strict rules. It relies heavily on WSDL (Web Services Description Language) for defining and describing the capabilities of a web service, enabling discovery and interoperability.

SOAP messages are enveloped, meaning they contain a header and a body. The header holds metadata, while the body carries the actual payload. This structure, while robust, contributes to SOAP’s overhead compared to REST. Authentication, often basic, is implemented within these messages. The protocol’s specificity aims to reduce ambiguity, though it can impact performance due to the enveloping process.

Considering alternatives is crucial; SOAP’s complexity may not always be necessary, especially in modern web development where REST often provides a lighter-weight solution.

SOAP vs. REST: Key Architectural Differences

SOAP and REST represent fundamentally different approaches to web service design. SOAP is a protocol, dictating message structure and communication rules, utilizing XML and often relying on WSDL for service description. REST, conversely, is an architectural style, offering more flexibility and leveraging existing web standards like HTTP.

Performance-wise, REST generally outperforms SOAP due to its lighter weight and lack of enveloping. SOAP’s XML-based messaging adds overhead. However, SOAP’s strict standards can enhance security and reliability in enterprise environments. Authentication in SOAP is often implemented within the message itself, while REST utilizes HTTP authentication mechanisms.

The choice between them depends on project requirements; SOAP suits complex integrations, while REST excels in simplicity and scalability.

SOAP Message Structure

SOAP messages consist of an Envelope, a Header for metadata, and a Body containing the actual payload – the data being exchanged.

The SOAP Envelope: Defining the Message

The SOAP Envelope is the root element of every SOAP message, providing a structure that defines the message’s content. Think of it as the container for all other SOAP elements. It’s crucial for ensuring proper parsing and processing by both the sender and receiver.

The Envelope has a mandatory <soap:Envelope> tag, and it typically includes attributes defining the namespace and encoding style. Within the Envelope reside two child elements: the Header (optional) and the Body (required).

The Envelope’s primary role is to encapsulate the entire message, signaling to the receiving application that the content is a SOAP message and should be processed accordingly. Without a correctly formed Envelope, the message will likely be rejected or misinterpreted, leading to communication failures. It establishes the foundation for reliable web service interactions.

SOAP Header: Adding Metadata

The SOAP Header is an optional element within the SOAP Envelope, designed to contain metadata about the message itself. Unlike the Body, which carries the actual payload, the Header provides contextual information for processing the message. This metadata can include things like security credentials, transaction identifiers, or routing instructions.

Header blocks are defined using elements within a namespace, allowing for extensibility and customization. Multiple Header blocks can be included in a single message, each serving a specific purpose. However, it’s important to note that the Header is not intended for application-specific data; that belongs in the Body.

Properly utilizing the Header can enhance security, improve message routing, and provide valuable auditing information. It’s a powerful tool for managing and controlling SOAP message flow.

SOAP Body: Containing the Payload

The SOAP Body element is the core component of a SOAP message, responsible for carrying the actual data being exchanged between the client and server. This is where the request or response information resides, formatted according to the specific web service’s definition. Unlike the Header, which holds metadata, the Body focuses solely on the application-specific content.

The Body can contain any valid XML data, allowing for complex data structures and nested elements. It’s crucial that the Body conforms to the schema defined by the web service’s WSDL (Web Services Description Language) to ensure proper processing.

Effectively structuring the Body is vital for successful SOAP communication, ensuring the server can correctly interpret and process the transmitted data.

WSDL and SOAP

WSDL (Web Services Description Language) defines SOAP service interfaces, detailing operations, message formats, and endpoints for seamless communication and integration.

What is WSDL? Web Services Description Language

WSDL, or Web Services Description Language, is an XML-based interface definition language used to describe the capabilities of web services. It allows software applications to discover and interact with web services in a standardized manner. Essentially, a WSDL document acts as a contract between the service provider and the service consumer, outlining the operations available, the data types used, and the communication protocols supported.

This description includes details about the service’s endpoints (where to access the service), the messages it accepts and returns, and the binding information (how to communicate with the service, typically using SOAP). WSDL facilitates interoperability by providing a machine-readable description of the service, enabling different platforms and technologies to communicate effectively. It’s crucial for automated service discovery and integration in complex systems.

Using WSDL for SOAP Service Discovery

WSDL plays a vital role in discovering SOAP web services. Once a WSDL document is available – often through a URL – developers can utilize it to understand a service’s functionalities without needing prior knowledge. Tools like SoapUI can import WSDL files, automatically generating client stubs and providing a user interface to explore available operations.

This automated process simplifies integration, as developers don’t need to manually parse service interfaces. The WSDL details the message formats, data types, and endpoints, enabling the creation of compatible client applications. Service discovery using WSDL promotes loose coupling and allows for dynamic service composition, enhancing flexibility and scalability in distributed systems. Effectively, it’s a blueprint for interaction.

SOAP Security Considerations

SOAP employs authentication methods like Basic Authentication, ensuring secure communication; WSDL defines service contracts, and SOAP encapsulates messages for transmission.

SOAP Authentication Methods

SOAP (Simple Object Access Protocol) utilizes various authentication mechanisms to secure web service interactions. Basic Authentication, a common method, transmits usernames and passwords, often encoded, within SOAP messages. While straightforward, it’s vulnerable without HTTPS. More robust options include WS-Security, offering advanced features like digital signatures and encryption for message integrity and confidentiality.

WS-Security leverages XML signatures to verify message origin and integrity, preventing tampering. Encryption protects sensitive data during transit. Other methods involve token-based authentication, where a token, issued after successful login, is included in subsequent requests. Choosing the appropriate method depends on the sensitivity of the data and the security requirements of the application. Proper implementation, alongside secure transport (HTTPS), is crucial for effective SOAP security.

Implementing Basic Authentication in SOAP

Basic Authentication in SOAP involves encoding a username and password using Base64 encoding and including it within the SOAP request header. The client constructs an “Authorization” header with the “Basic” scheme followed by the encoded credentials. The server then decodes the credentials and verifies them against its user database.

However, transmitting credentials in Base64 is not secure without HTTPS, as it’s easily decoded. Therefore, always use HTTPS to encrypt the entire communication channel. Many SOAP toolkits and libraries provide built-in support for Basic Authentication, simplifying implementation. Developers must ensure proper handling of credentials to prevent exposure and adhere to security best practices. Consider more secure alternatives like WS-Security for sensitive applications.

SOAP Tools and Testing

SoapUI is a popular, open-source tool for testing SOAP web services, allowing developers to create and execute functional, load, and security tests efficiently.

SoapUI stands as a leading open-source cross-platform tool specifically designed for testing SOAP-based web services. It provides a graphical user interface, simplifying the creation and execution of tests without requiring extensive coding knowledge. Users can import WSDL files to automatically generate test cases based on the service’s operations and data structures.

SoapUI supports various testing levels, including functional, load, and security testing. It allows for the creation of complex test suites, data-driven testing, and mocking of service responses; The tool’s assertion capabilities enable validation of responses against expected values, ensuring service reliability. Furthermore, SoapUI integrates with continuous integration systems, facilitating automated testing within the development pipeline. Its robust features make it invaluable for developers and testers working with SOAP web services.

Using SoapUI to Consume WSDL Services

SoapUI streamlines the process of consuming WSDL services by allowing direct import of the WSDL document. Upon import, SoapUI automatically generates a request panel populated with the service’s operations, parameters, and data types. This eliminates the need for manual request construction, significantly reducing errors and development time.

Users can then populate the request parameters with appropriate values and execute the request. SoapUI displays the resulting response in a structured format, facilitating easy inspection and validation. The tool’s features enable modification of requests, setting of headers, and attachment of files. Furthermore, SoapUI supports creating test suites to automate the consumption of multiple WSDL services and their operations, enhancing efficiency and ensuring consistent testing.

SOAP Performance Characteristics

SOAP’s overhead, due to XML enveloping, can impact performance compared to REST; WSDL and message size contribute to latency in transmission.

SOAP Overhead and Performance Implications

SOAP messages, structured in XML, inherently carry more overhead than their RESTful counterparts. This is primarily due to the verbose nature of XML, including extensive tags for defining the message envelope, headers, and body. The process of enveloping and desenveloping these messages adds computational cost on both the client and server sides, potentially leading to slower response times.

Furthermore, the size of SOAP messages tends to be larger, increasing bandwidth consumption and transmission time. While compression techniques can mitigate this, they introduce additional processing overhead. The use of WSDL, while beneficial for service discovery and contract definition, also adds to the initial overhead during service interaction.

Compared to REST, which often utilizes lightweight data formats like JSON, SOAP’s performance can be less favorable, especially in scenarios demanding high throughput and low latency. However, the structured nature of SOAP can be advantageous in complex enterprise applications requiring robust error handling and security features.

Comparing SOAP Performance to REST

REST generally outperforms SOAP due to its lightweight nature. REST often leverages JSON, a less verbose data format than SOAP’s XML, resulting in smaller message sizes and faster parsing. The absence of a rigid protocol like SOAP allows for greater flexibility and reduced overhead, particularly when utilizing standard HTTP methods (GET, POST, PUT, DELETE).

SOAP’s enveloping and desenveloping processes, coupled with the complexity of WSDL parsing, contribute to increased latency. While SOAP offers robust features like WS-Security, these features also add processing overhead. Asynchronous communication in SOAP, while possible, can be more complex to implement than in REST.

However, the performance gap isn’t always significant. Optimized SOAP implementations and efficient XML processing can narrow the difference. The choice between SOAP and REST often depends on specific application requirements, prioritizing factors beyond raw performance, such as security, reliability, and existing infrastructure.

SOAP in Modern Web Development

SOAP remains vital in enterprise applications demanding stringent security and reliability, though REST gains traction; WSDL aids integration.

The Role of SOAP in Enterprise Applications

SOAP’s robust features continue to make it a cornerstone in many enterprise-level applications, particularly those within the financial and healthcare sectors. Its inherent support for WS-Security standards provides a crucial layer of protection for sensitive data transmitted between systems. The strict contract defined by WSDL ensures reliable communication and reduces integration complexities within large organizations.

While newer architectural styles like REST are gaining popularity, SOAP’s established infrastructure and comprehensive tooling often make it a more practical choice for existing systems. The formal nature of SOAP messages facilitates auditing and compliance requirements, essential in regulated industries. Furthermore, SOAP’s ability to handle complex transactions and stateful interactions remains a significant advantage in specific enterprise scenarios.

However, it’s important to acknowledge that SOAP’s overhead can impact performance, and its complexity can increase development time. Nevertheless, for organizations prioritizing security, reliability, and adherence to established standards, SOAP remains a powerful and relevant technology.

Alternatives to SOAP: When to Consider Other Protocols

When evaluating web service protocols, REST frequently emerges as a compelling alternative to SOAP. REST’s lightweight nature, utilizing standard HTTP methods, often translates to improved performance and scalability, particularly for public-facing APIs. Its flexibility in data formats – supporting JSON, XML, and others – further enhances its adaptability.

GraphQL presents another option, offering clients precise control over the data they request, minimizing over-fetching and improving efficiency. For real-time applications, technologies like WebSockets provide persistent connections, enabling bidirectional communication. gRPC, developed by Google, leverages Protocol Buffers for efficient serialization and is well-suited for microservices architectures.

The choice depends on specific needs. If simplicity, speed, and broad compatibility are paramount, REST is often preferred. For complex, stateful interactions requiring robust security, SOAP may still be the better fit. Carefully assess project requirements before committing to a particular protocol.

Finding SOAP Bible Study PDFs for Free

Free resources exist, but exercise caution; verify source reliability to avoid malware or inaccurate content when downloading SOAP study PDFs.

Reliable Sources for Free SOAP Study Materials

Locating trustworthy, free SOAP (Selective Observation of Patterns) Bible study materials requires discernment. Several ministries and theological websites offer downloadable PDFs, often as part of broader discipleship resources. Consider exploring websites affiliated with established Bible colleges or seminaries, as they frequently provide quality study guides.

Blue Letter Bible and Bible Gateway, while not exclusively SOAP-focused, offer extensive biblical resources that can be adapted for SOAP journaling. Many individual bloggers and Bible teachers share their SOAP studies online; however, carefully evaluate their theological stance and accuracy before relying on their interpretations.

Church websites sometimes publish SOAP study guides used in small groups or personal devotionals. Always prioritize sources with clear doctrinal statements aligned with your beliefs. Remember to cross-reference information and compare different perspectives to gain a well-rounded understanding.

Potential Risks of Downloading PDFs from Unverified Sources

Downloading SOAP Bible study PDFs from unverified sources carries inherent risks. These files may contain malware, viruses, or other malicious software that can compromise your device and personal information. Additionally, the content itself might be theologically unsound, promoting false doctrines or misinterpretations of Scripture.

Unreliable PDFs could also infringe on copyright laws, potentially exposing you to legal issues. Websites offering “free” resources may engage in deceptive practices, such as collecting personal data or redirecting you to harmful websites. Always exercise caution and prioritize reputable sources.

Before downloading, scan the PDF with a reputable antivirus program. Verify the website’s security certificate (HTTPS) and research the author or organization providing the material. If something feels suspicious, err on the side of caution and avoid downloading the file. Protecting your digital security and theological integrity is paramount.

christmas dingbats with answers pdf

Christmas Dingbats offer a festive and engaging mental challenge, blending visual puzzles with holiday cheer! Downloadable PDF formats provide convenient access to these delightful brain-teasers, complete with answers.

What are Dingbats?

Dingbats are clever visual word puzzles where a familiar phrase or saying is represented through a combination of pictures, symbols, and strategically placed letters. The challenge lies in deciphering these visual clues to reveal the hidden message.

Essentially, they’re a playful form of rebus puzzle, demanding lateral thinking and a keen eye for detail. Christmas Dingbats specifically adopt a festive theme, often utilizing imagery and concepts associated with the holiday season, and frequently come with readily available answers in PDF form.

The Festive Twist: Christmas Dingbats

Christmas Dingbats inject holiday spirit into the classic puzzle format! These puzzles utilize imagery like snowmen, Christmas trees, and festive decorations, cleverly integrated with letters and symbols.

The goal remains the same – to decode the visual representation and uncover a Christmas-related phrase or saying. Many resources offer printable PDF versions, often including an answer key for quick verification, making them perfect for family gatherings or office parties during the holiday season.

Finding Christmas Dingbats in PDF Format

Numerous websites provide readily available Christmas Dingbats in PDF format, offering instant downloads for festive fun, often including complete answer keys!

Popular Websites Offering Printable PDFs

Several online platforms specialize in providing free, printable Christmas Dingbats PDFs. Websites dedicated to puzzles and games frequently host collections, ensuring easy access to festive challenges.

You can discover numerous options through a simple web search, often finding variations in difficulty and theme. Many sites offer answer keys separately or on a subsequent page within the PDF document, enhancing the user experience.

Look for resources that clearly state the inclusion of solutions to avoid frustration and maximize enjoyment during your holiday puzzle-solving sessions!

Key Features of Christmas Dingbat PDFs

Christmas Dingbat PDFs typically feature a landscape orientation for optimal puzzle presentation. They commonly include 20 or more puzzles per sheet, each representing a festive phrase or saying.

A crucial feature is the provision of an answer key, either integrated or as a separate page, allowing solvers to check their progress. The PDF format ensures easy printing and sharing with family and friends during the holidays.

Expect visually appealing designs incorporating classic Christmas imagery!

Understanding the Dingbat Puzzle

Christmas Dingbats utilize visual clues – letters, symbols, and abbreviations – to represent phrases. Deciphering these requires logical thinking and recognizing common Christmas terms.

How Dingbats Work: Deciphering the Visual Clues

Christmas Dingbats present a unique puzzle experience where well-known sayings or festive phrases are cleverly concealed within visual arrangements. Players must carefully analyze the positioning and combination of letters, symbols, and abbreviations.

The key lies in recognizing how these elements interact to suggest a familiar phrase. For example, a picture of a bell combined with letters might hint at “Jingle Bells.” Successfully solving these puzzles demands a blend of logical reasoning, visual perception, and a touch of Christmas spirit. Printable PDF versions often include answers for verification.

Common Symbols and Abbreviations Used

Christmas Dingbats frequently employ shorthand to create concise visual clues. Common abbreviations include “on” represented by a circle, “in” by a square, and “to” by an arrow; Symbols like stars, bells, and trees directly relate to the Christmas theme.

Understanding these conventions is crucial for deciphering the puzzles. PDF versions often rely on these established symbols, and knowing them speeds up the solving process. Finding the answers becomes easier with familiarity!

Christmas Dingbat Themes & Examples

Christmas Dingbats showcase themes like traditional imagery – snowmen, Santa – and popular carols. PDF puzzles often feature festive phrases, testing your holiday knowledge and wit!

Traditional Christmas Imagery

Christmas Dingbats frequently utilize iconic symbols deeply rooted in holiday tradition. Expect visual representations of Santa Claus, reindeer, twinkling Christmas trees, and beautifully decorated ornaments within the PDF puzzles.

Snowflakes, stockings, and presents are also common elements, cleverly disguised as visual clues. These puzzles challenge solvers to decipher these familiar images into well-known Christmas phrases, often with answers relating to classic tales and customs. The imagery aims to evoke a sense of nostalgia and festive spirit!

Popular Christmas Songs & Carols

Many Christmas Dingbats cleverly incorporate lyrics and titles from beloved carols and songs! PDF puzzle creators often use visual puns representing phrases from classics like “Jingle Bells,” “Silent Night,” or “Deck the Halls.”

Expect to see depictions hinting at “Twelve Days of Christmas” or “Santa Claus is Coming to Town.” Successfully deciphering these requires familiarity with popular Christmas music, with the answers revealing those cherished melodies and lyrical snippets.

Solving Christmas Dingbats: Strategies & Tips

To crack Christmas Dingbats, break down each visual element and consider common phrases! PDF solutions are available, but try deciphering the clues first for maximum enjoyment.

Breaking Down the Puzzle

Christmas Dingbats thrive on visual deception, so methodical dissection is key! Begin by isolating individual symbols and letters within the PDF puzzle. Consider how these elements relate – are they positioned to suggest prepositions or articles?

Look for common abbreviations or symbols frequently used during the festive season. Don’t immediately jump to complex solutions; simpler interpretations often unlock the answers. Remember, the goal is to identify a well-known Christmas saying or phrase hidden within the visual arrangement.

Thinking Outside the Box

Christmas Dingbats often require unconventional thought! Avoid literal interpretations; the PDF puzzles rely on playful symbolism and indirect representation. Consider multiple meanings for symbols and letters – a ‘T’ could represent ‘tea’ or be part of a larger word.

Don’t be afraid to explore less obvious Christmas associations. The answers aren’t always straightforward; a fresh perspective and willingness to challenge assumptions are crucial for success. Embrace creative thinking to decipher these festive riddles!

Christmas Dingbat Answers: Where to Find Them

PDF Christmas Dingbats often include dedicated answer keys! Alternatively, explore online communities and forums for assistance with solving these festive puzzles.

Dedicated Answer Keys

Many Christmas Dingbats PDF resources thoughtfully include a separate answer key, conveniently located within the document itself. This allows solvers to quickly verify their solutions and understand any challenging puzzles they encountered.

These keys typically list each dingbat alongside its corresponding phrase or saying, providing a straightforward method for checking accuracy. Utilizing these dedicated keys enhances the overall puzzle-solving experience, fostering both enjoyment and learning.

Online Communities & Forums

When seeking Christmas Dingbats solutions, numerous online communities and forums dedicated to puzzles offer collaborative assistance. Puzzle enthusiasts frequently share answers and discuss strategies for deciphering tricky dingbats found in PDF formats.

These platforms provide a space to ask questions, exchange hints, and celebrate successful solves, fostering a supportive environment for all skill levels. Engaging with these communities can significantly enhance your puzzle-solving journey.

Creating Your Own Christmas Dingbats

Design personalized Christmas Dingbats using available tools and resources! Craft challenging puzzles, then create a corresponding PDF document including the answers for festive fun.

Tools and Resources for Design

Several digital tools can aid in Christmas Dingbat creation. Graphic design software like Adobe Illustrator or Canva allows for precise symbol arrangement and text formatting.

For simpler designs, Microsoft Word or Google Docs can suffice, utilizing shape and text box features. Online dingbat generators, though less common, may offer pre-made elements.

Remember to save your completed puzzles as a PDF to ensure consistent formatting across different devices, and prepare a separate answer key PDF for solvers!

Tips for Crafting Challenging Puzzles

To create compelling Christmas Dingbats, employ clever visual puns and utilize common holiday abbreviations. Vary symbol sizes and orientations to increase difficulty.

Ambiguity is key – ensure solutions aren’t too obvious, but remain logically deducible. Test your puzzles on others before finalizing them!

When preparing a PDF with answers, clearly separate the puzzles from the solution key to prevent accidental peeking and maintain the challenge.

Christmas Dingbats for Different Age Groups

Christmas Dingbats, available as PDFs with answers, can be tailored! Simpler puzzles suit children, while complex designs challenge adults, ensuring inclusive festive fun.

Dingbats for Children

Christmas Dingbats designed for children should feature simpler visual representations and commonly known holiday terms. PDF printables are ideal for easy access and repeated play! Focus on easily decipherable symbols representing gifts, snowmen, or Santa Claus.

Providing an answer key alongside the puzzles encourages independent problem-solving and builds confidence. Keep the phrases short and sweet – think “Santa Claus” or “Christmas Tree” – to avoid frustration. These festive puzzles offer a fun, educational activity for younger family members during the holidays!

Dingbats for Adults

Christmas Dingbats geared towards adults can incorporate more complex visual puns and less obvious holiday phrases. Printable PDF versions are perfect for parties or quiet evenings! Expect puzzles utilizing abbreviations, layered symbols, and references to classic Christmas songs or traditions.

An included answer key allows for friendly competition and avoids prolonged frustration. These puzzles offer a stimulating mental workout, encouraging creative thinking and collaborative problem-solving amongst friends and family during the festive season.

Christmas Dingbats in Social Settings

Christmas Dingbats, readily available as PDF printables with answers, are fantastic icebreakers for parties! They encourage teamwork and friendly competition during holiday gatherings.

Dingbats as a Party Game

Christmas Dingbats, easily sourced as printable PDFs containing answers, transform holiday parties into lively events! Divide guests into teams and challenge them to decipher the visual puzzles.

Award points for correct solutions, fostering a competitive yet friendly atmosphere. The PDF format ensures easy distribution and a readily available answer key for the host. This activity is perfect for all ages and adds a unique, engaging element to your festive celebrations!

Dingbats for Office Christmas Parties

Boost office morale with Christmas Dingbats! Printable PDFs, often including answers, provide a quick and easy team-building activity. These puzzles encourage collaboration and lighthearted competition amongst colleagues during festive gatherings.

A Dingbats quiz offers a refreshing break from work, promoting camaraderie and holiday spirit. The readily available PDF format simplifies setup, making it ideal for busy office environments and ensuring a fun, inclusive experience for everyone.

The History of Dingbats

Dingbats evolved from rebus puzzles, gaining popularity in the mid-20th century. Christmas-themed versions, often found as PDFs with answers, add a seasonal twist!

Origins and Evolution of the Puzzle Type

Dingbats trace their roots back to the rebus, an ancient form of visual word puzzle. Rebuses utilized pictures to represent syllables or whole words, challenging viewers to decipher the hidden meaning. The modern dingbat, as popularized in the 20th century, streamlined this concept, focusing on visual representations of phrases and sayings.

Christmas Dingbats, frequently distributed as printable PDFs containing both puzzles and answers, represent a seasonal adaptation. This evolution demonstrates the puzzle’s adaptability and enduring appeal, offering festive fun for all ages and skill levels.

Dingbats and Popular Culture

Dingbats have permeated popular culture, appearing in newspapers, magazines, and increasingly, online as shareable content. The rise of printable PDFs, often including Christmas Dingbats with readily available answers, has further fueled their accessibility. They’ve become a staple for holiday gatherings and office parties, fostering friendly competition.

Their simple yet challenging nature makes them universally appealing, transcending age and background. The festive theme of Christmas Dingbats specifically enhances their seasonal relevance, solidifying their place in holiday traditions.

Printing and Preparing Your Dingbat PDFs

For optimal results, print Christmas Dingbat PDFs in landscape mode. Ensure high-quality paper is used for clear visuals and easy readability of the answers!

Printer Settings for Optimal Results

To ensure your Christmas Dingbat PDF prints beautifully, select ‘Landscape’ orientation within your printer settings. This maximizes space for the visual puzzles and answers. Choose a high-quality print setting – typically ‘Best’ or ‘Photo’ – for sharp lines and clear symbols.

Consider enabling ‘Fit to Page’ to prevent any cropping of the dingbats. Preview the print before finalizing to confirm everything appears as intended. Properly configured settings guarantee an enjoyable puzzle-solving experience for everyone!

Paper Quality Considerations

For the best Christmas Dingbat experience, opt for a slightly heavier weight paper – around 20-24lb is ideal. This prevents marker bleed-through if players choose to write directly on the PDF printouts, preserving the clarity of the puzzles and answers.

A matte finish reduces glare, enhancing visibility; Bright white paper provides excellent contrast, making the visual clues stand out. Consider the number of copies needed when selecting a paper pack!

Variations of Christmas Dingbats

Christmas Dingbats come in diverse forms, including picture-based puzzles and combinations of words and images, all available as convenient PDF downloads with answers.

Picture Dingbats

Picture Dingbats present a unique twist on the classic puzzle, relying heavily on visual representation rather than solely textual clues. These Christmas-themed variations utilize images to cleverly depict phrases or sayings, demanding a keen eye for detail and creative thinking.

PDF versions often include a series of these pictorial riddles, accompanied by an answer key for self-checking or group play. The challenge lies in interpreting the arrangement and symbolism within the picture to unlock the hidden Christmas message. They are a fun alternative!

Combined Word & Picture Dingbats

Combined Word & Picture Dingbats represent a sophisticated level of puzzle complexity, seamlessly integrating both textual and visual elements. These Christmas-themed puzzles, frequently found in PDF formats, challenge solvers to decipher clues presented through a blend of letters, symbols, and imagery.

Successfully navigating these puzzles requires a holistic approach, interpreting how the words and pictures interact to reveal the hidden festive phrase. Answer keys are essential for verifying solutions and enhancing the overall puzzling experience.

Resources for More Christmas Dingbats

Numerous websites boast extensive collections of Christmas Dingbats, often available as printable PDFs, alongside readily accessible answers for puzzle enthusiasts!

Websites with Extensive Collections

Several online platforms dedicate themselves to providing a wealth of Christmas Dingbat puzzles in easily downloadable PDF format. These sites frequently categorize puzzles by difficulty, ensuring options for all ages and skill levels.

Many offer accompanying answer keys, simplifying the solving process and enhancing the overall experience. Explore resources like Puzzle Baron, where you can find themed collections, and various quiz websites that regularly update their festive content.

Don’t forget to check dedicated puzzle hubs and educational sites for additional Christmas Dingbat PDFs and solutions!

Books Featuring Dingbat Puzzles

While online resources are plentiful, several books compile extensive collections of Dingbat puzzles, often including dedicated Christmas-themed sections. These publications provide a tangible and screen-free puzzle experience, ideal for cozy winter evenings.

Look for puzzle books specifically marketed as “brain teasers” or “logic puzzles,” as they frequently incorporate Dingbats. Many include complete answer keys at the back, allowing for self-checking and a satisfying resolution to each challenge.

Consider searching for seasonal puzzle books during the holiday season for a curated selection of Christmas Dingbats!

The Benefits of Solving Dingbats

Solving Christmas Dingbats enhances cognitive skills like logical reasoning and problem-solving. They also provide fun and entertainment for individuals and families during the holidays!

Cognitive Skills Enhancement

Christmas Dingbats, particularly those found in readily available PDF formats with answers, are excellent brain exercises. Deciphering these visual puzzles actively stimulates critical thinking and boosts lateral thinking abilities. The process of decoding symbols and abbreviations strengthens pattern recognition skills, improving visual perception.

Furthermore, successfully solving Dingbats enhances concentration and memory recall. The mental agility required to connect visual clues to familiar phrases contributes to overall cognitive function, offering a playful yet effective mental workout during the festive season.

Fun and Entertainment

Christmas Dingbats, easily accessible as PDF downloads with included answers, provide lighthearted entertainment for all ages. They’re a fantastic alternative to traditional holiday activities, offering a unique and engaging challenge. These puzzles inject a dose of playful competition into family gatherings and festive parties.

The satisfaction of cracking each Dingbat brings a joyful sense of accomplishment. Sharing the experience and comparing solutions adds to the fun, creating lasting holiday memories and fostering a spirit of camaraderie.